• When you click on links to various merchants on this site and make a purchase, this can result in this site earning a commission. Affiliate programs and affiliations include, but are not limited to, the eBay Partner Network.

Replacing Bulkhead Connector Block

Ron H

FBBO Gold Member
FBBO Gold Member
Local time
12:13 PM
Joined
Feb 29, 2016
Messages
10,412
Reaction score
13,112
Location
WI
There's a lot of info about bulkheads on our forum I sifted through finding helpful. Thought I'd create a new ask about this as it seems if I could replace the block this might be best as I have a new engine harness in (two years ago). Did try to clean up the female connectors but they're still looking skanky in the block and have ignition problems due to a poor connection. I notice more recent indication of overheating on that link (blue wire). The BH has been heat damaged from other ills anyway.
Reading older posts appears that some did the replacement (I see Evans sells BH for '63 Plymouth). Recall reading posts where this could be done from the engine side? Can the BH be fanagled out to do this on engine bay side? Been up under the dash for endless brake hassles and remove the seat to work up there as at my age now it's a bitch to do...and ahh reaching the BH is a further stretch. Issue looks to be the ignition wire shutting me down anytime it wants to.
Thanks for your help!
 
I might have shorted myself and others with pictures in my thread.

To answer Ron's question, you can press in on the four clips to release the block from the opening in the firewall. Then push it into the cabin, turn it a certain way and it should pull back out through the opening. The thing is how much slack do you have in the wiring in order to work on it. Actually once you push the block through the firewall, into the cabin, you might have more slack inside.

Four retaining clips. Push in/down from the outside. They stay on the block.
Screenshot_20200819-135157.jpg


Don't loose these small clips that grip to hold the plug from coming loose.
Screenshot_20200819-140716.jpg


I'm thinking the '63 is the same as the '62. There are so many items that are advertised for 63' to '65 that are the same for '62. I guess the info isn't there and the vendors don't want to be wrong.

Someone with a '63 could verify please.

Its a little tight up in there :)
20170723_190448.jpg
 
Last edited:
I might have shorted myself and others with pictures in my thread.

To answer Ron's question, you can press in on the four clips to release the block from the opening in the firewall. Then push it into the cabin, turn it a certain way and it should pull back out through the opening. The thing is how much slack do you have in the wiring in order to work on it. Actually once you push the block through the firewall, into the cabin, you might have more slack inside.

Four retaining clips. Push in/down from the outside. They stay on the block.
View attachment 990915

Don't loose these small clips that grip to hold the plug from coming loose.
View attachment 990916

I'm thinking the '63 is the same as the '62. There are so many items that are advertised for 63' to '65 that are the same for '62. I guess the info isn't there and the vendors don't want to be wrong.

Someone with a '63 could verify please.

Its a little tight up in there :)
View attachment 990919
Thanks much! Yeah it's a furrr stretch to reach it under the dash hoping I could make the switch on the top side. The new engine harness connectors don't have any retaining clips - that would be a nice idea. Also like the brake pedal rod setup you have - another subject I'd like to chat about. Thanks again.
 
Thanks much! Yeah it's a furrr stretch to reach it under the dash hoping I could make the switch on the top side. The new engine harness connectors don't have any retaining clips - that would be a nice idea. Also like the brake pedal rod setup you have - another subject I'd like to chat about. Thanks again.

Anytime Ron. The brake pedal rod is all factory, just cleaned and painted.
 
I found that lying on the floor and working was a bit easier than over a fender and under the hood. I did mine in about an hour.
 
Don’t you have to replace the female packard connectors (that go inside the bulkhead connector) if you replace the bulkhead connector? Or remove your old female connectors and install them in the new bulkhead connector?

I have to deal with this and haven’t attempted to take the old bulkhead connector apart yet. I’ve just been removing the seats from my car and and other **** in preparation to be able to lay down on the floor pan to start work on this unpleasant task. If it’s too much of a bitch to do in the heat the car will just have to sit for another couple months.

People keep saying on here that the Packard connectors are terrible. What the hell else are you going to use to connect your 22 or so wires through the firewall? Why do I see factory bulkhead connections on $100k + dollar cars if all they are going to do is fail? Why did all American auto makers use these lousy connectors on their cars, in the 70s, if they are so bad?
It is a common issue but not a defect. My car is still using its 50 year old dash harness. This is a very easy task done with needle nose pliers, a screwdriver and patience. Remove a terminal by squeezing the sides, clean it, reopen the terminal and install it in the new block. I had to change mine merely because the plastic points that locked the plugs on were worn down and the engine side harnesses kept popping off. There is almost a foot of harness curled up behind the pedals. I had the seat out, set up a fan, a good light and did the whole thing in an hour. This is an easy project.

This was just an area that was never serviced and it got dirty and corroded. Some are worse and some are perfect. You are really overthinking this.
 
Don’t you have to replace the female packard connectors (that go inside the bulkhead connector) if you replace the bulkhead connector? Or remove your old female connectors and install them in the new bulkhead connector?

Both. I did this on my 69. PITA with an A/C car, box is slightly bigger.

1. Remove the drivers seat and put down a blanket or something to lay on.

2. I replaced the two trouble spot Packard connectors - fusible link in and alternator, the two large gauge wires. I got 12 ga. Packard female connectors and really good correct crimpers to duplicate the factory crimp. I cut the old ones at the connector, at the bare wire only. That way I didn't have to worry about it being too short. If you're going this far...

https://www.tooltopia.com/otc-tools...BMbU8tS4WGPWCyH2NEgy7lpKoJj6hH_AaAjC8EALw_wcB

https://www.amazon.com/Molex-63811-...eywords=amp+crimp+tool&qid=1598095585&sr=8-12

Also bought the plastic block from Evans. I bought a set of release tools for the female side connectors as well. Most of the other connectors on the firewall won't have much trouble if they have never shorted out. I did "tighten" all of the female connectors as I swapped them to the new bulkhead block.
I bought the crimpers that have interchangeable dies that do spark plug wires as well as Packard and regular wire terminals. Likely a Jeg's or Summit item. Evans can supply some terminals for you.
 
I've had my driver's seat out so many times to do under dash work was thinking of using wing nuts for the seat. Glad I installed buckets. The BH looks daunting since it's so high on the firewall; but I read here it has been done both ways top and bottom side. Ordered a new BH from Evans and will see which way to go with it. The release tool sounds interesting to remove the female ends and will have to check this out. What I think is happening is the connector in the block for the ignition wire is loose and the car has died on the road or in a no run when I try to start it. This and some melting had occurred at the amp gauge connection I've since cut off.
 
Before you reuse the old packard connectors make sure the corrosion has not spread up into the wires. If it has you should splice in fresh wire and a new connector.
 
I had the seat out, set up a fan, a good light and did the whole thing in an hour. This is an easy project.
I've yet to do ANYTHING to this car that was "easy" for me.. I've already spent much longer than an hour getting the car ready for me to lay on my back and get under the dash. Which included removing both bucket seats, cassette player housing, frontal carpet/mats to inspect the floor pan areas to make sure it's not rust city underneath them. At least I didn't find any rat **** all over my floor pan. I did find a little bit of surface rust though..
 
I've yet to do ANYTHING to this car that was "easy" for me.. I've already spent much longer than an hour getting the car ready for me to lay on my back and get under the dash. Which included removing both bucket seats, cassette player housing, frontal carpet/mats to inspect the floor pan areas to make sure it's not rust city underneath them. At least I didn't find any rat **** all over my floor pan. I did find a little bit of surface rust though..
I wish we had dry heat in Florida!
 
This weekend I did the BH swap. A little sooner than planned but the ignition wire connection kept failing and come to find out it wasn't only the BH side. I had enough slack to do the chore top side and I've spent so much time on my back under the dash with the brakes just hoping I could do this upright. Tedious as those who've done it know, requiring a durable pinch-grip. I was pleasantly surprised to find all the crimps and wires in nice condition. I gave them a vinegar bath and used sanding sticks I had from the hobby store yet leftover from another project to clean up the inside of the females. Then used a mule-prong to gauge the packard connections and re-shaped them to obtain a snugger fit. Yeah, at my age, leaning over and angle-right for a few hours I think burned off a few calories (I have way too many anyway). Then I found the ignition wire spade in the new engine harness was loose while all others were tight. My guess is running the car long as I did with a poor connection there created some heat - evident on this wire on the harness side. I'm pondering on some product (maybe an epoxy) to drip into that wire from the backside to assure it stays tight. Thanks for the advice all provided!

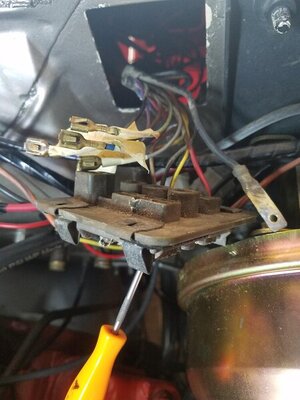
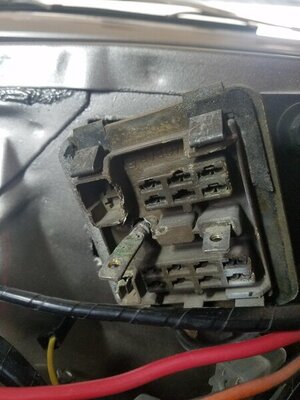
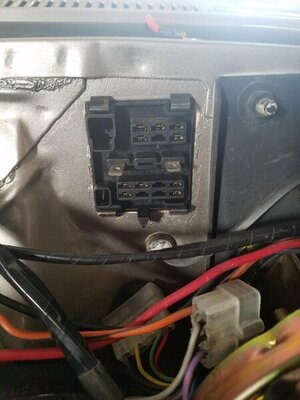
Bulkhead 1.jpg Bulkhead 2.jpg Bulkhead 3.jpg
 
I need a Packard crimping tool that will handle 12 and 16 gauge wire. I'm finding tools, like the one linked above, that only go up to 14 gauge largest size.

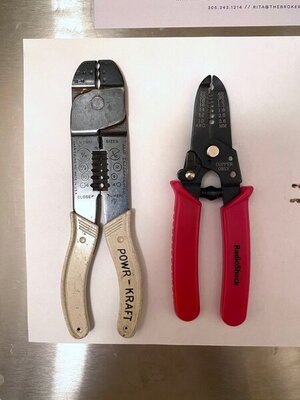
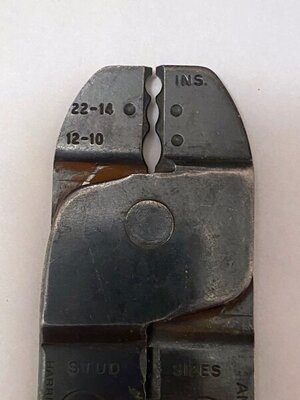
My late father's ancient Wire stripper (made in Harrisburg, PA) has crimper jaws for 22 to 14 and another pair for 12 to 10 gauge. I've included photos, are these jaws intended for Packard or some other connector?

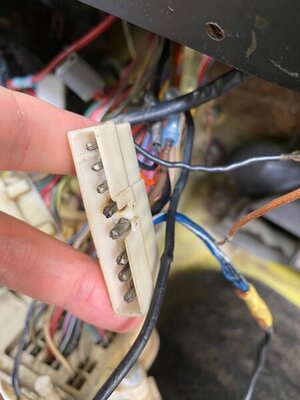
Will the tool set linked to in a previous post, in this thread, allow me to remove the Molex male and female connectors? My damaged Molex has 5 big wires that are 12 gauge, and 3 small wires that are 20 gauge. I tried to remove these today without using a specialized tool with no success..

IMG_3977.jpg IMG_3978.jpg IMG_3950.jpg
 
Auto Transport Service
Back
Top