You are using an out of date browser. It may not display this or other websites correctly.
You should upgrade or use an alternative browser.
You should upgrade or use an alternative browser.
63 plymouth front park/turn housing gaskets
- Thread starter Mrbagley
- Start date
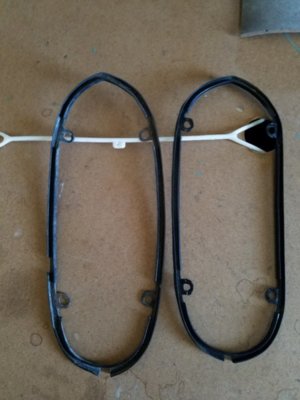
Had one hell of a time finding these gaskets as I couldn't find any sources who sold them unless buying new housings. A fellow member sold me a used pair seen on the right in photo with mine on left. They were way off on sizing near 1/2" even putzing with the shape to insert in the housing. Began to wonder if these were made different sizes depending on the day of the week. Located yet another used set and damn...they were different too. I ended up carefully cutting the bottom edge and tacking them to the housing to align with the screws. Glad to say they ended up pretty nice. Hope you have better luck and if you locate a source for new ones please lemme know.


- Local time
- 4:38 AM
- Joined
- Dec 14, 2008
- Messages
- 12,690
- Reaction score
- 16,995
- Location
- Long Island,New York
I had to heat a set to stretch it to fit,not fun!
There was a guy on e-bay selling all types of gaskets made from original patterns.
He contacted me once when I was parting a 63 Polara and wanted to buy all the gaskets, like tail light foam and master cylinder gaskets, ect.
Just found them
Detroit Muscle Technologies
https://www.ebay.com/itm/DMT-Mopar-...g-Turn-Signal-Light-Lamp-Gaskets/290637882675
He contacted me once when I was parting a 63 Polara and wanted to buy all the gaskets, like tail light foam and master cylinder gaskets, ect.
Just found them
Detroit Muscle Technologies
https://www.ebay.com/itm/DMT-Mopar-...g-Turn-Signal-Light-Lamp-Gaskets/290637882675
I had put all new gaskets and foam in during my resto...agree, not fun like assembling the tail lights and getting them back on the car. I ended up having to install another ground wire for tail lights. '63 Fury parking lights were a real treat to install those body mount gaskets as I posted before. HEMI-ITIS posted he heated them and had better luck than I did heating those up to fit. I really started to wonder if the housing sizes were made from different molds or something lol. '63 Plymouth parking lights are about as 'art deco' as ya can get!
There was a guy on e-bay selling all types of gaskets made from original patterns.
He contacted me once when I was parting a 63 Polara and wanted to buy all the gaskets, like tail light foam and master cylinder gaskets, ect.
Just found them
Detroit Muscle Technologies
https://www.ebay.com/itm/DMT-Mopar-...g-Turn-Signal-Light-Lamp-Gaskets/290637882675
That’s Jim Filmore, he is very focused on doing stuff 100% right or not at all... I restored my first couple cars back in the 80’s, I bought the reproduction body gasket kits & was so disappointed in the complete lack of quality that I reused every original gasket I could... That continued through the 90’s.. In the early 2000’s timeframe Jim was restoring his 71 R/T, he bought the reproduction body gasket set & like me was appalled at the crap we were being sold.... Un like me, he had the ability to do something about it... He worked as a engineer in Detroit for a company that supports the auto industry by supplying weatherstripping & body gaskets...
Initially he just made a few small runs of gaskets for his particular body style Mopar... He sold a few gaskets, I was one of the guys who bought his product before it was really a product...
Everyone raved about the quality & Jim decided to expand, he bought some equipment, started talking with suppliers about exactly what materials were originally used, he started asking to borrow tail lights, marker lights, parking lights etc...
By taking precise measurements off the light rather that the gasket he assures the gasket fits the housing rather than duplicate a gasket that had shrunk over 50 years...
Anyway lots more to the story including buying his own building in Detroit to manufacture products...
If you haven’t bought from Jim you should... If there’s something you need that he doesn’t offer ask, he’s always looking for new products..
Jim & Loretta Filmore
Detroit Musclecar Technologies
https://www.detroitmuscletechnologies.com/
Blackheart
Well-Known Member
- Local time
- 4:38 AM
- Joined
- Dec 20, 2010
- Messages
- 411
- Reaction score
- 262
- Location
- Burlington, North Carolina
I have talked to Joe Suchy as recently as Carlisle about these gaskets. The reproduction ones are too small to fit as one piece. I did as he suggested and cut mine in two at the bottom to allow them to spread wide enough to fit.
This is what I did making a nice clean cut tacking them slightly with weather strip so they would stay put while installing and stay aligned. It bugged me to do this; but very inconspicuous and after awhile I forgot about it what with all the other car chores to do.I have talked to Joe Suchy as recently as Carlisle about these gaskets. The reproduction ones are too small to fit as one piece. I did as he suggested and cut mine in two at the bottom to allow them to spread wide enough to fit.
Similar threads
- Replies
- 11
- Views
- 952


