You are using an out of date browser. It may not display this or other websites correctly.
You should upgrade or use an alternative browser.
You should upgrade or use an alternative browser.
70 Road Runner Dust Trail Location
- Thread starter Wile E
- Start date
PurpleBeeper
Well-Known Member
I don't have the diagram....but as you've probably noticed, you see those dust trail stripes in ALL different locations....all over the place. I "think" the dust trail should be like this
1. The "road" & "runner" on the side scoops appears to be a little bit higher up than half-way on the side scoops...not dead-center on the side scoops
2. The back end of the dust trail starts inside the scoop and even with the "road" & "runner" on the side scoop.
3. The front end of the dust trail should go just over the top of the front wheel well.
4. The front sections of the dust trail stripe have a front/back and left/right. It's hard to see, but there are two X's inside that dust (the Road Runner's feet). Those X's should be in front and down.
They say "measure twice"..... for this one, I suggest you measure 5 times. Like I said, I see these stripes going up, going down, too high, too low, upside down, not on the correct side....etc
Yup. Agree 100% on all points. Many make the mistake and have the dust trail start in the center of the side scoop. This is wrong as it starts higher up, as PurpleBeeper suggests. If you get the location of the Road Runner emblem right, it should start "centered" on the emblem. Let us know if you need the location for that.I don't have the diagram....but as you've probably noticed, you see those dust trail stripes in ALL different locations....all over the place. I "think" the dust trail should be like this
1. The "road" & "runner" on the side scoops appears to be a little bit higher up than half-way on the side scoops...not dead-center on the side scoops
2. The back end of the dust trail starts inside the scoop and even with the "road" & "runner" on the side scoop.
3. The front end of the dust trail should go just over the top of the front wheel well.
4. The front sections of the dust trail stripe have a front/back and left/right. It's hard to see, but there are two X's inside that dust (the Road Runner's feet). Those X's should be in front and down.
They say "measure twice"..... for this one, I suggest you measure 5 times. Like I said, I see these stripes going up, going down, too high, too low, upside down, not on the correct side....etc
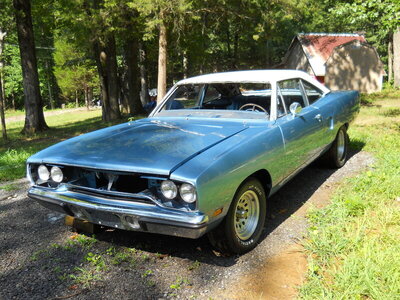
Here's an image of mine during construction:
Here's how I did it: To Install, I used blue tape just a smidge (that's a technical term) wider than the dust trail. Then I got that positioned correctly. This is actually hard and takes a long time to get it straight. Look down the body to be sure it is not wavy. Then (not shown in picture), put blue tape above and below your original tape line following the exact tape edges. Then remove the original center tape strip. Now put the decal on as you would any other decal in between the two pieces of tape.
Good Luck!
Hawk
- Local time
- 3:10 AM
- Joined
- Sep 15, 2009
- Messages
- 23,485
- Reaction score
- 50,143
- Location
- State of insanity
Excellent replies. I'll just add another important suggestion. Do it while sober. 

I see so many trail stripes that are placed on the car crooked. Looks like the mistake is trying to center them on the scoop.
Photon440
Well-Known Member
- Local time
- 12:10 AM
- Joined
- Mar 14, 2012
- Messages
- 18,643
- Reaction score
- 34,635
- Location
- Surrey, B.C. Canada
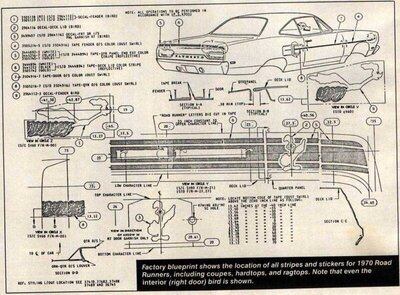
It's hard to imagine a way to make that diagram more vague for the side stripe placement.
I totally agree, the factory drawing is horrible, I like the advise given above!
Wile E
Well-Known Member
Excellent advise as expected. You folks are great. I have original quarters so emblems are correct now. I will follow along with what is here as I was leaning the same way. The tape alignment idea is great and I have done it on some tape stripes. All the help is great gang!!!
Triplegreen500
Well-Known Member
- Local time
- 3:10 AM
- Joined
- Dec 3, 2020
- Messages
- 12,457
- Reaction score
- 31,562
- Location
- western Maryland
If you have one, use a chalk line to snap a straight line...THEN set your masking tapes.
If you don't have one...get a chalk line from the hardware store, and use it to snap a straight line for your masking tapes.
Also, depending on the type of decal, you should be able to apply it to a wet surface. That will give you a little "wiggle room" (literally) to make sure it's where you want it. Then, squeegee the water out and it'll stick itself to the body. Again, depending on the decal and adhesive types.
BLK 68 R/T
Well-Known Member
- Local time
- 12:10 AM
- Joined
- Jan 10, 2016
- Messages
- 3,037
- Reaction score
- 7,454
- Location
- Taxington state
Kinda like so many 68 charger stripes put on straight instead of angled down the sides.I see so many trail stripes that are placed on the car crooked. Looks like the mistake is trying to center them on the scoop.
Similar threads
- Replies
- 0
- Views
- 87
- Replies
- 60
- Views
- 5K


