• When you click on links to various merchants on this site and make a purchase, this can result in this site earning a commission. Affiliate programs and affiliations include, but are not limited to, the eBay Partner Network.

Brake Lamp Switch Modification

65RoadRacer

Well-Known Member
Local time
12:21 AM
Joined
Aug 19, 2013
Messages
1,110
Reaction score
2,278
Location
somewhere else
I'm not sure if this is common, I've talked to another person who has seen this issue.
Background: I have a four-wheel disc conversion with a Mopar M/C, and I removed the brake booster to switch to manual brakes. My brake pedal doesn't have a positive stop or return spring, so when it comes to rest it doesn't always come back to the same spot.

This sometimes left my brake lights on, and other times the pedal returned far enough to shut them off. Occasionally I'd put my foot under the pedal to pull it back, but that sometimes damaged the switch or bent the switch bracket. So I got creative to fix this problem and thought I'd share it in case others have had this issue.

Since the plunger part of the switch doesn't "open" until the plunger and the switch are in alignment; that meant that if the pedal didn't come back far enough, it would leave the brake lights on, and if it came back further it would damage the switch. I've been at a couple of car shows where I've had to climb under the dash and make yet another adjustment to the switch, and it's annoying.

So I came up with a solution that seems to work great: I drilled a small hole in the plunger, tapped it for a small machine screw that I got at a hobby store (not sure if home improvement stores have them that small), and threaded the screw into the plunger. I used a small nylock nut to lock into place on the plunger.

Now I can mount the switch so that the lights turn off at the lowest brake return level, but if it comes back further, the plunger still works properly when it exceeds the face of the switch, and the small screw allows it to push the plunger further in without any damage to the switch or bracket.

Why the switch has to be fully "plunged" to create the open circuit is a mystery, but that always meant that the pedal had to contact the body of the switch to shut off the brake lights. This allows for that little variance.
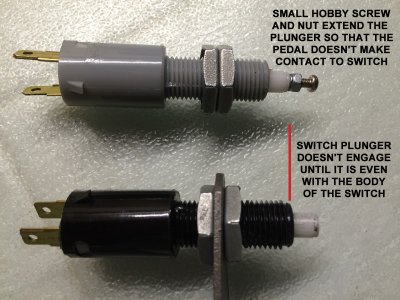
modifiedswitch1.jpgmodifiedswitch2.jpg
 
Something I don't understand here

There were (as Carl Sagan would have said) "bullions and bullions" of these made that worked just fine.

Is it possible you simply got a badly made switch, that is did you try "another" ?

Or is it more the chineseoated replacement parts we are saddled with these days?

I'm wondering myself. I drove the car for a couple years and the switch broke one day. Got a replacement and a few years later that one broke. I changed to a different switch, and this is the second one that requires the plunger to be pushed flush with the switch housing to work properly. This seems to work, so I guess it is what it is, but I wonder myself how this was okay for 40 years and now nothing but problems. lol
 
You need a stop for the pedal and if need be add a return spring so the pedal returns to the same place each time and gives you slight clearance on rod so piston in MC is all the way back
 
I had to install a custom bumper to the underside of my dash for the "up stop" of the brake pedal arm. Then as with all my previous vehicles there is a spring attached to the arm that guarantees positive "up" against the bumper. Sometimes when going over bumps, conventional brake pedal arms will dance up and down due to their weight triggering false brake signals. It's also much easier to set the brake switch when you know just exactly where the arm will be when at rest. This is one of the best and cheapest mods anyone can do.
 
I had the identical problem with my '68 D100 truck, and the problem ended up being a bad master cylinder. It would stop the truck fine, but the pedal wouldn't return to the proper position without pulling it up with the toe of my shoe; plus the brakes would stick just ever so slightly, if I didn't do this. Plus the brake lights remained lit until the pedal was lifted back up.

Replaced the master cylinder, and all of those problems went away. Having to modify the brake light switch shouldn't be necessary in a properly-working system. That simply means something else is wrong.
 
Hydraulic switch.
\
In a previous life I sold auto parts. I would not have a hydraulic switch jammed up my a$$. They are in my book, unreliable. Also, you can make a "gentle stop" with many of them and the lights never come on. Experience? Old Jeeps, Ford Falcon.
 
That simply means something else is wrong.

With a modified brake system with a different master it is the norm to have to fix this... not everyone just simply replaces with OEM parts. I have had to do this several times.
 
With a modified brake system with a different master it is the norm to have to fix this... not everyone just simply replaces with OEM parts. I have had to do this several times.

Perhaps, but since the OP apparently used the original interior brake parts (pedal assembly), again, the brake switch should not have been the issue.
 
Perhaps, but since the OP apparently used the original interior brake parts (pedal assembly), again, the brake switch should not have been the issue.

I never stated that I used the original interior brake parts, I switched from power to manual brakes, so it's a different pedal assembly. I'm not saying everyone has come across this, but I find it sort of messed up that the only time the switch disengages (lights off) is when the plunger is flush with the face of the switch body. That leaves zero room for tolerance. If it had a little play in it, that allows for inconsistencies. As it is, if the pedal pushes the switch back just one time and bends the bracket, which happened to me, then the switch is no longer set properly.

At any rate, this is just a modification I did that may help someone else who has done a big brake conversion. Just offering up some insight in case someone could use it. It is not meant to tell everyone that there is a 50 year old flaw and that they should do this. Again, I've heavily modified my car so this fixed my dilemma and has not failed once since I did it. Before, I had people telling me regularly that my brake lights were on. I trust the shop that did my brake pedal conversion and he has told me there isn't a fixed 'stop' for the brake pedal.
 
My original 1968 stop/brake light switch "bracket" is bent and the switch no longer aligns correctly. Can someone show me a better switch/bracket idea, in a better location than was originally? I have been way under the dash for several days trying to fix the positioning; and the bracket itself wiggles and I cannot get in to tighten or loosen it. So I want a different switch location, different bracket, and/or different type of switch. There must be some, if not many, that have upgraded this non-precise 50 year old design/technology.

Any pictures or suggestions would be much much appreciated.
 
I'm not sure if this is common, I've talked to another person who has seen this issue.
Background: I have a four-wheel disc conversion with a Mopar M/C, and I removed the brake booster to switch to manual brakes. My brake pedal doesn't have a positive stop or return spring, so when it comes to rest it doesn't always come back to the same spot.

This sometimes left my brake lights on, and other times the pedal returned far enough to shut them off. Occasionally I'd put my foot under the pedal to pull it back, but that sometimes damaged the switch or bent the switch bracket. So I got creative to fix this problem and thought I'd share it in case others have had this issue.

Since the plunger part of the switch doesn't "open" until the plunger and the switch are in alignment; that meant that if the pedal didn't come back far enough, it would leave the brake lights on, and if it came back further it would damage the switch. I've been at a couple of car shows where I've had to climb under the dash and make yet another adjustment to the switch, and it's annoying.

So I came up with a solution that seems to work great: I drilled a small hole in the plunger, tapped it for a small machine screw that I got at a hobby store (not sure if home improvement stores have them that small), and threaded the screw into the plunger. I used a small nylock nut to lock into place on the plunger.

Now I can mount the switch so that the lights turn off at the lowest brake return level, but if it comes back further, the plunger still works properly when it exceeds the face of the switch, and the small screw allows it to push the plunger further in without any damage to the switch or bracket.

Why the switch has to be fully "plunged" to create the open circuit is a mystery, but that always meant that the pedal had to contact the body of the switch to shut off the brake lights. This allows for that little variance.
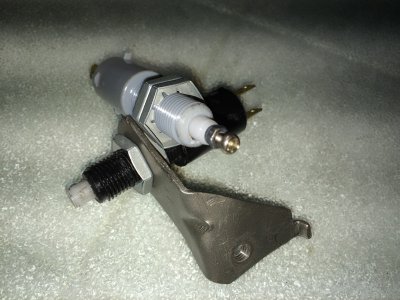
View attachment 279188View attachment 279189
The problem you are experiencing is more than likely created when you switched to manual from power. You have, in effect, used a power brake arm for a manual brake application which doesn't work properly without modification. The position of the mounting hole in the brake arm for the pivot of the pushrod to the master is somewhat different for both applications. This positioning creates what is known as peddal ratio and effects the stroke and force needed to depress the master's plunger and return. The rod connected to the brake pedal drops down about 3 degrees when pushed forward and should be about 3 degrees up from horizontal when the pedal is up. This swing in angle of the rod has to be just right or the rod will bind at the nose of the master, in the pass through hole in the firewall or at the pivot where the pivot mechanism attaches to the brake pedal arm. A "worse case senario" angle will be pushing upwards on the spool of the master causing it to bind and wear out prematurly. If all is set right and rod alignment is correct, you should have 1/4 to 3/8 inch of free play with the brake pedal all the way up, the brake pedal height from the floor should be 4 1/2 inches minimum and the pedal will return to it's home position every time. Although a return spring is a good idea, the master should have enough spring pressure to return the pedal to it's home position every time. If this is not attainable with the existing pedal arm, you'll have to relocate the hole for the pushrod in the arm either up or down, modify the arm length and pedal angle or replace the arm with the proper one. This type of modding is not to be taken lightly and must be done correctly because lives, both yours and your car's as well as others, depends on your brakes proper operation.
 
The problem you are experiencing is more than likely created when you switched to manual from power. You have, in effect, used a power brake arm for a manual brake application which doesn't work properly without modification. The position of the mounting hole in the brake arm for the pivot of the pushrod to the master is somewhat different for both applications. This positioning creates what is known as peddal ratio and effects the stroke and force needed to depress the master's plunger and return. The rod connected to the brake pedal drops down about 3 degrees when pushed forward and should be about 3 degrees up from horizontal when the pedal is up. This swing in angle of the rod has to be just right or the rod will bind at the nose of the master, in the pass through hole in the firewall or at the pivot where the pivot mechanism attaches to the brake pedal arm. A "worse case senario" angle will be pushing upwards on the spool of the master causing it to bind and wear out prematurly. If all is set right and rod alignment is correct, you should have 1/4 to 3/8 inch of free play with the brake pedal all the way up, the brake pedal height from the floor should be 4 1/2 inches minimum and the pedal will return to it's home position every time. Although a return spring is a good idea, the master should have enough spring pressure to return the pedal to it's home position every time. If this is not attainable with the existing pedal arm, you'll have to relocate the hole for the pushrod in the arm either up or down, modify the arm length and pedal angle or replace the arm with the proper one. This type of modding is not to be taken lightly and must be done correctly because lives, both yours and your car's as well as others, depends on your brakes proper operation.
That was a lot of typing for an assumption to be made. I didn't just remove the booster, I had my friend's shop convert my brakes to manual, which means they installed a manual brake arm. So everything you just stated, while it might be true, doesn't apply to my situation because I had the right arm installed when I removed the booster.
 
I'm not sure if this is common, I've talked to another person who has seen this issue.
Background: I have a four-wheel disc conversion with a Mopar M/C, and I removed the brake booster to switch to manual brakes. My brake pedal doesn't have a positive stop or return spring, so when it comes to rest it doesn't always come back to the same spot.

This sometimes left my brake lights on, and other times the pedal returned far enough to shut them off. Occasionally I'd put my foot under the pedal to pull it back, but that sometimes damaged the switch or bent the switch bracket. So I got creative to fix this problem and thought I'd share it in case others have had this issue.

Since the plunger part of the switch doesn't "open" until the plunger and the switch are in alignment; that meant that if the pedal didn't come back far enough, it would leave the brake lights on, and if it came back further it would damage the switch. I've been at a couple of car shows where I've had to climb under the dash and make yet another adjustment to the switch, and it's annoying.

So I came up with a solution that seems to work great: I drilled a small hole in the plunger, tapped it for a small machine screw that I got at a hobby store (not sure if home improvement stores have them that small), and threaded the screw into the plunger. I used a small nylock nut to lock into place on the plunger.

Now I can mount the switch so that the lights turn off at the lowest brake return level, but if it comes back further, the plunger still works properly when it exceeds the face of the switch, and the small screw allows it to push the plunger further in without any damage to the switch or bracket.

Why the switch has to be fully "plunged" to create the open circuit is a mystery, but that always meant that the pedal had to contact the body of the switch to shut off the brake lights. This allows for that little variance.
View attachment 279188View attachment 279189
 
It would have been nice to know that you changed the arm in the first place. I was merely reiterating what has proven to cause issues on conversions. It's good information to know anyway. I still contend that there is an strange issue here because I've never heard of the need to modify a brake light switch. Got me baffled.
 
It would have been nice to know that you changed the arm in the first place. I was merely reiterating what has proven to cause issues on conversions. It's good information to know anyway. I still contend that there is an strange issue here because I've never heard of the need to modify a brake light switch. Got me baffled.
It says it in my responses that I changed the arm, I was flat out told that when you switch from power to manual that you have to change the brake arm because the power one won't work, so I was under the impression most everyone knew that. I'm trying to figure out why it's an issue as well, but I did have problems with the first switch before I swapped to disc brakes... that switch broke on me twice. Now with a new MC, new brake arm... still a problem. I don't get it, and why I posted here to see if anyone had an idea. Even the shop that did it is a little baffled, and they build 62-65 B bodies regularly.
 
It says it in my responses that I changed the arm, I was flat out told that when you switch from power to manual that you have to change the brake arm because the power one won't work, so I was under the impression most everyone knew that. I'm trying to figure out why it's an issue as well, but I did have problems with the first switch before I swapped to disc brakes... that switch broke on me twice. Now with a new MC, new brake arm... still a problem. I don't get it, and why I posted here to see if anyone had an idea. Even the shop that did it is a little baffled, and they build 62-65 B bodies regularly.
I'm not sure if this is common, I've talked to another person who has seen this issue.
Background: I have a four-wheel disc conversion with a Mopar M/C, and I removed the brake booster to switch to manual brakes. My brake pedal doesn't have a positive stop or return spring, so when it comes to rest it doesn't always come back to the same spot.

This sometimes left my brake lights on, and other times the pedal returned far enough to shut them off. Occasionally I'd put my foot under the pedal to pull it back, but that sometimes damaged the switch or bent the switch bracket. So I got creative to fix this problem and thought I'd share it in case others have had this issue.

Since the plunger part of the switch doesn't "open" until the plunger and the switch are in alignment; that meant that if the pedal didn't come back far enough, it would leave the brake lights on, and if it came back further it would damage the switch. I've been at a couple of car shows where I've had to climb under the dash and make yet another adjustment to the switch, and it's annoying.

So I came up with a solution that seems to work great: I drilled a small hole in the plunger, tapped it for a small machine screw that I got at a hobby store (not sure if home improvement stores have them that small), and threaded the screw into the plunger. I used a small nylock nut to lock into place on the plunger.

Now I can mount the switch so that the lights turn off at the lowest brake return level, but if it comes back further, the plunger still works properly when it exceeds the face of the switch, and the small screw allows it to push the plunger further in without any damage to the switch or bracket.

Why the switch has to be fully "plunged" to create the open circuit is a mystery, but that always meant that the pedal had to contact the body of the switch to shut off the brake lights. This allows for that little variance.
View attachment 279188View attachment 279189


65RoadRacer, where did you get the new brake light switch and do you have a part number? I am going to do the same thing to mine. I converted from manual to power and now the brake lights are on all the time because the pedal is not hitting the switch.
 
Assuming you are only talking a 1/4" or less, just glue a small rubber pad to the brake pedal where it contacts the switch plunger. Problem solved.
 
Auto Transport Service
Back
Top