• When you click on links to various merchants on this site and make a purchase, this can result in this site earning a commission. Affiliate programs and affiliations include, but are not limited to, the eBay Partner Network.

Changing Out Motor Mounts 440

MarPar

If it weighs, it pays
FBBO Gold Member
Local time
1:05 PM
Joined
Nov 21, 2008
Messages
19,749
Reaction score
48,508
Location
In GTXtacy Illinois
Is there any easy way to change out motor mounts (well, the isolator-the rubber part) without a cherry picker and a car lift??

my right side one is pretty cashed, and since i have the exhaust manifold is off already, i figured i should change it.

i think it would be easiest to take off the mount completely (both sides); then separate and re-install the isolator from there...

only place i see to hold the motor up is a little ear back by the bellhousing on the right side. not sure if that would be ok or not.

i unhooked the trans and kickdown linkages, am i missing anything else??

any thoughts and comments would be greatly appreciated, as always!!! :pimp_daddy:
 
Floor jack and a few pieces of 2x10 under the oil pan. The engine should come up high enough to get the isolator out.
 
Floor jack and a few pieces of 2x10 under the oil pan. The engine should come up high enough to get the isolator out.

yikes!!! :eek:

under the pan, Red? it wont cave in or bend the pan?
 
Red's suggestion will work just fine and I've done it that way several times without harming the pan in any way.

Loosen the motor mounts first and then only jack the engine as high as you need to remove/install the new ones. Do not jack it so high that you start lifting the car though.
 
I've changed them using this method also. Works fine.
 
Just jack it up slowly. The idea of the wood is to spread the load out entirely over the bottom of the pan so you don't dent it up. I have done it too in the past,,,, now I own a hoist and just use it.
 
I have also done this MANY times, especially when changing out starters. Maybe not ideal but it works fine.
 
Thanks for all the responses, guys. probably going to do it this weekend...wish me luck!!! lol
 
ok, going to do the motor mounts today....the pass. side seems pretty straightforward, but the driver's side looks to be a bit more dicey.

what do i need to do to get at the driver's side mount without making myself into a contortionist???

thanks guys...
 
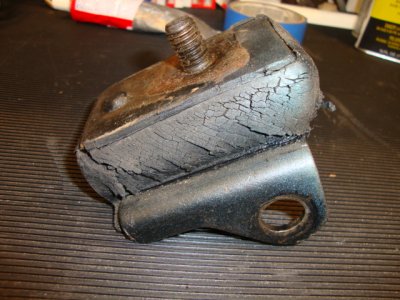
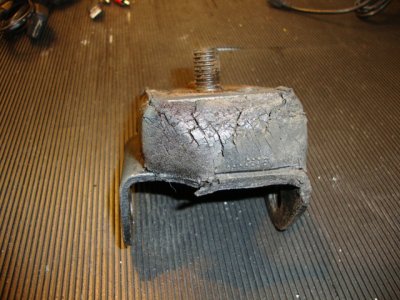
so this is my former pass side motor mount...:eek:

i knew it was cashed..but not this bad!!! lol

driver's side is still in good shape and didn't change it, for now.

going to rip that puppy out when i put the new steering box in.

then i was going to put the valve covers back on, and guess what??? brand new high-temp RTV tube dried out!!! blew the *** out of it trying to get the goo out (you can see it in the background with duct tape on it)!!!

just my luck...oh well, time for a Jack n Coke!!! lol
 

Attachments

  • DSC01939.JPG
    DSC01939.JPG
    136.4 KB · Views: 1,217
  • DSC01940.JPG
    DSC01940.JPG
    137.9 KB · Views: 964
  • DSC01941.JPG
    DSC01941.JPG
    134.2 KB · Views: 946
Im lost on pulling my passenger side mount.....pulled bolt on k member side but how do u get to the stud side of the motor mount to loosen it??? there is a horizontal bolt underneath it but it just spins when i try to back it out?!?!? mind u this is a 69 sport satellite that was a 318 car converted to a 440. need help!!!! please!!!!
 
is your mount the same as the pic above? we took out both sides of the mount (the one attached to the k and the one attached to the motor) and slid the whole assembly out from the front. (had to loosen the trans mount and jack the motor up a little bit to get it out)
 

Attachments

  • $(KGrHqR,!j!E+E7nsK3uBPzUj-j,Pw~~60_1.JPG
    32.3 KB · Views: 800
When I changed mine, I removed the 3 bracket to engine block nuts and bolts, and then the K Member thru bolt. There is no nut on this one. Then once you get it all out in 1 piece, you can easily remove the nut that holds the rubber biscuit to the bracket. And I cleaned and painted the metal bracket black. Also I cleaned the nuts and bolts, and oiled them, which makes re assembly a breeze! Good luck!
 
I am putting my new mounts on, question I have is it worth adding a lock washers on the single stud that mates the rubber insulator to the bracket attached or he block?
 
Auto Transport Service
Back
Top