• When you click on links to various merchants on this site and make a purchase, this can result in this site earning a commission. Affiliate programs and affiliations include, but are not limited to, the eBay Partner Network.

Feel fairly stupid asking, but...

miller

Well-Known Member
Local time
12:55 AM
Joined
Jan 5, 2014
Messages
4,081
Reaction score
2,025
Location
Tom Bean,Texas
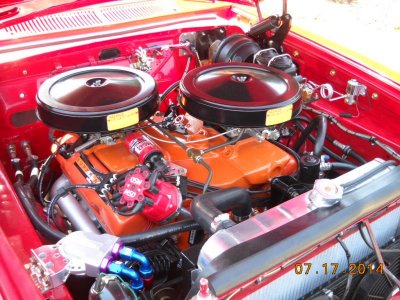
Considering mounting up my 63 model crossram, to the 440 I'm building. (Yes, know all about the ports, etc.)

Kind of a dumb question...but. Just mocking things up, set the intake in place, looked fairly good. Add both block and heads (906s) have been shaved .005 each.
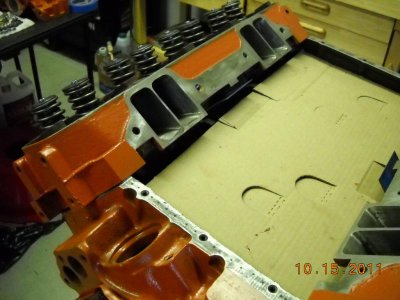
Just intake to bare head surface, main surfaces flat out. But, the front/rear is 3/16 to 1/4 gap, if not more. That sound about right? Also fairly certain the intake has never been cut.

Question is, what kind of gasket/seal is used at the front and rear of the intake? And what holds it in place?

I've looked up 'stock' crossram gasket sets, don't think .060 thick gaskets will work for me. Can't make out any detail on those end gaskets.
 
Sounds about right, RTV will seal it.
Doug
 
Thinking out loud. Thinking about making my own intake gaskets, using .015-.020 gasket material.

If I do a mock-up, with the gasket in place, measure that front/rear gap. With that thickness, find some sort of gasket material. Will wind up kinda thick, anyway. Cut it, poke holes where the normal bolts go, and cut a countersunk bevel into the holes. Thinking is to use screws, with beveled heads, to fasten those seals down. The screw heads would be under the top surface of the 'gasket' surface, not interfering, with the intake's surface against the gasket.

Any thoughts?
 
Miller; You don't need to re-invent the wheel (feel free to if you just HAVE to...lol). I take a sharpened nail set and peen a small divot on the top surface of the end rails of the block about every 1/2" across the front and rear. Use KW Coppercoat or Gaskacinch to hold the side gaskets in place. Then lay down a nice 1/4-5/16" thick bead of gray RTV across the end rails of the block. Let the RTV sit several minutes to start to gel, then carefully set the manifold in place, trying not to shift it. Torque the bolts to specs in the order set out in the factory manual. Wet your finger and drag it across the end manifold to block RTV sealant to smooth it and make it look 'pretty'. No leaks and no sweat...
 

Attachments

  • DSCN3227.jpg
    DSCN3227.jpg
    84.6 KB · Views: 297
  • DSCN1436.jpg
    DSCN1436.jpg
    59.6 KB · Views: 294
Thanks, Dave.

Agree. Sometimes I get out-of-hand on my thinking. Just not a fan of rtv.
 
Thanks, Dave.

Agree. Sometimes I get out-of-hand on my thinking. Just not a fan of rtv.
I know the feeling, Miller! But Dave is right, just put some divots on the end rails to give the RTV a grip surface. Be sure to use the ULTRA OIL RESISTANT RTV on the end rails. The stuff I used is gray or black. Works great! I have used it on the side rails of the rear main seal, and no leaks for 3 years and counting! Good luck.
 
I'm with you there. This is the only place I use RTV on my motors since Jegs came out with their one piece windage pan/rubber pan gasket. BTW, don't listen to all the naysayers who say a crossram is difficult or impossible to run on a street car. The secret is in the carb tuning. I highly recommend a wide band air/fuel gauge which makes the process much faster and easier. Nothing quite like the looks on people's faces when you pop the hood and see a max wedge motor, whether it's real or a look alike...I drive my car a lot and it idles at 950 rpm, doesn't stumble on take off and runs very 'normal' through the rpm range. It's fun being different.
 

Attachments

  • DSCN3753.jpg
    DSCN3753.jpg
    80.5 KB · Views: 265
  • DSCN3595.jpg
    DSCN3595.jpg
    98.8 KB · Views: 246
Yeah! Much appreciate, guys. (Gotta admit I'll sort of a hard-headed sob)

I'll go with the flow.

Great looking auto you have there, Dave! Panel looks pretty damn good, too. Another one of my evil thoughts, is a set of those AutoMeter gauges. Just have to hunt down some panel material. I hate idiot lights.
 
The Max Wedge used paper gaskets around the ports and cork end rail seals. RTV will work for the end rails.
 
Great looking auto you have there, Dave! Panel looks pretty damn good, too. Another one of my evil thoughts, is a set of those AutoMeter gauges. Just have to hunt down some panel material. I hate idiot lights.

speedymetals.com .125" 6061 aluminum with VHT wrinkle paint. Thank you for the nice comments.
 
Thanks! I'll take a look.

Sure thing on your car. Wish I still had my 63 Ply ragtop.
 
I'm with you there. This is the only place I use RTV on my motors since Jegs came out with their one piece windage pan/rubber pan gasket. BTW, don't listen to all the naysayers who say a crossram is difficult or impossible to run on a street car. The secret is in the carb tuning. I highly recommend a wide band air/fuel gauge which makes the process much faster and easier. Nothing quite like the looks on people's faces when you pop the hood and see a max wedge motor, whether it's real or a look alike...I drive my car a lot and it idles at 950 rpm, doesn't stumble on take off and runs very 'normal' through the rpm range. It's fun being different.

Thats is a really cool car Dave. The garage picture of all your parts and the car in your gallery reminds me of a Hot Rod photo shoot .. 2 thumbs up !


I see you changed it from this arrangement. You have a picture showing the whole dash with the new? Just curious how it looks now and what fills in the rest of the space

vbpgimage.php
 
Thanks, Tallhair. The dash was padded but I like the look of super glossy black paint better and it gives me something to polish when I run out of things to do...I changed the dash panel to accommodate the air/fuel gauge that I added later and to better position the turn signal indicator lights and the speedometer. Thanks for the comments.
 

Attachments

  • DSCN3759.jpg
    DSCN3759.jpg
    78.3 KB · Views: 144
  • DSCN1862.jpg
    DSCN1862.jpg
    61.1 KB · Views: 151
  • DSCN2306.jpg
    DSCN2306.jpg
    49.9 KB · Views: 150
  • DSCN1714.jpg
    DSCN1714.jpg
    63.7 KB · Views: 158
Auto Transport Service
Back
Top