• When you click on links to various merchants on this site and make a purchase, this can result in this site earning a commission. Affiliate programs and affiliations include, but are not limited to, the eBay Partner Network.

Old leading messed up on cowel, how to fix??

bandit

Well-Known Member
Local time
7:38 PM
Joined
Jun 1, 2012
Messages
303
Reaction score
18
Location
Illinois
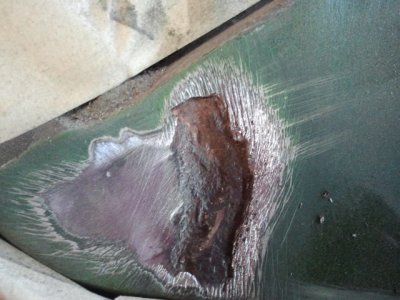
I am in the process of prepping the body for painting and working on the cowel right now. Right at the edge on both sides where it meets with the corner of the windshield, I had some ugly cracks. They looked like a bad bondo job that was starting to crack but after grinding one side down, I see it is lead filler and it came out quite easily because rust started under it. They apparently used the lead to help round the corner. What do you guys use to fill deeper gouges like this? I have no skills in leading so would like other alternatives and think this would stretch the bounds of body filler. I would say about 1/4 inch needs to be filled back in. (and I need to kill that rust that leaked in under the lead too)


Does using some JB Weld sound crazy??

Here are some pics.
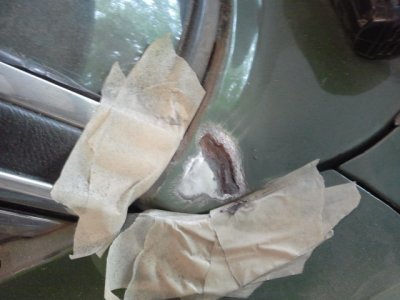
2013-08-19 16.25.30.jpg2013-08-19 16.26.21.jpg
 
That's a high stress area, too, specially from the twist of a high torque engine.

Pretty common to see them cracked there, and difficult to fix and have it not come back.

I'd be tempted to try non-rosin, solid core solder for an area that small.
 
Try Bondo Glass mixed with plain Bondo for a quick, dirty fix.
Bondo Glass is very hard to sand and the fibers may pop up. So you will need a finish coat of plain Bondo or body glazing compound. I think JB Weld will be hard to sand smooth too.

I was just researching this yesterday. I’m a fair welder and good a sweating copper. I’m tired of having to fix bondo bubbles.

Seems like there are different opinions on how to do it. But one thing seems to run through all articles. If the base metal isn’t clean very, very good, the tinning will trap flux and it will keep rusting.
Your problem reminds me of what jumped out at me when I read this guy.
http://www.autobody101.com/content/articles/working-with-body-solder-lead/

I wouldn't advise leading a seam unless the seam has been welded solid, because there is the possibility of trapping flux acid in the seam which could cause you problems down the road. Yes, its true the factory did it that way, but those guys were working with lead everyday and knew what they could get away with.
 
I have since read that JB weld is not flexible at all so if this is a flex point on the car, I'd have to assume the crack will probably just come back on me. I have heard of the fiberglass filler. I may end up using it if I can't think of something else by tomorrow. I don't want this hanging me up for days.

YY1, are you talking about regular plumbers solder?
 
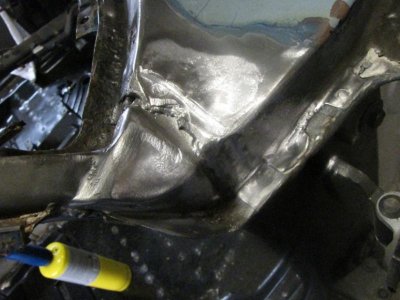
Going to be straight up, if you want to fix that right all the rest of that lead needs to come out to see what is going on underneath it. These cars like to obviously rot out at that point. Here's what it looks like under that lead, if all removed:

a.jpg

It cracked in that area for a reason. Going off you pic, odds are it has to do with corrosion degrading the integrity of the A-Pillar and inner cowl connection. I would guess the stitch weld and spot welds that connect the two are compromised as well. You can be assured, just recovering that with pretty much anything, you will see cracks popping back up. Could be a couple years down the road, could be a couple months. Like mentioned, it is a high stress area.

As far what to fill the area back in with; If the metal underneath is repaired and in good sound shape, Metal to Metal, Duraglass or lead will work to fill and provide many more years of a crack free area. As far as a band-aid quick repair, can't help you there. I honestly can't recommend some witch's brew that will have you back up and running in a few hours. To fix it and to fix it right with be dirty hard work that will suck up plenty of hours to complete, but at least you'll be done dealing with it down the road. Best of luck to you.


BTW.....If you do remove any more lead, do not do it with a sander or grinder. Talk of the town is that ingesting lead seems to be bad for your health. Use a torch..it will melt right out.
 
That's a great pic Propwash. Thanks!! That helps a ton to know what is under there.

My mistake taking it that far with the grinder. My first thought when I laid into it was that I was going to hit bondo because of the crack. Didn't realize it was lead until a saw the deep scratches in the metal.

How are you getting the lead off once you melt it?
 
Hey no sweat. Figured the pic would help. As far as the lead, no way you would know it was there until you broke the surface. A couple other areas you car has lead is the quarter to roof seam and the outer rocker to quarter transition in front of the rear wheels. As far as removal, a torch will get a great majority of it off. It will just run off like water basically, so watch out for where it might land/settle. It doesn't stick to much once turned to liquid them solidified again. Acts pretty much like solder does. Any remaining on the area, I take off with a file or hand sand with a heavy grit (while wearing a good 3M dust mask). Honestly I should probably be wearing a half mask, but hell...I still close lead split shots on my fishing line with my teeth..lol Best of luck to ya. Hope your repair goes well.
 
Haha, yeah I used to bite those things closed all the time. Haven't found time to fish in years though. I'm going to give it a try melting it tomorrow. Crossing my fingers that rust isn't crawling far under that stuff.
 
There's (at least) two types of fiberglass filler. Short strand and long strand. I think the short strand would work best for your fill. I've used it for quarter/roof seams after chunking out the factory filler and lead and it holds up well. It doesn't mind being laid on heavy like a plastic filler does. Finish with a glazing compound (waay less bubbles and pinholes, onlyone), hi-build primer, sealer or epoxy primer, then paint. But as mentioned before, fix the cause of the crack first....this stuff is pretty good, but it ain't magic.
 
I thought that was a panel seam, but didn't want to say anything because I didn't have a pic for sure.

I sure would like to see how the factory got those compound curves so perfect with the lead.

Especially since they're not on a level surface, and you would think the lead would run down, and find the lowest spot.
 
When leading, it should have a consistency of soft-ish butter. With pushing and pulling with a paddle, the stuff is workable, but a lot of learning. If it runs, its way too hot. The cowel area is definitely one of the hardest to get to shape. At least on the quarter its a straight line....
As for the OP, melt the old, blast the metal, fix the welds, and, personally, I'd re-lead. Its the right way.
 
Tried torching it and I got it to melt but the rubber around the window did not like it. Heat tranfered to it and it started burning. Got me worrying about the glass so stopped. Found best way for me was to just use a screwdriver and hammer. Lead was soft enough that it just peels out. The rest I hand sanded with some 60 grit. It does not look pretty but I see no signs of cracks in the weld or weak spots and got the rust out. Picked up some short strand filler today and will put on in the next few days.

I know the guy who owned the car before me raced it and there is even a NOX sticker on the windshield so I bet he torqued the crap out of things when he had it and why it probably cracked the lead and paint on both sides.

Thanks all for the help.
 
Last edited:
When I work in these areas, I use a Victor J-27 torch with a #3 tip and use pure tin as a filler. You have to get the area clean and it needs to be "tinned" with a flux so that
the pure tin will stick to it. Where are you in Illinois? I am in the Naperville area, and could take care of this problem for you!
 
Hey thanks zyzzyx! I am a little over an hour north of Naperville outside of Wauconda. Unfortunately I am in the middle of bodywork and have half of the car in pieces(bumbers, valance, door handles, trim, etc...) around the garage so can't move the vehicle. If you are planning any trips up north in the next week and don't mind swinging by, that would be great. This current project has drained my funds pretty bad so can't offer a lot but do have beer.:icon_thumright:
 
A beer sounds great, but I don't think I can get up there next week. I could take a ride up on the bike at some time though. Good luck with the project! The torch requires two gas bottles, so

i wouldn't be able to bring them to you. Maybe you can wait untill the car is driveable????
 
You can buy a smaller, portable two-bottle torch at most hardware stores. Bernz-0-matic or similar. Not sure if they're oxy-acetylene, but ougtta be plenty hot enuff for what you're doing, but without having to pony up the bucks for a full sized "blue wrench" outfit.
 
Auto Transport Service
Back
Top