• When you click on links to various merchants on this site and make a purchase, this can result in this site earning a commission. Affiliate programs and affiliations include, but are not limited to, the eBay Partner Network.

Battery relocate positive wire

inri

Well-Known Member
Local time
1:53 PM
Joined
Sep 8, 2013
Messages
163
Reaction score
51
Location
Sacramento
Hi guys,

As you may know I am converting my '69 RR that was raced into a street car with a Gen3 Hemi
20171021_175537_resized.jpg
. I've asked a few questions so far to help with the conversion and I've had great answers which allowed me to make progress.

My question now is;
The battery was relocated to the rear trunk with a On/Off switch. The positive gauge wire that runs from the trunk to the front is tied into a weird bolt where other wires touch it and then go to their proper location, i.e. starter, fuse, ignition etc.

As you'll see in the photo the positive wire runs to the screw bolt thingy and then smaller gauge wires come off that to make their connections. What is the best way to do this seeing how other positive wires will need to be touching/connected to the positive cable? I don't like the way it looks.

Thank you very much!
 
I would just get rid of all of the wires that go to the trunk, for the battery of course. Then just use the factory wireing setup under the hood. You'll need to look at other cars like yours and get a Factory Service Manual to see what's what.

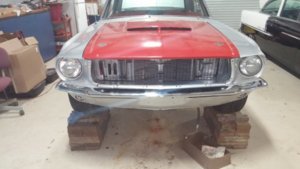
Please invest in a good set of heavy duty jack stands. Those blocks are really scaring me!
 
That's a spilt bolt, or also known as a kerney and is used for splicing cables...I wouldn't use it on a car....run you a new cable.
 
Based on the responses here I believe it may be best to run a new positive cable wire from the trunk to the engine bay, remove the existing kerney and run new wires from the trunk battery for the two other connections to the engine bay.

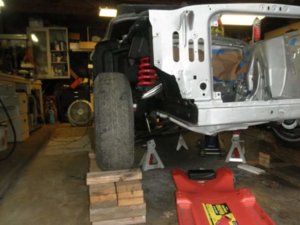
On a side note, I have several heavy duty jack stands but I prefer to keep the car off the ground with the 4x4 posts. I have the rearend on stands but the front end on wood. The stand tend to dent up the undercarriage and the 4x4 posts are very solid. Are these not a good idea?
 
Those 4x4's are an accident waiting to happen. If the car shifts a little they'll tip over. I'd do something different. Your call.
 
Take those 4x4 and build yourself some cribbing and set your wheels on them...

0628151920.jpg
 
Last edited:
I too cringed looking at your photo. The wiring and the blocking method. I agree that the stands tend to scratch and dent the undercarriage. I use the stands with a 2 x 4 between the stand and body. Another thing you could do is use an piece of old mud flap or piece of carpet in place of the 2 X 4.
 
Use stands. Period. a friend of a friend left his little girl without a daddy because he didn’t use proper stands.

Stack 4) 4x4’s and you can easily knock the top one off with a finger. Try to knock over a stand with that same finger - takes way more force.
 
I too cringed looking at your photo. The wiring and the blocking method. I agree that the stands tend to scratch and dent the undercarriage. I use the stands with a 2 x 4 between the stand and body. Another thing you could do is use an piece of old mud flap or piece of carpet in place of the 2 X 4.

Sorry, but I respectfully disagree with this advice. The fork shape of the top of the stand is designed for the chassis rail to sit down into the fork a bit, adding stability. The 2x4 keeps it up above, really creating an unstable situation.

If you want to prevent marring, use a sheet of Vulcan rubber, maybe 1/4” thick.
 
They are about 18" long, all I did was cut the same length doubled them up vertically and horizontally and nailed some stops on the top to keep the tire from rolling off.
Before we built the shop. I used these in my 2 car garage and they were life savers for all of the stripping and welding work.
These are the only pics I have of them...

FB_IMG_1430762068249.jpg
 
Sorry, but I respectfully disagree with this advice. The fork shape of the top of the stand is designed for the chassis rail to sit down into the fork a bit, adding stability. The 2x4 keeps it up above, really creating an unstable situation.

If you want to prevent marring, use a sheet of Vulcan rubber, maybe 1/4” thick.

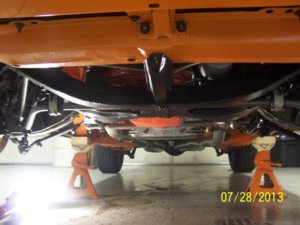
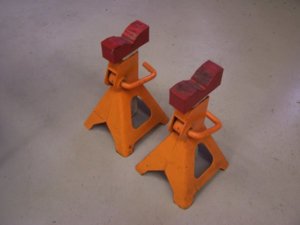
Nope. Not a bit unstable. The 2X4 sits between the ears of the stand. plus the 2X4 sits flat against the frame rail. I also have a couple of stands that I bought at Harbor Freight that have rubber ends that fit over the ears. I use them under the axle shaft. Here are a couple pics.
Rigging means everything when you are working under a load. I understand that completely. I wouldn't use the 2X4 in every situation but I spent my whole career working with heavy loads from 500 lbs to 500 Tons. I agree sometimes it is hard to recognize an unsafe condition and you can never be too safe. You always need to step back and look the situation over and expect the unexpected. Everyone that restores cars and don't want their paint scuffed should invest in the stands with the paint protectors.

100_5665.JPG 100_8357.JPG
 
Nope. Not a bit unstable. The 2X4 sits between the ears of the stand. plus the 2X4 sits flat against the frame rail. I also have a couple of stands that I bought at Harbor Freight that have rubber ends that fit over the ears. I use them under the axle shaft. Here are a couple pics.
Rigging means everything when you are working under a load. I understand that completely. I wouldn't use the 2X4 in every situation but I spent my whole career working with heavy loads from 500 lbs to 500 Tons. I agree sometimes it is hard to recognize an unsafe condition and you can never be too safe. You always need to step back and look the situation over and expect the unexpected. Everyone that restores cars and don't want their paint scuffed should invest in the stands with the paint protectors.

View attachment 530875 View attachment 530876

Fair enough. Thanks for the pix, that clears things up - the ears on my stands are different, I can see how yours are designed maybe with 2x4’s in mind.
 
Wooden stands aren't a problem, it's how they're used that can be the problem. 2 4X4s stacked on top of each other is not a good idea, 3 stacked in a pyramid shape and fastened together very well is another story. Any blocking under the tires should have built in chaulks and a wide base... don't ask how I know:rolleyes:

Point is if it's questionable don't do it, I nearly got crushed once because of It! I had a very stable wide base under the tires but realied on the parking brake and leaving the car in gear (standard) to keep it centered. Thank God for that squeak from the rotor because the second I heard it I kicked out from under the car before it rolled off!!!:BangHead: Complete idiot move that nearly cost me my life, I bought a 2 post lift after that lol. It's just not worth it.
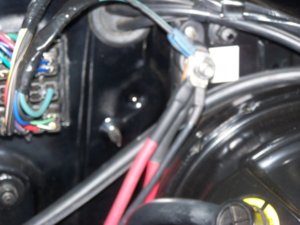
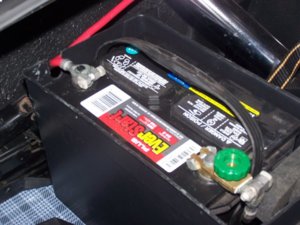
 
Back to the op’s original question... seems to me that bolt is located beneath the car? Imho, that thing needs to be in the engine bay. So if it were me, I’d buy 20’ of pure copper 1/0 welding wire (make sure is not the el cheapo copper coated aluminum) to replace the battery (+) cable and perhaps use the terminal bolt (I always called them bulk head bolts) that @Fran Blacker posted above.
 
Back to the op’s original question... seems to me that bolt is located beneath the car? Imho, that thing needs to be in the engine bay. So if it were me, I’d buy 20’ of pure copper 1/0 welding wire (make sure is not the el cheapo copper coated aluminum) to replace the battery (+) cable and perhaps use the terminal bolt (I always called them bulk head bolts) that @Fran Blacker posted above.
That's what I used, welding cables.
 
While your running a new positive run a ground wire doesn't have to be as heavy as positive cable.
 
Last edited:
Hi guys,

As you may know I am converting my '69 RR that was raced into a street car with a Gen3 HemiView attachment 530262 . I've asked a few questions so far to help with the conversion and I've had great answers which allowed me to make progress.

My question now is;
The battery was relocated to the rear trunk with a On/Off switch. The positive gauge wire that runs from the trunk to the front is tied into a weird bolt where other wires touch it and then go to their proper location, i.e. starter, fuse, ignition etc.

As you'll see in the photo the positive wire runs to the screw bolt thingy and then smaller gauge wires come off that to make their connections. What is the best way to do this seeing how other positive wires will need to be touching/connected to the positive cable? I don't like the way it looks.

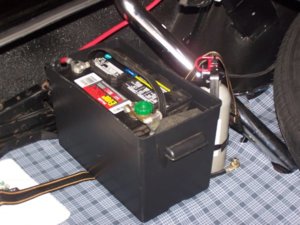
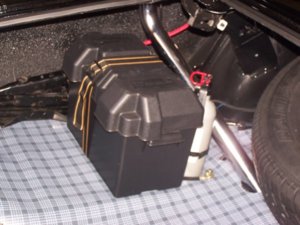
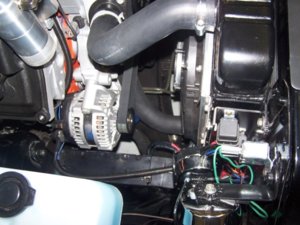
OK, I see you are doing a Gen III swap also so you almost need the battery in the trunk. Here are a few pics of my 6.1 swap into my 68 Charger.There are many different ways to skin this particular cat but here is what I did.
I bought a trunk mount kit that included a 20' cable of 2/0 wire that already had the battery post end installed. The kit I bought had an open battery box and I wanted it enclosed so found a plastic battery box. I then welded in a 3/8" stud into to frame rail for the Neg cable. I ran the 2/0 positive cable through the interior wire way and through a grommet I installed in the firewall below the brake booster.
I then installed a 5/16" buss stud above the booster to make the connections from the battery to the starter, Alternator and a double fusible link to two separate circuits in the dash. One fusible link feeds the Gen III computer and fuse panel that was included in the harness. The other fusible link feeds the original fuse panel. I eliminated the Amp gauge in favor of a volt meter that I had converted when I sent my gauge panel out for restoration.
I also ran a #8 wire from the Alternator stud to another Buss stud I installed in the radiator core support. That feeds the two relays for the cooling fans and also 2 relays for the headlights. Crackedback (here on FBBO) sells specialized headlight kits to replace the amperage the headlights use from going through the firewall making a better circuit for the headlights and improving safety from a fire from over loaded firewall connections.

100_8358.JPG 100_8359.JPG 100_8360.JPG 100_8361.JPG 100_8362.JPG
 
Auto Transport Service
Back
Top