• When you click on links to various merchants on this site and make a purchase, this can result in this site earning a commission. Affiliate programs and affiliations include, but are not limited to, the eBay Partner Network.

couple quick ?? before i pull the trany

HT413

Semi Pro Bowler
Local time
5:27 AM
Joined
Jul 5, 2012
Messages
5,317
Reaction score
5,331
Location
New Jersey
Pulling my 727 from my 69 belvedere to swap the converter. So i pulled the driveshaft, my exhaust (it just dumps before the diff, so it was a piece of cake), cable shift linkage, trans cooler lines, NSS harness, and speedo cable. Oh, and i removed all 4 converter bolts.

Right now i have a bit more than 18" clearance from pan to garage floor using my 10,000lb jack stands, the rear tires are on ramps. Extra jack under the k frame. I strapped the trans to my jack, thinking that might keep it in place (jack has a 8"x 12" flat platform).

Anything i'm missing before i pull the trans?

Any tips to make it as easy as possible?

Just gonna swap the converter under the car and bolt it all back together.

Thanks a bunch.
 
HT- Can you take some pics and post them? I'm planning on swapping my 727 to an 833 and will have to do the same as you. Wondering how much working room that will really give. Thanks.
 
Yes before you put the trany back in ,I would get 2 bolts 3/8' x 5'' long, cut the heads off the bolts , take a hack saw put the bolts in a vice and make a slot on the end so you can use a screwdriver to remove them ,they will be your guide bolts,thread them in the block one on the left and one on the right,the trany will slide in much better.Make sure you fill the converter with about a quart of fluid,last the converter only bolts up one way, check the bolt pattern before you put it back in ,it will save a lot of time. Rich
 
Also before you slide the converter off, measure the distance from the converter/flexplate bolt pads to the trans bellhousing mounting face. When you slide the new converter on it will at first feel like it's bottomed out, but you will need to rotate it back and forth until it "drops" into place. Check your measurement, if it is the same as before your are done. If not the same you don't have it seated all the way. Hope this makes sense.

As Rich said, the flexplate to converter bolt pattern will only bolt up one way.
 
Thanks fellas, i would never have guessed that about the converter bolting up only 1 way. You guys saved me at least an hour or more of wrestling, cursing and thinking i have the wrong converter. And I'll be sure to measure the clearance for sure.

That's why i became a gold member here - every time one of you guys helps me out it more than pays for itself.

Hey NJRR, sure, i'll be sure to post some pictures for ya and tell you all the ways i end up making more work for myself so hopefully you can learn from my mistakes(because i never seem to). :icon_neutral: :grin:

Btw, richey, i had a local old school mopar guy look at those 915's and he loved them. He gave me the name of a reputable machine shop locally and after we recover from the holidays they should be ready to bolt on.
 
It will drop twice. The other thing I have found to make it easier is once you have it lowered, slide it onto a piece of cardboard. Otherwise, the bellhousing seems to get much larger than the space available...oh and drain it, and place an old yoke in the output, or tie a bag on it.
 
Look at the flex plate and you will see a little pinhole. On the torque converter you should have a drain plug. Put them opposite of each other and your bolts will line up.
The bolt idea is a life saver trying to line things up also.

Yes before you put the trany back in ,I would get 2 bolts 3/8' x 5'' long, cut the heads off the bolts , take a hack saw put the bolts in a vice and make a slot on the end so you can use a screwdriver to remove them ,they will be your guide bolts,thread them in the block one on the left and one on the right,the trany will slide in much better.Make sure you fill the converter with about a quart of fluid,last the converter only bolts up one way, check the bolt pattern before you put it back in ,it will save a lot of time. Rich
 
Before you drop the trans,take a rattle can of paint,shoot a spot on whatever 'vert bolt you can see.Make the "spot" so it shows on the 'verter & flywheel.
Also,it's a good idea to "scribe" the the side of the trans bell housing to indicate where the flywheel is in relation to the bell.
I also cut an area of the bottom of the bell to be able to rotate the engine while installing the converter bolts.:grin:
 

Attachments

  • 3.21.12 (41).JPG
    3.21.12 (41).JPG
    87.6 KB · Views: 276
  • 3.24.12 (15).JPG
    3.24.12 (15).JPG
    116.8 KB · Views: 297
  • 3.26.12 (10).jpg
    3.26.12 (10).jpg
    127.5 KB · Views: 280
  • IMG_6496.jpg
    IMG_6496.jpg
    111.7 KB · Views: 299
Hey NJRR, sure, i'll be sure to post some pictures for ya and tell you all the ways i end up making more work for myself so hopefully you can learn from my mistakes(because i never seem to). :icon_neutral: :grin:

Thanks HT. I'm sure I'll make plenty myself. Only way I really learn :D
 
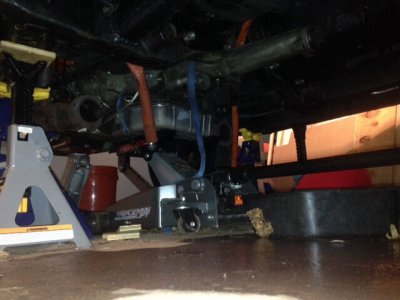
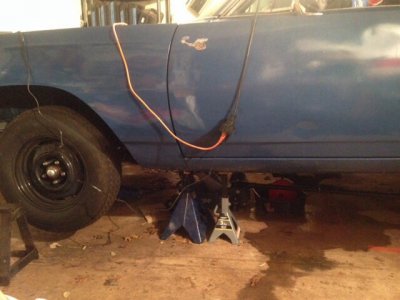
Here are a few pics of the work I've done so far. I have a few more to post, will do that tomorrow. Btw, the fluid on the floor is water, not ATF. some snow melt got in - just enough to be a pain.

Lol, well, thank to HEMI-ITIS and his clean as heck garage floor and tranny, my pics look like hell in comparison, but here are a few.

NJRR, the job went smoothly so far. I jacked it up so I have about 18" from floor to bottom of the rocker. Top tranny bolts were a pain and the front cooler line just didn't want to get out of the way, but other than that, it went smoothly. For the top bolts, the clearance around the bolt head wasn't sufficient for my speed wrenches (though I think a higher quality set would require much less clearance than my el cheapo's) and I couldn't attack them from below with a ratchet, so I had to use an open end wrench to loosen like 1/8 turn at a time then work my hands in to hand loosen the rest of the way. I just made sure the tranny was jacked up a bit to take the tension off the bolts and to assure nothing settled and somehow crushed my fingers unexpectedly.

Then I slid the tranny a couple of inches toward the rear of the car and lowered it down - plenty of room to remove the converter. Tomorrow I plan on mocking up the new converter on the flex plate to get its orientation right and then I'll install it and button it up.

The large blue 10,000lb stands are supporting the weight, with the smaller 3 ton stands set in and shimmed with some wood as a backup. The rear wheels are on ramps to get the car back near level.
 
image.jpgimage.jpg

- - - Updated - - -

I would replace the seal, But that's just me. :eek:ops:

Good point. I have one just forgot to mention it.
 

Attachments

  • image.jpg
    image.jpg
    80.7 KB · Views: 256
If you had to take the trans out all the way,you have to take it off the jack to clear the car and sometimes when it's real tight you have to lift the tailshaft up a little to get it out from under the car!!
I have to drop the exhaust also because of the "X" pipe:icon_eyes:

- - - Updated - - -

2 top bolts I can get from the top:blob1:
 
HT- Thanks for the update. I'm taking notes. I like the backup jack stands, very smart. What are the blue and red things hanging near the floor jack? Straps holding something up?

Here are a few pics of the work I've done so far. I have a few more to post, will do that tomorrow. Btw, the fluid on the floor is water, not ATF. some snow melt got in - just enough to be a pain.

Lol, well, thank to HEMI-ITIS and his clean as heck garage floor and tranny, my pics look like hell in comparison, but here are a few.

NJRR, the job went smoothly so far. I jacked it up so I have about 18" from floor to bottom of the rocker. Top tranny bolts were a pain and the front cooler line just didn't want to get out of the way, but other than that, it went smoothly. For the top bolts, the clearance around the bolt head wasn't sufficient for my speed wrenches (though I think a higher quality set would require much less clearance than my el cheapo's) and I couldn't attack them from below with a ratchet, so I had to use an open end wrench to loosen like 1/8 turn at a time then work my hands in to hand loosen the rest of the way. I just made sure the tranny was jacked up a bit to take the tension off the bolts and to assure nothing settled and somehow crushed my fingers unexpectedly.

Then I slid the tranny a couple of inches toward the rear of the car and lowered it down - plenty of room to remove the converter. Tomorrow I plan on mocking up the new converter on the flex plate to get its orientation right and then I'll install it and button it up.

The large blue 10,000lb stands are supporting the weight, with the smaller 3 ton stands set in and shimmed with some wood as a backup. The rear wheels are on ramps to get the car back near level.
 
HT- Thanks for the update. I'm taking notes. I like the backup jack stands, very smart. What are the blue and red things hanging near the floor jack? Straps holding something up?

The blue strap is a ratchet strap that I used to strap the trans to the jack platform. I figured the trans might overbalance once I took the converter off so I just took the precaution- though I don't think it was necessary. The red things are my speedo cable (driver side) and the shifter cable (passenger side). Previous owner ran them inside the red fiberglass insulation sleeve so I just left it like that.

Yeah, regarding the backup jacks, a guy I knew was killed a few years back when he was crushed by his truck, so I always triple up - I also had a backup jack under the k-frame lol. I know, kinda nuts. I figure if the house came down, safest place is under the car lol.

- - - Updated - - -

If you had to take the trans out all the way,you have to take it off the jack to clear the car and sometimes when it's real tight you have to lift the tailshaft up a little to get it out from under the car!!
I have to drop the exhaust also because of the "X" pipe:icon_eyes:

- - - Updated - - -

2 top bolts I can get from the top:blob1:

Yeah, glad I didn't have to take the trans out from under the car, I'd have had to jack the car way up.

Hey, is there a certain wrench or trick to making those bolts easier to deal with/ faster? Those were the biggest pain of the whole job for me (so far).
 
Ok, got er back together. Thanks for the help, fellas.

NJRR - here's a couple more things I learned...

I did need that ratchet strap (or to just be more careful). While maneuvering it back into place, the tranny almost came off the jack, not even sure how this happened, as I 'thought' I was being careful. I needed the spare jack to get it back on. I didn't empty the fluid completely and when it slid, it tipped a bit and dumped a quart or two of trans fluid out of the dipstick hole and onto the garage floor.

While tightening the 1st converter bolt (with the other 3 hand tightened), the bolt pulled the converter closer to the flex plate. That made the other 3 bolt heads contact the engine block. So I had to loosen up the one I just tightened and push the converter back into the trans a bit, then hand tighten each one a lot tighter before I could wrench tighten any of them.

I found that cranking the motor with a breaker bar and 1-1/4" socket on the crank bolt was the easiest way to access the other converter bolts. As the other guys mentioned, the converter only bolts one way, so it took a few attempts to get it right. I loosened the spark plugs to make it easier.

Those 5" bolts that rich mentioned up above - for my car 2.5" bolts worked better. They were the perfect length to help guide the trans into place, but were short enough for me to get a shorty screwdriver onto them without the trans tunnel getting in my way. In fact, I lubed those threads and didn't even need the screwdriver to take em out. I only took em out after the top 2 bolts were in place.

Also, I found that I had to lift the converter a little to get it to seat into its final position.

Hope this helps! Sorry for no photos, but I was pretty stressed when the trans almost came down and just bolted the thing up ASAP.

Thanks again, fellas.
 
Good job HT. Just goes to show that when it comes to safety, redundancy is a good thing. I'm going to refer back to this thread when I start on mine. Thanks.
 
The blue strap is a ratchet strap that I used to strap the trans to the jack platform. I figured the trans might overbalance once I took the converter off so I just took the precaution- though I don't think it was necessary. The red things are my speedo cable (driver side) and the shifter cable (passenger side). Previous owner ran them inside the red fiberglass insulation sleeve so I just left it like that.

Yeah, regarding the backup jacks, a guy I knew was killed a few years back when he was crushed by his truck, so I always triple up - I also had a backup jack under the k-frame lol. I know, kinda nuts. I figure if the house came down, safest place is under the car lol.

- - - Updated - - -


Yeah, glad I didn't have to take the trans out from under the car, I'd have had to jack the car way up.

Hey, is there a certain wrench or trick to making those bolts easier to deal with/ faster? Those were the biggest pain of the whole job for me (so far).

Which bolts.the top 2 bell bolts or the converter bolts??
 
Which bolts.the top 2 bell bolts or the converter bolts??

Those top 2 on the bell housing. For the driver side I disconnected the throttle cable and moved the harness around and it was a lot easier to get my hand on it. I don't have big meat hooks, but those guys with huge hands those must be a real pain lol.
 
It's tight on top,especially with the CSI trans shield.Offset 9/16 box wrench and a 1/4 turn at a time until loose enough to use your fingers.
For the converter bolts,I use a pry bar against the opening in the bottom of the bellhousing and the teeth of the flywheel.I use the prybar or large screwdriver to rotate the engine and to hold while tightening the converter bolts with a flat 16 inch ratchet wrench for lotsa leverage.
I have NO room to get to the bolt in the front:confused2:
 

Attachments

  • 3.26.12 (10).jpg
    3.26.12 (10).jpg
    127.5 KB · Views: 148
  • 3.29.13 014.jpg
    3.29.13 014.jpg
    154.5 KB · Views: 170
  • 6.12.12 025.jpg
    6.12.12 025.jpg
    111.3 KB · Views: 199
Auto Transport Service
Back
Top