• When you click on links to various merchants on this site and make a purchase, this can result in this site earning a commission. Affiliate programs and affiliations include, but are not limited to, the eBay Partner Network.

Damper Mark

I agree.
You know, another thread somewhere brought out a problem of timing tape not staying on the damper. He was looking for a way to degree the damper other than timing tape. I wonder if when using timing tape, if one were to go over it with one wrap of that clear Gorilla packaging tape, might it last?

Might have to do with the surface prep? Mine was freshly painted and cleaned with thinner, over 6,000 miles on it so far.
 
This should really be check during the build while indexing the cam so #1 top dead can be checked for proper location on the dampner timing mark. If they do not line up find another dampner that is correct. I find it silly to try referencing the dampner to any location at the distributor. A change in distributor timing doesn't change dampner to piston alignment.
 
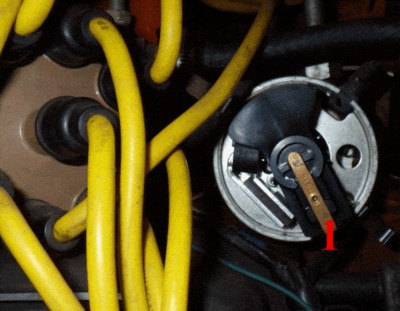
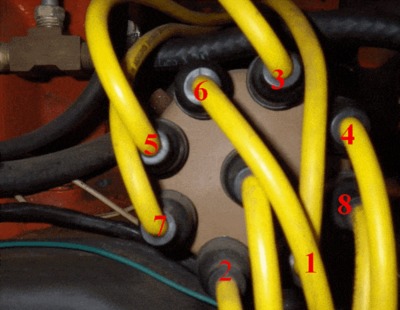
This what I am seeing now. With the line on the damper lined up with 0 on the timing tab, the rotor is pointing at the port on the distributor cap two spaces away from the one marked 1 by the manufacturer.

tdc_zpszup1hswv.jpg
 
Like mentioned location of where #1 ends up on the cap means nothing, put #1 wire where the rotor is and continue the firing order from there. I set the positioning with the balancer closer to where you want your initial though, smoother start up.
 
Rotate all 8 plug wires counterclockwise 2 spots.
 
Right now there's no wires on the engine. I was just wanting to make sure I got 1 in the right spot. :)
 
Right now there's no wires on the engine. I was just wanting to make sure I got 1 in the right spot. :)
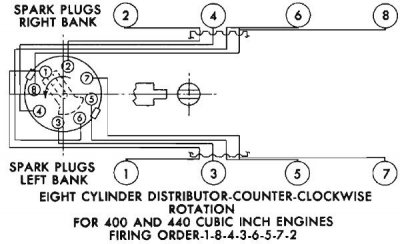
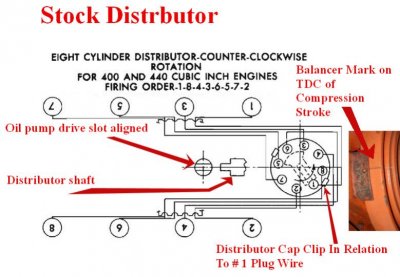
Are you using a stock distributor? If so, pull the distributor out and look at the oil pump drive slot. To get a stock distributor in the correct location the slot needs to be straight forward and back. As said before an aftermarket distributor may have a different index. That will cause #1 to be in an other than stock location. You'll start with where the rotor points for #1 and follow the order CCW around.

Mine uses the stock type distributor............

CapRemoved.gifCapInstalled.gif
 
Number 1 can be anywhere like said, but I always put it in the factory location.

Make sure your at tdc compression stroke, make sure the slot on top of the oil drive gear is parallel with the cam, drop in the distributor so the rotor is pointing towards the alternator, and your done.

image.jpg
 
Rotate all 8 plug wires counterclockwise 2 spots.

It won't run if you do that unless you have enough adjustment to rotate the distributor that far, #1 has to be where the rotor is when at 10-20 btdc.
 
Lol, if it helps!

As far as the dist housing, no matter what dist your using, need to decide where the advance 'can' will be located once the dist is down. You need clearance around it, to be able to rotate the housing to set the timing. That's also were the lug on the cap going on one way comes into play.
 
Okay... Redneck tech works! I made a squeaky gauge and the gauge started squeaking as the damper approached the mark on the damper, stopped when the mark was about 15 degrees away, and then started up again once the mark had passed, so I guess that cut is the TDC mark. And the rotor at that point is pointing at about the 1/2 position on Daves69's photo. :)
 
Just for grins...looking at the point where your rotor is. It can be changed to where you want, or need it.

Like some have said, with the dist out, looking at the drive gear and the slot for the dist shaft to fit into. If the rotor needs to be moved, pull that drive gear up, and rotate it a tooth. Normally the slot in the drive gear lines up with the cam line.
Even if the drive gear needs to be rotated 180, you can set things up like you want it. Don't forget the bottom end of the drive gear works the oil pump via a hex end.
If you want the rotor on #1 on the cap, it CAN be done.
 
My issue is this engine has been dead for ten years, and is being installed into a different car (make, model, engine size, and year), so there are a LOT of things that can cause a no-start condition and I'm trying to eliminate as many potential issues as I can. :)
 
Using 440+6's diagram, this is what I have...................................

image.jpg
 
Auto Transport Service
Back
Top