• When you click on links to various merchants on this site and make a purchase, this can result in this site earning a commission. Affiliate programs and affiliations include, but are not limited to, the eBay Partner Network.

Gerst/QA1 susp install with the motor in the car

dvw

FBBO Gold Member
FBBO Gold Member
Local time
4:00 PM
Joined
Feb 16, 2010
Messages
8,140
Reaction score
14,328
Location
waterford mi
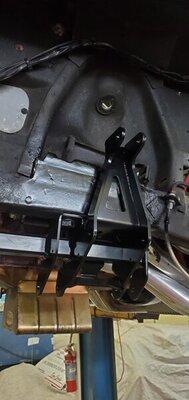
Doing a install QA1. Decided not to pull the motor and trans. Took every thing off except the K frame. Supported the trans with a large (1" diameter) tent stake. The lower and upper bump stop brackets must be removed. I cut them with a torch. Then ground off the remaining areas near the spot welds. Supported the engine with a trans jack. Removed the motor mount bolts to the K frame. Pulled 4 frame bolts. Removal went smoothly. Installed the new QA1 part without issue. The new K positions the motor back 1.5". Had to figure out how to pull it back. Two ratchet straps working a little at a time got it done. Started all the new mount bracket bolts. Finished pulling it into position. Engine and headers fit. Trans shield is pretty close to the floor in one spot. Al little hammer work took care of it. Next the trans crossmember and mount.
Doug

20211115_181927.jpg
20211115_142024.jpg

16994.jpeg

20211116_184501.jpg
20211116_184513.jpg
 
Last edited:
Do all of the QA1 k-members move the engine back that far? I was unaware of that, thought the engine was in the stock location
 
Doing a install QA1. Decided not to pull the motor and trans. Took every thing off except the K frame. Supported the trans with a large (1" diameter) tent stake. The lower and upper bump stop brackets must be removed. I cut them with a torch. Then ground off the remaining areas near the spot welds. Supported the engine with a trans jack. Removed the motor mount bolts to the K frame. Pulled 4 frame bolts. Removal went smoothly. Installed the new QA1 part without issue. The new K positions the motor back 1.5". Had to figure out how to pull it back. Two ratchet straps working a little at a time got it done. Started all the new mount bracket bolts. Finished pulling it into position. Engine and headers fit. Trans shield is pretty close to the floor in one spot. Al little hammer work took care of it. Next the trans crossmember and mount.
Doug

View attachment 1194588View attachment 1194589
View attachment 1194594
View attachment 1194597
View attachment 1194596
What front shocks will you be using. Also will cut out old shock towers.
 
QA1 coil overs that come in the kit. The inner towers remain stock. The third pic shows the new upper shock mount. This is a customer car, not mine.
Doug
 
My qa1 k member moved the engine back also. Great time to switch over to a motor plate.
 
That is odd, Doug which part number did you get? Did it specify that the motor would relocate?
Mine appears to be in the original position as the trans mount is stock. Wish it would have moved it back to give me more clearance at the radiator.
 
I'm pretty sure if you swap the mounts side to side it would put the motor pretty close to the original location. The owner want it back. Car is a 64 Fury.
Doug
 
The original trans crossmember had been previously modified to use what appears to be a Chevy style mount. Got that all cut off and decided to use the existing mount. The new engine posistion required the mount to be sunk into the crossmember . Some cutting and welding took care of it. The exhaust was close to the torsion bar crossmember. A little heat and hammer work allowed it to fit as well. Now onto the rest of the assembly.
Doug

17109.jpeg
17110.jpeg
17112.jpeg
17129.jpeg
 
Went To finish it up. The 8 spacers for the control arms are missing. They're coming, hopefully today. QA1 only sells power racks with the kit. So if you want the drag race kit with heims they give you a source (Speedway) for a manual rack. However QA1 failed to tell my customer that the lower U-joint at the rack is different. And QA1 doesn't source it. So he had to find it on his own. Put all the Will Wood brakes together. We now have to spindles with rotors, calipers and pads attached. The steering column has been removed to install the lower column bearing and tig weld the upper U-joint to the shaft.
Doug
 
Good info for anyone doing this swap. Can you let us all know what and where you or him found the u joint. All info is good thanks dvw.
 
It's been a few days since this project was finished. QA1 only sells this kit with a power rack. If you want a manual rack they give you a part number from Speedway Automotive. However they don't tell you the lower U-joint to the rack is different. So the supplied U-joint is wrong. Nice to find out in midstream. Also the rack mounts in different holes in the K frame. The drivers hole breaks into the power rack hole. So the original hole was welded up first. Both racks need the inner tie rods removed and extensions installed to compensate for track width. The rest of the parts bolted on without any real issues. A few burrs, thread cleaning, etc. Not much in the line of instructions as to which size bolts and spacers go where. But you can figure it out. The only welding besides the trans crossmember is the U-joint to the factory column. The column must be removed and disassembled to install the lower shaft bearing. I suggest getting it tig welded. Had a buddy do it for me. They don't mention cutting the factory steering shaft. It'll fit but the U-joint angles would be better if it was shortened. It was left long as other headers will be installed with a different motor later. Easy to change. One simple trim and weld. The part I don't like. I'm not convinced the bump steer is correct. to get the tie rod and lower control arm parallel it took nearly double the tie rod spacer. I tried contacting both Carl Gerst and QA1. So far I've received no real answer. Just that the alignment needs to be set on the ground and caster/camber need to be set first. While I agree with this the amount of bump steer with the kit spacers seemed way out of wack. At home there is no way to measure caster. How ever the heims were screwed in the suggested 3 threads showing. In my day I've done over 3000 alignments. There isn't a ton of caster offset with the cams in the same position side to side. To get the arms parallel it took 2 5/16" worth of spacer vs the 1" supplied in the kit, along with a longer bolt. We used grade 8. All of the supplied hardware is grade 5. Look at the difference in the angles in the left and right pics below.. So we'll see when it goes on the alignment rack. Also the 350 lb springs supplied the front end is extremely stiff. The drag race option was ordered. The springs were installed with no preload on the coil overs. My bet is that'll need a way softer spring. So at close to $4500 for the kit and 25hrs+ to install. Good thing I don't charge shop labor. It's still pretty expensive. This includes modifying the trans crossmember, building the Will wood brakes, R&R the column to install the lower bearing. Antisieze, locktite, correctly torqueing all parts. Personally I'd run the stock stuff.
Doug

17380.jpeg
17381.jpeg
 
Last edited:
Great install dvw. Thanks on all the heads up needed to make something like that fit.
 
This is a customer car, not mine.
Doug
Glad to hear that. At first I thought you were cutting up your beautiful car.
 
Glad to hear that. At first I thought you were cutting up your beautiful car.
And speaking of your car would like to know how your engine is coming? Curious minds (or nosey) needs to know.
 
And speaking of your car would like to know how your engine is coming? Curious minds (or nosey) needs to know.
The one in my Super Bee? Got it back together and put about 20 miles on it before the roads got salted......
 
Auto Transport Service
Back
Top