• When you click on links to various merchants on this site and make a purchase, this can result in this site earning a commission. Affiliate programs and affiliations include, but are not limited to, the eBay Partner Network.

Getting ready to install six pack......any tips?

You were one of the few near as I can tell. Were those OEM or the Holley aftermarket?

OEM, I think.

You could sand the 266 throttle plates and bores to keep them from sticking, or just buy the 199 throttle plates.

Some guys would shift the throttle plates around on the throttle shafts to have air movement to help the WOT transition.
 
OEM, I think.

You could sand the 266 throttle plates and bores to keep them from sticking, or just buy the 199 throttle plates.

Some guys would shift the throttle plates around on the throttle shafts to have air movement to help the WOT transition.

You could sand the 226 throttle plates

Fixed it !:poke:
 
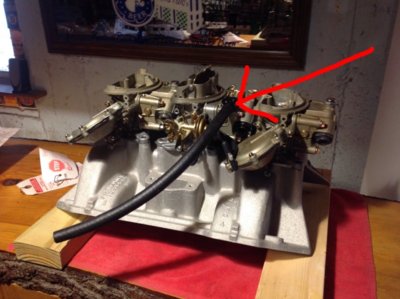
Can someone tell me what this hose is for and what it connects to ? man I wish this six pack came with some instructions ....

image.jpeg
 
On a ’71 center carb, or a new reissue carb as that one appears to be, that is the enclosed bowl vent valve hose, would have connected a three-nipple breather cap on the passenger valve cover. Part of the evaporative emission recovery system in ’71 and '70 California spec cars. If you are not running the correct breather, remove the hose and leave the port open to the atmosphere to retain a functional idle bowl vent.
On your ’72, if your original ’72 evaporative system is still intact (Charcoal Canister), there is a nipple labeled “Bowl vent” that you would connect it to, will require a longer 3/8” hose.
DSC07104.JPG
 
Last edited:
The factory used bolts for that application for a reason. If you are running the factory style fuel lines on those carbs, you will find servicing/removing the carbs will be easier if the carbs don’t have to lift up off studs. That said, on other single carb aluminum manifold applications, still never had the studs back out with clean threads. Double nut the stud going in, snug it up if you still have concerns.
 
I used studs. Nothing on the threads. Just a soft hand tight. Factory fuel lines were a pain. I went to braided #6.
 
I’ve heard some folks struggle with the factory fuel lines. I’ve never an issue with factory, quality repos, or decent factory style DIY fabricated flare-nut lines back in the day when the fuel lines were a non-serviceable part and could not be purchased from Chrysler parts, there were no reproductions then. In the seventies you could buy new carbs, manifolds, all hardware needed except the fuel lines over the dealer parts counter. Aftermarket fuel line options were far more limited than today.

I suspect most problems experienced could be avoided if a specific disassembly procedure is followed. Once initially assembled and tightened up, to disassemble, start with the flare-nut at the rear carb line to rear tee, use a 9/16” open ended wrench the stabilize the tee fitting, remove the rear carb, leave the flare-nut to bowl adaptor alone. Loosen the the rear tee to forward tee line, at the forward tee, remove center carb. Again, if there is no need, don’t mess with the bowl adaptor flare-nut fitting for carb removal. Next, remove fuel supply line to forward flare-nut, remove the front carb. Once more, this depends on the use of bolts rather than studs at the center and rear carbs as they need to shift rearward slightly to clear flare-nut fitting on disassembly.

Example of DIY lines fabricated from parts store fittings and straight lines using slightly some modified hand tools, circa 1976. This picture also shows the use of several other non-original easily obtainable, at that time, factory replacement parts. Note the call outs on the valve covers and cruise control.
Scan15.jpg
 
Last edited:
Auto Transport Service
Back
Top