• When you click on links to various merchants on this site and make a purchase, this can result in this site earning a commission. Affiliate programs and affiliations include, but are not limited to, the eBay Partner Network.

Heater box resto

Did you paint all the parts after cleaning off the rust? If so, what paint did you use? Did yours look like this one before you started? View attachment 772652

Yup used something called evaporust safe nontoxic and reusable. Then paint, you can use Seymour or Dupli color stainless steel paint color spray paint. I had mainly surface rust with minor pitting.
82497DA8-0566-477E-9EE5-38B8C410A078.jpeg
 
AFAIConcerned it was bare steel for 50 years and barely rusted. I just wiped mine down with gun oil and it will be good until well after I'm dead!
beerestoration2015-2016 715.JPG
 
Thanks!!
My OE insulation pad had another separate cardboard layer between. The heaterbox has never been out before.

Also a non AC car, only from 68.
 
AFAIConcerned it was bare steel for 50 years and barely rusted. I just wiped mine down with gun oil and it will be good until well after I'm dead!
View attachment 772748

Great job on this!
Did you have bits of cracking or cracks to fix and if so what did you do?
Mine has a few that seem fairly minor but I'd say my box overall is pretty rough. Lots of screws had completely rusted out heads made it tough to get apart! The baffles seem fairly rough to.
I'll clean it tomorrow and have a good look.
IMG_20200425_160727.jpg
IMG_20200425_180807.jpg
 
Great job on this!
Did you have bits of cracking or cracks to fix and if so what did you do?
Mine has a few that seem fairly minor but I'd say my box overall is pretty rough. Lots of screws had completely rusted out heads made it tough to get apart! The baffles seem fairly rough to.
I'll clean it tomorrow and have a good look.
I didn't have to fix the heater box, but it's made out of the exact same material as the Ramcharger air box and this works good and is even brown when cured... both the heater box and Ramcharger/Air Grabber hood boxes are dark Brown, not Black like most think.
beerestorationfall2018 165.JPG
 
Thanks I'll try this stuff.

I've done a first clean with just soap and water on my heater box.
What do you use to get the rust stains out our at least reduced?
Should I clear coat the whole thing?
I may look for some replacement guts...
Need a plastic grille cover on passenger side and some of the interior metal is fairly bad
IMG_20200426_210020.jpg
IMG_20200426_205951.jpg
IMG_20200426_205816.jpg
 
Kevin:

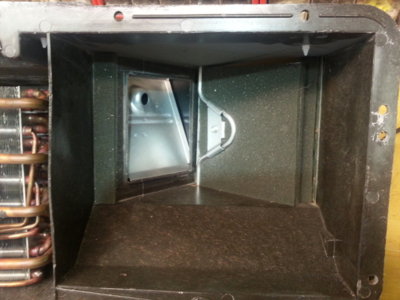
Here is what I did. I put the outer case halves of mine in the bathtub, cleaned with soap and water first (after I gutted it). If that didn't get it clean, use something a little stronger. I then put mine in a blaster and adjusted, if need be adjusting the air pressure. I was fortunate enuf that my friend had crushed walnut shells to use. Then I put light coats of just some clear to get the desired look almost like original. I took all of the metal pieces apart, blasted them, and sprayed them with Rust-oleum silver. Then reassembled using new gaskets and heater core. I checked heater core for leaks even though it's new simply because I don't want to do it again :praying:. Even though no one will see it, I guess my OCD was satisfied.
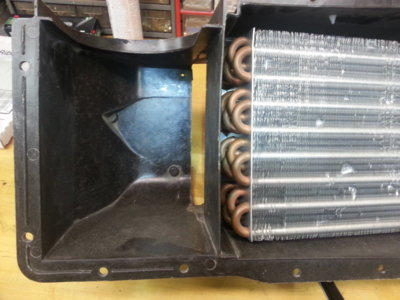
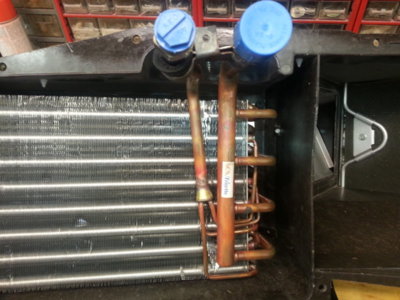
20150117_150430.jpg 20150117_150437.jpg 20150117_150448.jpg 20160725_174227_zpsgm7nzehk.jpg 20160725_174238_zpsolpzgvui.jpg
 
Kevin:

Here is what I did. I put the outer case halves of mine in the bathtub, cleaned with soap and water first (after I gutted it). If that didn't get it clean, use something a little stronger. I then put mine in a blaster and adjusted, if need be adjusting the air pressure. I was fortunate enuf that my friend had crushed walnut shells to use. Then I put light coats of just some clear to get the desired look almost like original. I took all of the metal pieces apart, blasted them, and sprayed them with Rust-oleum silver. Then reassembled using new gaskets and heater core. I checked heater core for leaks even though it's new simply because I don't want to do it again :praying:. Even though no one will see it, I guess my OCD was satisfied.
View attachment 942635 View attachment 942636 View attachment 942637 View attachment 942638 View attachment 942639

Thanks for the input!
Cleaned up the outer case and it could use more. Are you saying you blasted the fibreglass shell with walnut? I could do that, was just worried about damage.
My interior guts may need replacing even, at least a few of the pieces that are quite bad.
 
yes, I used crushed walnuts because I didn't know if sand would hurt it or not, wanted to be cautious. It was literally not bad when all said and done
 
None are being repopped that I know of. Have to look for used. I determined and came to conclusion that mine worked still by using a small amount of air on a little hand pump, saw them move, and even felt a little vacuum action. Then I cleaned the pods, painted, and reinstalled
 
I didn't have to fix the heater box, but it's made out of the exact same material as the Ramcharger air box and this works good and is even brown when cured... both the heater box and Ramcharger/Air Grabber hood boxes are dark Brown, not Black like most think.
View attachment 941743

Do you think I can use the JB filler to fix this chunk missing? It is not visible once the grill is installed but as it sits I can't use that for fastening the grill too.
I envisioned putting a plate on both sides and fastening through that but curious if you think this JB weld would fix my problem?
 
I built entire sections for my ramcharger box that the battery acid ate, I can't see why not! You didn't post a picture of this "chunk" but a few lines of draft seal putty, some wires to reinforce and the JB and you can build anything..
 
I built entire sections for my ramcharger box that the battery acid ate, I can't see why not! You didn't post a picture of this "chunk" but a few lines of draft seal putty, some wires to reinforce and the JB and you can build anything..
Screenshot_20201031-154628.png


What does the draftseal putty do?
Tips are appreciated!
 
Read through the Ramcharger box section in my restoration thread. Draft seal, on wax paper, makes a good mould to retain the JB while it cures. You have to get creative to fill the void while keeping the JB the correct shape and the thickness of the original material.
 
So, I'm reading this thread with interest. Just got my 70 Charger 500 on Monday. Survivor unrestored Florida car, heater core unhooked. Before I hook it up and bathe my interior in coolant (was it unhooked because it's Florida? Or because it leaked?), I think I'll pull my box and check components. The Charger is factory a/c, buckets and console. How major of a surgery am I in for, to remove this thing? Is it really 5 bolts, cables, and out? Or is the console going to throw me some new curve balls? I'm not worried about the rebuild process...just the rubiks-cube movements required to actually get it out of the car!

Great photos - I'll definitely use them for reference :)
 
Auto Transport Service
Back
Top