• When you click on links to various merchants on this site and make a purchase, this can result in this site earning a commission. Affiliate programs and affiliations include, but are not limited to, the eBay Partner Network.

Interior refresh for a 64 Fury wagon

The new carpet kit has some insulation on the back, but it's only in places and not as thick as the original stuff. So I decided to get a roll of under carpet padding/insulation that included the foil on one side for additional heat shield.

IMG_2980.JPG
 
So, the boys and I went over to my buddy's place to install the insulation and we got quite a bit done.
I have to say though, that stuff was a challenge. It was tough to cut and molding it was no walk in the park, but as with most things, the more we worked on it, the more we figured out. I sent a photo to another one of my buddies and his response was "Why is the carpet grey!?"

IMG_3385.JPG
IMG_3387.JPG
IMG_3389.JPG
 
I also bought new weather stripping to install since the original stuff was completely shot. I was hoping to get original looking stuff that has the sewn look on the windlace, but found that it's only available from a few sources online and was pretty expensive. I'm doing this all on a tight budget, so I went with all black, which I was able to source locally for a fraction of the cost.

IMG_3391.JPG
IMG_3390.JPG


It'll work for the time being. I can always upgrade it in the future.
 
After we got the insulation in we started with the carpet. Since it's molded it was much easier to get to the areas it needed to be, but it also required lots of cutting and trimming. Fortunately the actual carpet was MUCH easier to cut than the insulation was.


IMG_3396.JPG
IMG_3395.JPG
 
Nathaniel was a big help, as usual. I'm glad we are able to do these projects together. I think it will be neat someday when the Fury is his that he will be able to tell folks that he helped put the interior in this car when he was 11.

IMG_3392.JPG
IMG_3394.JPG
 
Looks fantastic. I may go with the rubber weatherstripping also. I'm also going to do the rubber floor mats. Since my wife wants it as a beach car it will be easier to clean than carpet.
 
Yeah, it was pretty gross. Some mice got in the car at one point and decided to make a mouse condominium under the back seat. I didn't take a photo of it, but it wasn't very pleasant.
 
Looks fantastic. I may go with the rubber weatherstripping also. I'm also going to do the rubber floor mats. Since my wife wants it as a beach car it will be easier to clean than carpet.
Thank you. The black weatherstipping doesn't flow with the rest of the interior color wise, but it doesn't stick out like a soar thumb either, so it will do for now. It's SO much better than what was in there. It was pretty much shot after 56 years.
The black stuff will look right at home in your wife's car since it's black.
 
I decided to upgrade the seatbelts too. This car originally came with two seat belts. One for the driver and one for the front passenger. A nine passenger car, two seat belts. Those were the days.
When my Dad bought the Fury from Grandpa in 1987 one of the first things they did was go to a local wrecking yard and buy seat belts. I remember the one and only trip I took in the Fury before the "new" belts were installed. I was 6 years old, and I was riding in the back seat (not the way back) and I kept standing up to see things. I thought it was so neat that I could move freely. Of course my Mom kept telling me to sit down...
The belts that Dad and Grandpa installed were black 1980's era GM retractable lap belts. Although they work fine, I am going for more or a stock look for the Fury and decided to go with these instead of reinstalling the black ones.

IMG_2972.JPG
IMG_2973.JPG
 
Time to get the seats installed. The back seat was a cinch.

IMG_3562.JPG
IMG_3564.JPG
IMG_3570.JPG


The front seat was fun getting in there, and once we got it lined up with the holes for the frame we realized we had another issue. Between the insulation we installed, the insulation that was on the back of the carpet AND the carpet, the back stud for the seat frame wouldn't go through the floor far enough to get the nut on!
clip_image001.png

So, after pulling the carpet back carefully and reaching back in there with a utility knife I was able to cut some of the insulation out of the way. It was enough on the drivers side, but just shy on the passenger's side. I was trying to figure out what to do next when I had an idea. I asked Caleb and Nathaniel to sit in the front seat. Their combined weight was enough to squeeze everything together and poke the stud just far enough through the hole so that I could get the nut started! :whew: Finally I got everything bolted in like it's supposed to be.

IMG_3576.JPG
IMG_3573.JPG
IMG_3567.JPG


Got the rubber grommet around the high/low beam switch installed, tidied up some other odds and ends and stood back to admire our work.

Of course now that all of the fun is over, it's time to clean up. Caleb helped carry all of the scraps out to the truck.

IMG_3565.JPG
 
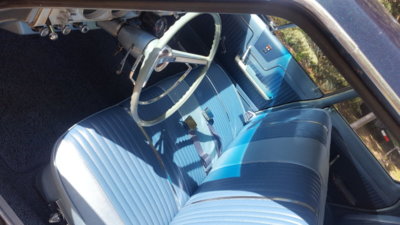
Dead on clone to my wagon interior. I added seatbelts all around as well.

Those legendary seat covers are extremely comfortable and well made.

20190511_154809.jpg
 
Wow Matthon, they are identical!
I haven't had much seat time in the car yet, but what I have has been great. These seats really are comfortable. I can't believe how much of a difference there is between the old and the new!
 
I mentioned earlier in the thread that I had the sun visors recovered. Here's how they looked after they came back from the upholstery shop:

IMG_4069 (Medium).JPG
 
I thought I had a photo of Nathaniel re-installing them, but I can't find it anywhere. Regardless, they are in the car now and look very nice.

IMG_3906.JPG
IMG_3909.JPG
 
Thanks Timmayy. There's still some little odds and ends to work on plus the rear wheelwell project, but it's really turning out well.
 
Auto Transport Service
Back
Top