You are using an out of date browser. It may not display this or other websites correctly.
You should upgrade or use an alternative browser.
You should upgrade or use an alternative browser.
Need 1971 4-speed linkage help
- Thread starter rog_allen
- Start date
- Local time
- 9:38 PM
- Joined
- Jan 14, 2009
- Messages
- 2,070
- Reaction score
- 1,630
- Location
- Shoreline, Washington
rog_allen
Well-Known Member
Thanks 72rrgtx
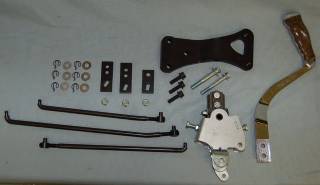
ok now it shows all sift tabs strait upwards
but 1&2 and 3&4th have 2 holes for the linkage..anyone know wich one gets used ? Top or bottom ?
Also it looks like the reverse rod gets mounted backwards with the swival on trany shift tab
ok now it shows all sift tabs strait upwards
but 1&2 and 3&4th have 2 holes for the linkage..anyone know wich one gets used ? Top or bottom ?
Also it looks like the reverse rod gets mounted backwards with the swival on trany shift tab
Snoman
Well-Known Member
use the wholes on the top of the likage arms they will give you more leverage but a longer throw, if you use the bottom wholes you get a shorter shift but it shifts harder (less leverage). I will see if i can get a pic of my tranny tonight.
rog_allen
Well-Known Member
use the wholes on the top of the likage arms they will give you more leverage but a longer throw, if you use the bottom wholes you get a shorter shift but it shifts harder (less leverage). I will see if i can get a pic of my tranny tonight.
thats great help ..thanks..i bought everything piece by piece so makes it kinda tough...
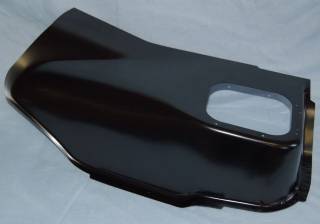
also we picked up this new tunnel for the floor and was wondering what the whole is shaped like that we need to cut out for the shifter to poke up threw?
it apears we may need to cut out some for linkage to clear too? anything and everything is very very helpful thanks
please keep in mind this is the bench seat location with the 6 inch setback mounting plate
Attachments
Snoman
Well-Known Member
no problem Rog, mine is the same as yours, it has bucket seats with a buddy seat in the middle and a 4 speed, let me know if you have any questions I could get some pics for you.
- Local time
- 9:38 PM
- Joined
- Jan 14, 2009
- Messages
- 2,070
- Reaction score
- 1,630
- Location
- Shoreline, Washington
... was wondering what the whole is shaped like that we need to cut out for the shifter to poke up threw?
it apears we may need to cut out some for linkage to clear too? anything and everything is very very helpful thanks
Place the hump on your floor, you will find it only fits the contours of the floor in one place. Trace the outline to the floor, remove hump, draw another “cut” line about ¾-1” inboard of your tracing. Plug weld the hump’s flange to the floor and seal.
Bucket seat hump with Tremec mod;
rog_allen
Well-Known Member
Place the hump on your floor, you will find it only fits the contours of the floor in one place. Trace the outline to the floor, remove hump, draw another “cut” line about ¾-1” inboard of your tracing. Plug weld the hump’s flange to the floor and seal.
Bucket seat hump with Tremec mod;

wow !!! great project !! ok now... i know what your saying about traceing and cutting out ..but mine dont seem like it should all be cut out...i dont know if im seeing yours right.. it apears that yours is a councle shift and or you use the rear shifter location on your tranny,, the hole is located behind your cross member.. please corect me if im wrong...
mine im sure the hole goes before the cross member..im useing the forward shift location with the 6 inch set back
rog_allen
Well-Known Member
no problem Rog, mine is the same as yours, it has bucket seats with a buddy seat in the middle and a 4 speed, let me know if you have any questions I could get some pics for you.
thank you once again..if you have time and it aint too much trouble any and all pics would be helpfull.. if we could see part of the shift hole from the bottom and a couple of ur linkage while your there would be greatly apreciated thanks rog
- Local time
- 9:38 PM
- Joined
- Jan 14, 2009
- Messages
- 2,070
- Reaction score
- 1,630
- Location
- Shoreline, Washington
Correct, my installation used a reproduction bucket seat floor hump, with the shifter location aft of the cross-member. An additional panel was required for the Tremec TKO-600. Yours will be ahead of the cross-member for the bench seat or buckets with the buddy seat. They were installed by the factory with a full cut-out. You may be able to get away with a smaller hole but may leave behind cavities that could trap water and debris.

More pictures here;
Project thread over on Roadrunnernest.com
More pictures here;
Project thread over on Roadrunnernest.com
rog_allen
Well-Known Member
correct, my installation used a reproduction bucket seat floor hump, with the shifter location aft of the cross-member. An additional panel was required for the tremec tko-600. Yours will be ahead of the cross-member for the bench seat or buckets with the buddy seat. They were installed by the factory with a full cut-out. You may be able to get away with a smaller hole but may leave behind cavities that could trap water and debris.

more pictures here;
project thread over on roadrunnernest.com
yes you are totaly right .. Dont need no shelves for debris or nests.... So you say to spot weld it ?? Do you mean pop holes about every 3/4 inch around it and spot weld threw the holes or just tack weld the edges ? Keep in mind my new pan is 20 guage i couldnt find 18 guage for my car..
I cant realy see an alighnment from my floor to the new pan ,,,im thinking i may have to cut a hole just big enough to mount the shifter .. Then center the new pan to the shifter. Then cut full size hole and weld pan in place ...
Also what kinda sealer did you use afterwards ?
Thanks again and what an awesome car you have there !!
rog_allen
Well-Known Member
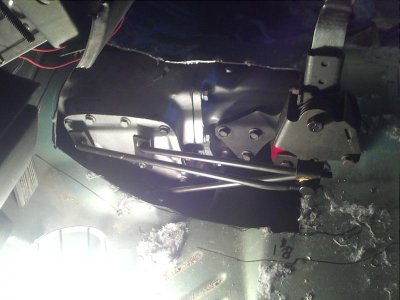
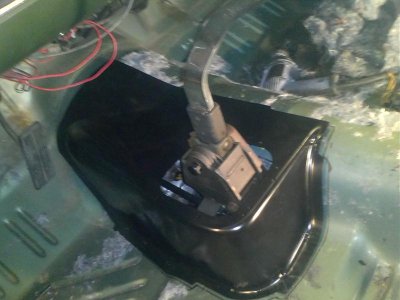
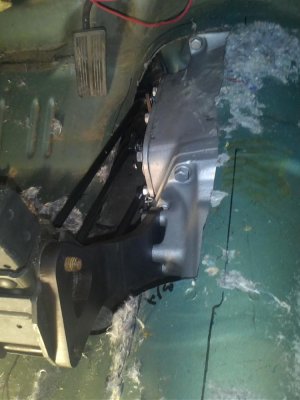
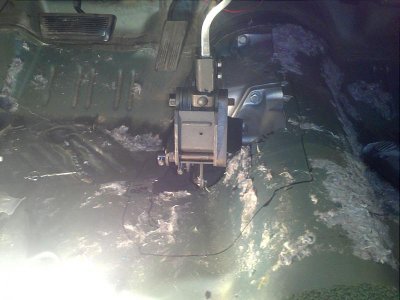
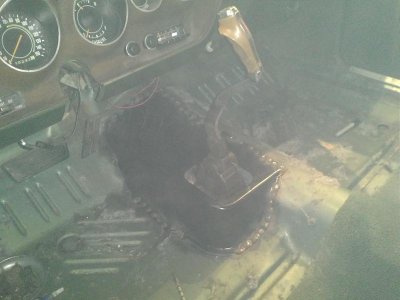
SORRY THE PICTURES ARE A LITTLE SMOKEY FROM WELDING IN THE CAR...SHE IS NOW A TRUE 4 SPEED.. ALL HOOKED UP AND READY TO ROCK !!! :headbang:
I WANT TO THANK EVERYONE FOR THEIR INPUT.. IT HELPED EVERYTHING GO VERY SMOOTHLY !! I HOPE THIS POST AND PICTURES WILL HELP THE NEXT GUY THAT IS DOING THE THE SAME BIG SWAP...NOTHING TO IT ...
MERRY CHRISTMAS TO YOU ALL AND THANKS AGAIN
I WANT TO THANK EVERYONE FOR THEIR INPUT.. IT HELPED EVERYTHING GO VERY SMOOTHLY !! I HOPE THIS POST AND PICTURES WILL HELP THE NEXT GUY THAT IS DOING THE THE SAME BIG SWAP...NOTHING TO IT ...
MERRY CHRISTMAS TO YOU ALL AND THANKS AGAIN
Attachments
dangina
Well-Known Member
Can anyone tell me what kinda sealer or caulking i need to put around the base of that tunnel now ??
Clutch pedals are next.. Should be a breeze
i just use black body sealer from napa - comes in a caulking tube
rog_allen
Well-Known Member
i just use black body sealer from napa - comes in a caulking tube
nice !!! ....ill get some monday ...thank you and merry christmas to ya ...roger
- Local time
- 9:38 PM
- Joined
- Jan 14, 2009
- Messages
- 2,070
- Reaction score
- 1,630
- Location
- Shoreline, Washington
Any quality seam & joint sealer will work, I recommend 3M #08500 found at automotive body & paint supply stores commonly.
Similar threads
- Locked
- Replies
- 6
- Views
- 2K
- Replies
- 2
- Views
- 539
- Replies
- 3
- Views
- 1K

