• When you click on links to various merchants on this site and make a purchase, this can result in this site earning a commission. Affiliate programs and affiliations include, but are not limited to, the eBay Partner Network.

New Project - Grandpa's 1962 Dodge Dart 330 Wagon

Well....

I'd take their insurance $$$ and...bang the fender out as good as can, go sparingly with some primer/sealer in a close match to your original color (I think a paint supply store could do this), get a decent headlight ring and fender trim piece, then just straighten the bumper.

Keep that original patina vibe!
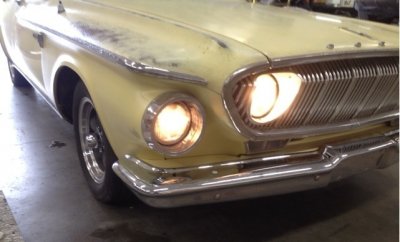


That is a possibility many do not know about. Tell the insurance to write a check and you will get it fixed later. If it's damage you can live with - money in the pocket.

At any rate - the repair can be kept below the trim line - and the "patina" on top saved.

:eusa_think:
 
All fixed from her collision at the hands of the front end alignment shop.........

Deedee is one fine looking girl........... :glasses13:

Fix It.jpg
 
Looks cool man, I love the wheels! this will be a cool looking ride!! Very nice work....
 
Just something incredibly cool about an old wagon. Lucky to have one that is solid, for finding body parts would be a definite challenge. They do make offset A arm bushings for bringing these old b bodies into alignment. Just make sure you spring for the good ones. The cheap ones don't come with washers and will be sloppy. Keep up the good work!
 
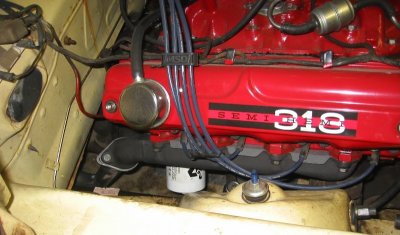
Latest upgrade - cut and welded a driver's side exhaust manifold opposite to fit the passenger side.

Passenger side before was center dump with a heat-riser.

Less restriction now.
Better clearance away from steering gear.
Clear access to oil filter - before it had to go out from above.
Cleaner look.

:upside down:

Exhaust.jpg
 
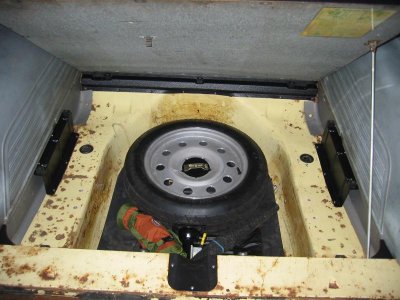
Added a 16" space saver spare. Picked up one from a late model Lincoln Town Car - Mustangs also have the same 4.5" bolt pattern. The Goodyear tire still has the nubbies.

Nearly same dia as the tires I am running. 14 pounds lighter than the original spare, only weighs 25 #’s. And will clear the front disc brakes, unlike the original wheel. Not bad looking either, although once I get the cargo area sheet metal and cover back in there, nobody will see it. (Had all the removable cargo area sheet metal sand blasted and been painting it).

Now to fasten it down, load jack and tools and she will be ready for whatever the universe throws at us. ; )
 

Attachments

  • sss 001.jpg
    sss 001.jpg
    51.1 KB · Views: 274
  • sss 001.JPG
    sss 001.JPG
    121 KB · Views: 269
  • sss 002.JPG
    sss 002.JPG
    147.2 KB · Views: 273
Last edited:
Don't know what the universe is going to throw but its looking sweet and ready to go! Have fun :)
 
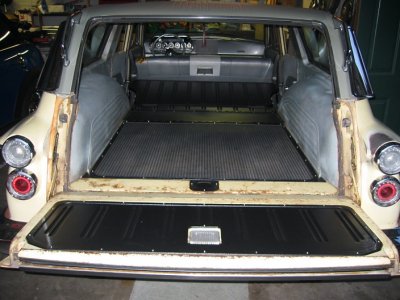
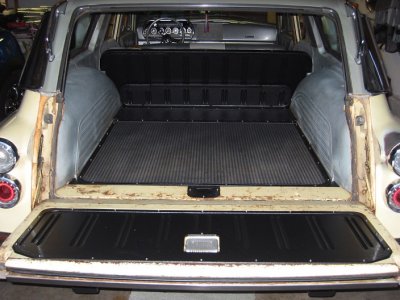
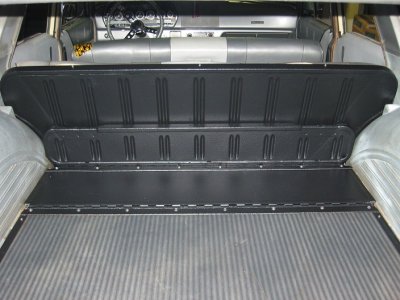
Wheel and tools mounted in place - cargo panels back in - finished in POL Raptor bed coating.... When I replace the floor pan up front will refinish the rest of the back floor.

cargo after 002.JPG

cargo after 003.JPG

cargo after 004.JPG

cargo after 001.jpg
 
Last edited:

Thats brilliant! If I go with the Poly I will definately look into doing that.
Cast is tricky to weld.
Any issues, or was it as simple as preheat a bit and weld?
BTW...how do you find the Poly powerwise? Ok...or surprisingly strong?
Never having driven one, I'm on the fence about it being enough engine for good driving on the highway, but I'm hopeful because I LOVE the look!

Cast is a challenge - had a buddy who welds for a living do it. Go for it with the Poly torque monster 230 hp - 340 lb/ft factory rating. Plenty of motor for today's driving.

:icon_winkle:
 
Cast is a challenge - had a buddy who welds for a living do it. Go for it with the Poly torque monster 230 hp - 340 lb/ft factory rating. Plenty of motor for today's driving.

:icon_winkle:

I think I will! I have it...it's fairly low mileage from a 67 Belvedere and doesn't even have many oil leaks or anything.
A buddy found a junk Poly engine up in the woods last fall...guess I'll have to get him to show me where it is so I can pull the manifold.
Seeing what you have done makes me feel a lot better about it as the original manifold was obviously a restriction, to the point of being a performance eyesore!
Even if the modified one is only marginally better, it LOOKS 100% better...and for a regular driver thats pretty darn good!
One of those 4 bbl intakes and I'll be a happy camper! :D
 
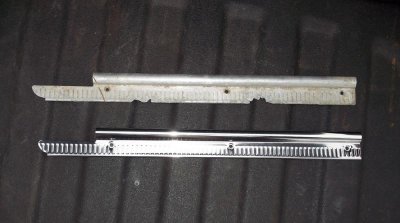
Got some 4-door sill plate bling yesterday, 8pcs. Look good, a little softer material than OEM but very nice bling, especially since my 330 wagon only had the 4pcs inners originally. Double the bling bling! :sunny:


From Hemi Eddie on eBay. Kramer also has them. Figure I better get them now while they are available. Even though might be several years before the interior is nice enough to install them.

http://stores.ebay.com/hemieddy/_i.html?_nkw=sill+plates&submit=Search&_sid=105041989

bling .jpg
 
Man that back floor you put in is sweet that and the engine your plugging away pretty good at this! Thats a beautiful shot of your steering wheel and dash!!
 
Started pre-assembly of front end parts. Figure what I can do in advance is good - all new to me - learning as I go. Pressed the Moog K7103 offset bushings into the front of the new upper A-arms to allow more caster - one step above "Granny" as outlined in this article:

http://www.allpar.com/history/mopar/front-end-alignment.html

View attachment 157749

View attachment 157742


Surprisingly my 4" vise opened up the needed 8" plus to press together the lca bushings and pivot shaft.


View attachment 157743
Thanks for the Skosh Chart. It will come in handy soon.
 
Cool wagon wish my grandfather would have kept a few of his cars around . How did the fender hunt/repair come out?
 
Auto Transport Service
Back
Top