• When you click on links to various merchants on this site and make a purchase, this can result in this site earning a commission. Affiliate programs and affiliations include, but are not limited to, the eBay Partner Network.

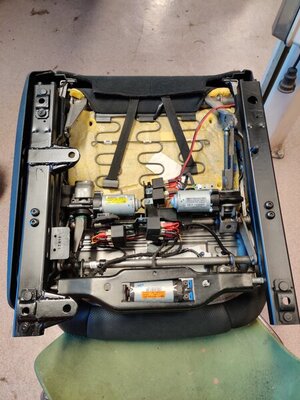
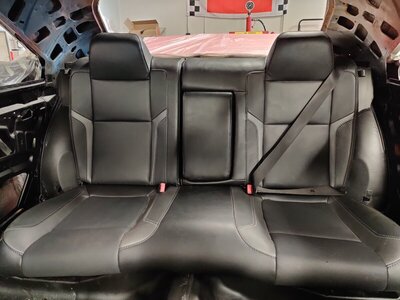
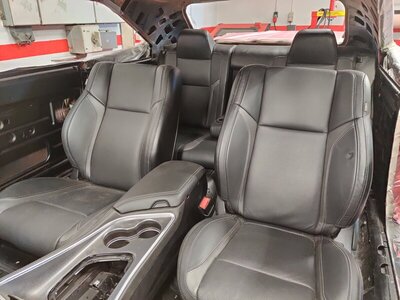
SRT seats and wiring

Looks great, going the same route in my car. Forgot about the seat heat option, would be nice to have that working as well!
I am also worried about the height. Wondering if I should try and modify the rails to get them as low as possible? Anyone done that?
My interior parts came out of a -17 Challenger.
I'm going to look into getting the heated seats working this winter while it's down.
As far as seat height goes, I took off the mounting pads off the rails and ran the bolt down through to get them as low as I could in the front
 
I'm going to look into getting the heated seats working this winter while it's down.
As far as seat height goes, I took off the mounting pads off the rails and ran the bolt down through to get them as low as I could in the front


What did you use to level the chairs? I've placed the seats in my car to have a first look, but the holes of the rails aren't near the original seat holes. I think I will be using a square tube on the floor that will be leveled and mount the seat/rail on top of that.
 
What did you use to level the chairs? I've placed the seats in my car to have a first look, but the holes of the rails aren't near the original seat holes. I think I will be using a square tube on the floor that will be leveled and mount the seat/rail on top of that.
I lined up the front holes with the factory mounting locations and had to drill new holes about 1" outside of the original holes and I used a square tube to mount the back of the seat to the floor and had to drill new holes. The rear mounts aren't anywhere close. It doesn't give much room for the rear passengers but fortunately it's my car and I never sit back there lol
 
I found out the wiring from my 2008 seats:

Driver side:

Orange/red: power;
Black/orange: ground;
Yellow: LED light in the back of the seat;
Green: seat belt;
Light green/black: seat heating.

Passenger side:
Orange: power;
Black/white: ground;
Yellow/white: LED light in the back of the seat;
Blue/orange: seat belt;
Green/purple: seat heating.

The distance between the front and rear mounting point is 390mm/15,35". The distance between the front mounting point- pin is 366mm/14,4".
The width of the left and right rail mounting holes is 420mm/16,54".

I'm in the process of determine the place of the SRT seats. When adjusting the seat far forward it will stick 130mm/5.12"out of the mounting rail. When adjusting it far backwards it will stick out 30mm/1,18" of the mounting rail.

Because the floor not being level, the rail of the driver side seat, near the door, needs to be lifted about 42mm/1,65" on the front. This because the motor underneath the seat, for adjusting, will hit the floor. When using a spirit level the rear has to be raised about 60mm/2,36". The rail near the tunnel needs to be lifted 22mm/0,87" on the front and about 50/1,96" on the rear when using the spirit level. I've used some metal tubes to level everything.

I will position the custom rails a little bit further to the rear then the original seat mount holes are. Maybe an inch.
 
Have you thought about using spacers instead of adding metal?
 
I did. Spacer will never be as strong as a full length tube in a crash. With a thin floor like this and 4 spacers the seat will tilt if you have an accident. Tubes are way stronger. Safety first!
 
I’ll die in the fire anyway. I too want to know about head clearance and if a simple 12v power source will suffice for fore aft and height.
 
12 volts will do just fine. Head clearance, with headrest at the lowest, about 4 inches. I’m 180cm/ about 6 feet and have enough head scape when the seat is at his lowest.
 
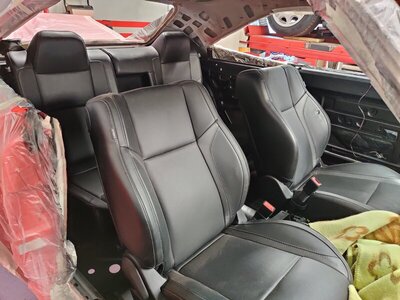
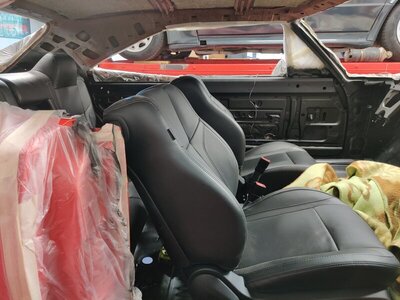
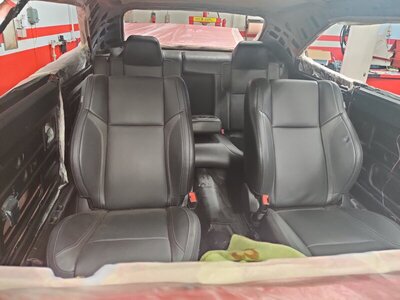
Seat height is close, I am more comfortable leaned back a little so that frees up some headspace. If it is straight up, my head hits the headliner and I'm 5'11", But they look great and match the car perfectly. Dont mind the mess, I'm in the process of putting the rear challenger seats in.

View attachment 817678
What console did you put in there?
 
Unfortunately my phone won't let me upload photos right now due to low memory, I'll do it when I get a chance at the laptop
 
I have seats from a 2011-2012 challenger in my 68 coronet, not sure if there the same. Only needed a pos and a negative to get the power seats working. Haven't figured out the heat and cooling yet.
Im wanting to go with late model seats and cant find alot of info. I have a 68 charger with origonal buckets. Im curious if you know what would fit and what you had to do to mount them. Also do you know if the late model Charger seats would fit? My brother fit late model Challenger seats in his Cuda. He had lots of time in it and they sit way higher. The bottom of the steering wheel is only about 4" above the seat front. I have a hard time getting in and out but the 68 Charger is bigger and hope not to have that problem. Anyh information you have would be apprecated. Did you use the backseat as well? Thanks....
 
Im wanting to go with late model seats and cant find alot of info. I have a 68 charger with origonal buckets. Im curious if you know what would fit and what you had to do to mount them. Also do you know if the late model Charger seats would fit? My brother fit late model Challenger seats in his Cuda. He had lots of time in it and they sit way higher. The bottom of the steering wheel is only about 4" above the seat front. I have a hard time getting in and out but the 68 Charger is bigger and hope not to have that problem. Anyh information you have would be apprecated. Did you use the backseat as well? Thanks....

They are considerably taller, you cant use any the factory mounts. I had to make them as short as possible so I cut off the newer challenger seat mounting pads, its doesnt gain you much (maybe 3/8") but wanted as much room as I could get. I mounted my seats by running a bolt down through the seats track and had to put the nut on the underside of the car. On the back mounts I put a 1×1 square pipe from the outside mount to the inside mount to held with the hump under the factory seat. You have to do this because of the motors and electronics under the newer challenger seats and it helps level the seats out some. I have a smaller steering wheel which helps with seats clearance also. Might not be a option if you have manual steering.
Yes, I also used the back seats also and was able to keep the fold down function. I had to make a complete bracket and remove some of the foam from the middle of the lower seat to get it to sit over the driveshaft tunnel the way I wanted.the back takes more fabrication than the front. Then you have to make filler pieces for the sides because the back seats are narrower than the factory rear seat. I have gotten that far yest since I had to replace quarters, wheel wells, deck filler and repainted it over this past winter, but hope to get back to it soon
 
My seats are from a 2017 Challenger and I was able to mount the front seats directly onto the floor without raising the rear mounts. Maybe the electronics underneath differentiate between years?
If I'd known how narrow the rear seat is I would try and find a matching Charger seat instead. The Chargers have filler pieces already.
I also sectioned down the front passenger seat frame since it is slightly taller than the driver. Maybe 20-25mm(about 1")
My goal was to mount the seats as low as possible.

IMG_20200519_195421.jpg IMG_20200513_174625.jpg
 
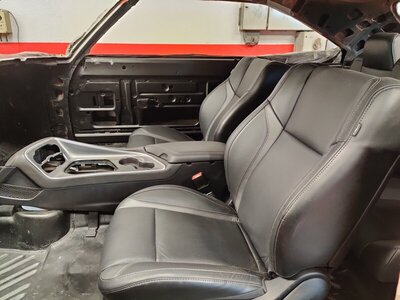
Would like to see a pic from outside into the drivers side (door Open) to see the general aspect of front seat , rear seat configuration and relationship to each other ….IF you don't mind....
 
Would like to see a pic from outside into the drivers side (door Open) to see the general aspect of front seat , rear seat configuration and relationship to each other ….IF you don't mind....
Something like this?

IMG_20200517_185031.jpg IMG_20200517_185017.jpg IMG_20200514_195638.jpg IMG_20200514_195645.jpg IMG_20200514_195620.jpg
 
I believe I have Pics of mine from the outside earlier on in this thread
 
Their is a difference in the years but I'm not sure what the difference is and what year the change was
 
In a 2020 SRT the headrest moves forward in some rear impacts. Does this matter.
 
The "active" headrest is a simple inertia clip setup, nothing powered.

I like this thread. I have a totaled 2005 Magnum R/T donor (bought it new, at 35k miles someone ran a stop sign and T-boned it, totaling it) that I've pulled the 5.7 Hemi out of, along with all computers, and interior. The seats are slated for my '72 Satellite wagon along with the 5.7, but I hadn't even gotten far enough to test-fit anything yet. I haven't done much 'car stuff' for a while at all...but picking up my survivor '70 Charger recently has given me the "bug" again, and I may get some work done on the ol' wagon this winter.

For the wiring, I'd run dedicated circuits to the battery for things like heat, and motors. They draw some current, and I wouldn't want to splice those into existing (old) circuits. Just route two good-gauge wires per seat, directly to the battery. Put inline fuses about 6" from the battery on each wire. If you want, you can even bundle all four together into a separate sub-harness to help it disappear under the hood; run them as a group, to the firewall, then split them off L and R inside the cabin. Ground directly from the connector to the chassis, with a short jumper wire. You can get a large washer-style wiring terminal that can go directly on one of the mounting bolts when you bolt the seats to the floor.
 
Auto Transport Service
Back
Top