• When you click on links to various merchants on this site and make a purchase, this can result in this site earning a commission. Affiliate programs and affiliations include, but are not limited to, the eBay Partner Network.

TTI Header install

uwss

Well-Known Member
Local time
11:04 PM
Joined
Sep 5, 2012
Messages
561
Reaction score
177
Location
Dallas, Texas
I purchased the 2" TTI headers for my 69 Plymouth GTX. I like the headers but you do have to some modifications for the headers to fit.
1. I have head studs; the bottom of the header flange will have to be trimmed so the head studs will clear. There are 4 studs that will interfere on both the passenger and driver side;
2. On the passenger side the last bolt on the engine to bell housing will need to be reversed so the head of the bolt is facing front and the nut is facing the rear; the headers will hit this bolt and will not allow the headers to rotate so the flange mates up properly to head;
3. I am using flat out copper header gaskets;
4. I am getting rid of the Hooker headers because I keep blowing no.5 exhaust gasket; yes i keep tightening the bolts but the bolts keep loosening;
5. I am going to try the stage 8 bolts with the locking tab.

The old exhaust is 2 1/4 and I am going to go with 3" exhaust which should be in tomorrow. I look forward to seeing how this new TTI exhaust system will help the performance of the newly rebuilt 440 which is now 520 cu in. ; 4 speed, 4:10 rear end.
 
This is just a suggestion, Always install good quality engine mounts and tranny mount during your installation. I have installed many sets of TTI's and only clearance problems had, were with reusing sagging old mounts. Yes any aftermarket items such as using head studs,you will have to make adjustments as the headers are designed for most part to factory specs. If you have any questions I would contact Sam Davis direct,He is the owner,a very soft spoken guy,and has gone out of his way many times to help us when using aftermarket parts.Just a thought..
 
i have 2"tti's with a torqueflite in my 65 coronet. i did buy new motor mount isolaters, do use studs and no fitment issues with anything. no trimming, dents or anything. i've used these headers with iron and alum angle plug heads and think everything works easier with the alum heads. i use a mini-starter and getting your fingers thru the tubes to tighten the nuts is challenging. i do have the tti 3" exhaust,h-pipe, and 3" dynomax mufflers, perfect fit.
 
remflex gaskets are the best for a 440 block....I have TTI on My hemi and they are fine except for the new motor breakin warning....I used hooker super comp on my 440 and they fit fine with no mods.....wonder why all the issues with the TTI and 440 ? 440 blocks seem to have a poor history with header gaskets...that's why I suggest remflex...they seal the best
 
fel-pro 1413's here. tighten them up and forget them; never an issue.
 
I use 1 7/8" hooker comp headers with OEM iron heads, no issues. Went in without any modification, just had to be installed in the "proper order", which is not in the instructions thus I had to learn the hard way. I use stock starter, which is admittedly a bitch, but they are cheap and work well.

You should never overtighten header studs/bolts with the hooker headers, or any header really. That can definitely warp the flange and cause leaks and problems. Need to use good header gaskets and torque down in sequence. Warped header flanges are difficult to seal but its possible if you are not opposed to taking them off/putting back on multiple times.
 
Hey guys - looking to purchase new headers ..

Have a 73 Charger with a 318 .. Has crappy pAinted headers now that don't line up with the cut outs on the torsion/trans mount - the collectors are too far out on both sides and the pipes going back are a 1/4 inch away ..

Was wondering if the Hookers or TTI are curved inward toward the cut out.. ??
 
I went with the copper flat out header gaskets and Stage 8 locking bolts. Just got the 3 " exhaust in yesterday. So, any ideas on running the electrical up to the solenoid ? I have big hands, so this project has been challenging for me. The passenger side was the hardest for the headers, the drivers side was very easy. I found that I could install the RobbMC starter clock it bolt it in and jack up the engine and the header will slip right in. Just have to torque it all down, install plugs, etc up on top; then I will do the new exhaust. This is part of my bucket list! Fighting cancer.
 
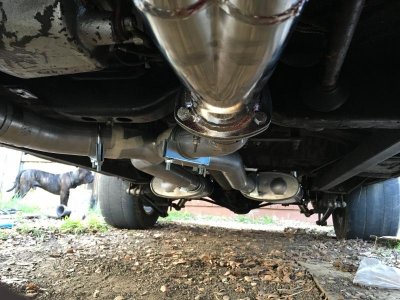
Definitely learned some lessons doing the exhaust on the ground on jack stands. First off, put all the pieces together before attaching to headers. if you do it piece by piece from the headers back you will run into problems with sliding the individual pieces together. I put a 2x8 under the mufflers and jacked it all up, I used a crowbar to pry against the header flange and push the entire exhaust rearward. Slid the gasket in and tightened everything up. It all went really fast after I figured it out. I watched youtube videos which show starting at the front and working back but that did not work on this b body.
Now, I have to check all the bolts, install the spark plugs and then the Z bar. I do not like installing the Z bar.
 
Update: I installed the Robbmc Starter for the 2nd time. YOU must use the shim supplied. I had the Ford/AMC type relay and when I hooked up the battery the starter immediately ran. So, I am assuming my starter relay is bad. I bought a Mopar starter relay and will try that. You cannot jump a wire from the big nut and the small nut on the starter, beware. You will definitely have to turn the header loose to install the header.

There are 4 allen head bolts you have to remove, then pull the nose off , install the shim, use some blue loc-tite and put it all back together. One thing to remember the nose of this starter fits into a hole in the bell housing. put both bolt in and wiggle the starter to make sure it seats . Then start tightening make one more check that the starter is faced to the bell housing and then tighten it all up. Make sure the starter engages the flywheel before you button it all back up. Saves a lot of time if you missed something.
 
IMG_2943.jpg
 
Auto Transport Service
Back
Top