- Local time
- 1:34 PM
- Joined
- Oct 16, 2014
- Messages
- 29,607
- Reaction score
- 73,193
- Location
- Salisbury, Vermont
Express update..
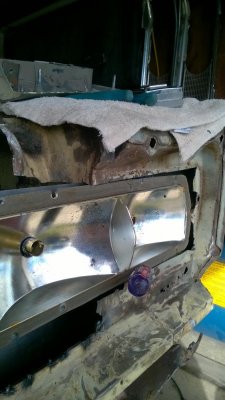
I spent today sitting both in the trunk and behind the rear bumper. Welding and fitting the light bucket panel up to the space there. I finished the lower lip that screws into the bottom of the light bar and is welded to the backing panel to form the other side of the square channel the light buckets reside in. I had to study it some because I needed to leave a way to get those screws back out to remove the buckets at a later date. I also needed to weld the mounting panel to each quarter at the inside edge of the trunk wall. AND I needed to weld the panel along the bottom in the trunk for rigidity. Not to mention the trunk seal frame and the lower lip of the trunk deck that was cut off and will be welded in place under the light bar. So..once I had all of the mounting holes punched and drilled out and the screws in place I tacked the lower to the upper to form the channel, I set it in place and got in the trunk to see what had to be done on the inside. Remember I don't have a trunk floor. So I marked the areas to be cut out for access to the lower edge screws and where I wanted to tack down the ends, and pulled it back out for umpteenth time and made the changes. I set it back in and got back in the trunk to see what else had to be considered. I ate my lunch sitting in there on a HD bucket while I thought it through.
Considerations to be made include the trunk lock bar placement, the close out of the top of the light panel between that and the trunk seal lip and the close out on the inside of the trunk seal lip to the mounting panel while keeping access to the upper screws as well. Fun.
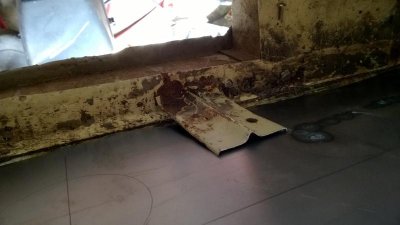
After lunch I cut and bent a couple of angles to place around midway at the bottom lip of the mounting panel to weld that to the floor. Then I tacked in both lower ends. I fabbed up a couple of small plates to fill the gaps at the inside trunk wall and welded them to the wall and the top surface of the mounting panel and to the rear fascia. It turned out to be nice and solid. And now the quarters are tied together again.
I set the trunk deck in place to see where the seal was going to have to go and then stopped for the day.
Here's some pics..
I spent today sitting both in the trunk and behind the rear bumper. Welding and fitting the light bucket panel up to the space there. I finished the lower lip that screws into the bottom of the light bar and is welded to the backing panel to form the other side of the square channel the light buckets reside in. I had to study it some because I needed to leave a way to get those screws back out to remove the buckets at a later date. I also needed to weld the mounting panel to each quarter at the inside edge of the trunk wall. AND I needed to weld the panel along the bottom in the trunk for rigidity. Not to mention the trunk seal frame and the lower lip of the trunk deck that was cut off and will be welded in place under the light bar. So..once I had all of the mounting holes punched and drilled out and the screws in place I tacked the lower to the upper to form the channel, I set it in place and got in the trunk to see what had to be done on the inside. Remember I don't have a trunk floor. So I marked the areas to be cut out for access to the lower edge screws and where I wanted to tack down the ends, and pulled it back out for umpteenth time and made the changes. I set it back in and got back in the trunk to see what else had to be considered. I ate my lunch sitting in there on a HD bucket while I thought it through.
Considerations to be made include the trunk lock bar placement, the close out of the top of the light panel between that and the trunk seal lip and the close out on the inside of the trunk seal lip to the mounting panel while keeping access to the upper screws as well. Fun.
After lunch I cut and bent a couple of angles to place around midway at the bottom lip of the mounting panel to weld that to the floor. Then I tacked in both lower ends. I fabbed up a couple of small plates to fill the gaps at the inside trunk wall and welded them to the wall and the top surface of the mounting panel and to the rear fascia. It turned out to be nice and solid. And now the quarters are tied together again.
I set the trunk deck in place to see where the seal was going to have to go and then stopped for the day.
Here's some pics..
Attachments
-
 WP_20151108_11_57_50_Pro.jpg63.7 KB · Views: 535
 -
 WP_20151108_11_57_55_Pro.jpg82.9 KB · Views: 529
 -
 WP_20151108_12_17_03_Pro.jpg45.8 KB · Views: 530
 -
 WP_20151108_12_17_25_Pro.jpg72.5 KB · Views: 528
 -
 WP_20151108_12_17_32_Pro.jpg77.4 KB · Views: 548
 -
 WP_20151108_12_17_48_Pro.jpg31.9 KB · Views: 527
 -
 WP_20151108_12_17_52_Pro.jpg36.8 KB · Views: 518
 -
 WP_20151108_12_18_00_Pro.jpg50 KB · Views: 515
 -
 WP_20151108_12_18_05_Pro.jpg52.2 KB · Views: 519
 -
 WP_20151108_12_19_05_Pro.jpg73.4 KB · Views: 525
 -
 WP_20151108_12_19_24_Pro.jpg53.8 KB · Views: 536


