You are using an out of date browser. It may not display this or other websites correctly.
You should upgrade or use an alternative browser.
You should upgrade or use an alternative browser.
1965 Coronet AWB Build
- Thread starter skicker
- Start date
skicker
Well-Known Member
- Local time
- 8:57 AM
- Joined
- Dec 15, 2011
- Messages
- 1,394
- Reaction score
- 3,386
- Location
- Cumberland, Maryland
skicker
Well-Known Member
- Local time
- 8:57 AM
- Joined
- Dec 15, 2011
- Messages
- 1,394
- Reaction score
- 3,386
- Location
- Cumberland, Maryland
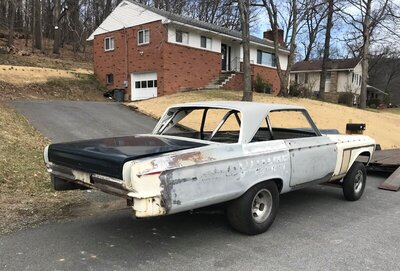
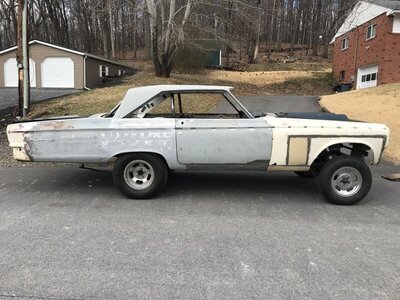
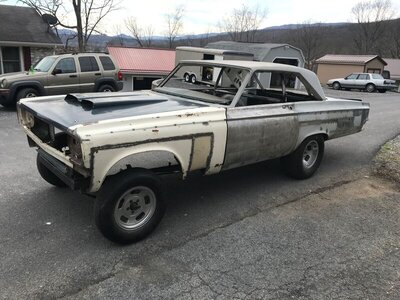
This is what it looked like when I got it out of one garage and transferred down to the other one to go back into storage till fall...
Almost all metal patching from the firewall back is completed...some trim holes need welded in the passenger rocker and the new trunklid...
After that a little more 1/4 panel work is all that's really left to do...
I did manage to pick up a very nice trunk lid and a fiberglass hood for a good deal...


I am amazed at your talent. You make it look easy, which I know is not! Thanks for posting.
skicker
Well-Known Member
- Local time
- 8:57 AM
- Joined
- Dec 15, 2011
- Messages
- 1,394
- Reaction score
- 3,386
- Location
- Cumberland, Maryland
So another summer of fun with my completed cars is over...

This has been moved back into the upper garage for work to continue...
Plan is to get all of the metal work completed...
Then send it over to a buddies garage to begin bodywork and paint...
I have a lot of work to do with the front end to finish the fenders and get the hood on...
Once that is worked out I need to design any bracing and fabricate all of the latches to get the front end to open and close correctly...
It will be a one piece flip nose front end for ease of working on it later...
Plan is to mock up everything for the engine and transmission again to sort out the brackets for the radiator...throttle linkage and the like...
skicker
Well-Known Member
- Local time
- 8:57 AM
- Joined
- Dec 15, 2011
- Messages
- 1,394
- Reaction score
- 3,386
- Location
- Cumberland, Maryland
I had forgot to mention that I changed the entire rear clip about 1' from the back...
This car was rearend-ed sometime early in its life and it destroyed the tail-panel...
Separated it along the seam in the trunk floor and down the sides...
With the new trunklid on everything fits pretty good now...
Before the change nothing was even close...
I also swapped out the 65 B Body 8 3/4" for one from a 63 B Body to narrower the rear an inch...
If you zoom in on the images below you can see the difference...
funnykarman
Well-Known Member
What are you going to use for an oil pan? I have one That would work great on your car. My 65 AFX I wanted to run lower that most do. Your 65 sits high and would work great. 8qt Milodon 4x4 pan left me with only 3 inches Ground clearance my new pan has almost 6 inches. All that would be needed is the correct pickup. Let me know if you are interested!


skicker
Well-Known Member
- Local time
- 8:57 AM
- Joined
- Dec 15, 2011
- Messages
- 1,394
- Reaction score
- 3,386
- Location
- Cumberland, Maryland
Thx...but with everything else going on right now there hasn't been any progression on my car...
I'll need to source a bunch of parts at some point...sold a pan identical to that probably 7 years ago off of my pick-up...another one of those parts I should have kept...
I'll need to source a bunch of parts at some point...sold a pan identical to that probably 7 years ago off of my pick-up...another one of those parts I should have kept...
funnykarman
Well-Known Member
OK, Sold it last week.Thx...but with everything else going on right now there hasn't been any progression on my car...
I'll need to source a bunch of parts at some point...sold a pan identical to that probably 7 years ago off of my pick-up...another one of those parts I should have kept...
skicker
Well-Known Member
- Local time
- 8:57 AM
- Joined
- Dec 15, 2011
- Messages
- 1,394
- Reaction score
- 3,386
- Location
- Cumberland, Maryland
Ask and you shall receive...I have made some more progress...Any updates on this project
I wasn't happy with the leaf spring sliders as they looked out of place and were way longer than they ever needed to be...
They have been removed and a pair of traditional shackles were installed...
I drilled through the frame and added a piece of tubing with a 1/2" hole and welded it in...
Then it was time to come up with shock mounts...If everything was this easy I'd have been finished a long time ago...
Shocks from a 73 dart were used for the mock-up but are similar to the B Body shock...
All I had to do was drill the bottom sleeve from 7/16" out to 1/2"...
After installing the shackles I rechecked the kingpin camber angle and it is almost 10 degrees...
skicker
Well-Known Member
- Local time
- 8:57 AM
- Joined
- Dec 15, 2011
- Messages
- 1,394
- Reaction score
- 3,386
- Location
- Cumberland, Maryland
Time to start figuring out this whole flip nose frontend deal in all steel...
What a monster PITA...
So it needs to slide forward 4 1/4" to allow for the fenders to not hit the doors while rotating up...
This means the hood would have to have the hole for the carbs cut back 4' farther than normally needed...
That's a deal breaker as that is removing all of the back of the hood behind the carbs...
When it is closed the whole top of the cowl would be visible...

Using some 3/4" tubing (steering shaft) that has a 1/2" inside hole and some 1/2" round stock I came up with this deal...
It allows the fenders to close and have an area to land on and then slides the fenders back into place so they fit as good as I could get them to fit...
The bottoms also need something to secure them so round bar was added there and a hole drilled into the end of the rockers...
I started with the drivers side and got all the bugs worked out before moving to the passenger side...


What a monster PITA...
So it needs to slide forward 4 1/4" to allow for the fenders to not hit the doors while rotating up...
This means the hood would have to have the hole for the carbs cut back 4' farther than normally needed...
That's a deal breaker as that is removing all of the back of the hood behind the carbs...
When it is closed the whole top of the cowl would be visible...

Using some 3/4" tubing (steering shaft) that has a 1/2" inside hole and some 1/2" round stock I came up with this deal...
It allows the fenders to close and have an area to land on and then slides the fenders back into place so they fit as good as I could get them to fit...
The bottoms also need something to secure them so round bar was added there and a hole drilled into the end of the rockers...
I started with the drivers side and got all the bugs worked out before moving to the passenger side...
skicker
Well-Known Member
- Local time
- 8:57 AM
- Joined
- Dec 15, 2011
- Messages
- 1,394
- Reaction score
- 3,386
- Location
- Cumberland, Maryland
I actually have to weld the fenders to the doors to hold everything in place and then fab all the brackets from underneath...
Moving onto the passenger side I found a few rust holes that needed repair prior to even fabbing up the brackets...
I patch was cut from and old fender and grafted into place to make the repair...
The fenders have repair panels cut from other multiple sets of junk fenders to make one usable set...
Three different ones were used on the left and now with this patch four different ones on the right...

skicker
Well-Known Member
- Local time
- 8:57 AM
- Joined
- Dec 15, 2011
- Messages
- 1,394
- Reaction score
- 3,386
- Location
- Cumberland, Maryland
Then it was on to completing the passenger fender typical to the drivers side...
With both completed I ended up with the first two pictures...
Once finished something had to secure the one piece frontend front to rear so more fab was required...
I used trunk latch assemblies on each side located between the door hinges...
They can be seen in the 1st pic...
Location was important as you will see later...
skicker
Well-Known Member
- Local time
- 8:57 AM
- Joined
- Dec 15, 2011
- Messages
- 1,394
- Reaction score
- 3,386
- Location
- Cumberland, Maryland
Then i moved on to getting some type of a bracket in place to hold the radiator...
I got lucky with finding this radiator in this condition for the install...
Made everything work and wrapped it up with a period correct cool can...


I got lucky with finding this radiator in this condition for the install...
Made everything work and wrapped it up with a period correct cool can...
skicker
Well-Known Member
- Local time
- 8:57 AM
- Joined
- Dec 15, 2011
- Messages
- 1,394
- Reaction score
- 3,386
- Location
- Cumberland, Maryland
I then began sorting out all of the electrical...
The cable drive tach needed a hole through the firewall as did the leads for the distributor and coil...
A battery lead needed installed along with an oil pressure line and a temp gauge cable...
I used a pass thru device for the starter however with using the ford relay this cable is only hot once energized...
I installed the battery tray in the trunk and ran the lead forward to under the dash...
Ignition is by a MSD Street fire box which has a rev limiter...
Then it was time to start working on the braking system...
Installed this old school line lock and started sorting out brake line placement...
skicker
Well-Known Member
- Local time
- 8:57 AM
- Joined
- Dec 15, 2011
- Messages
- 1,394
- Reaction score
- 3,386
- Location
- Cumberland, Maryland
I finished mocking up the dash and installing the required switches along with the tach...
Time to cut the holes in the dash and install the gauges...
Everything is period correct black faced Stewart Warner...
This is also kind of a final mock-up of everything prior to blowing it apart to start paint and bodywork...
I got out all of the inside window trim and mirror that are to be used and installed everything...
Then removed it all keeping all correct fasteners organized with their parts...
skicker
Well-Known Member
- Local time
- 8:57 AM
- Joined
- Dec 15, 2011
- Messages
- 1,394
- Reaction score
- 3,386
- Location
- Cumberland, Maryland
I completed the bracket in the trunk floor to reinstall the original gas tank and filler neck...
I did add a 1/2" fuel line pick-up rather than the existing 5/16"...
I also fabbed up 4 new tabs for the relocated seat belt tabs as the original locations were deleted or relocated...
The grill and headlight bezels were mocked up along with modifying the existing wiring harness...


I did add a 1/2" fuel line pick-up rather than the existing 5/16"...
I also fabbed up 4 new tabs for the relocated seat belt tabs as the original locations were deleted or relocated...
The grill and headlight bezels were mocked up along with modifying the existing wiring harness...
skicker
Well-Known Member
- Local time
- 8:57 AM
- Joined
- Dec 15, 2011
- Messages
- 1,394
- Reaction score
- 3,386
- Location
- Cumberland, Maryland
The entire interior I am using was mocked up less the door panels as they have already been completed...
This kind of gives you a feeling as to what everything should look like once completed...
The floor and inner wheel tubs will be white to match the inside of the roof...
No headliner or carpeting will be installed and more than likely maybe only one front seat...


This kind of gives you a feeling as to what everything should look like once completed...
The floor and inner wheel tubs will be white to match the inside of the roof...
No headliner or carpeting will be installed and more than likely maybe only one front seat...

Similar threads
- Replies
- 9
- Views
- 684
- Replies
- 15
- Views
- 1K

