• When you click on links to various merchants on this site and make a purchase, this can result in this site earning a commission. Affiliate programs and affiliations include, but are not limited to, the eBay Partner Network.

1968 Coronet 500 Project

I see trophies in your future, Jim. You sure deserve it! Probably the best, most detailed restoration down to every nut, bolt, fastener, hose, line, wire, and connector.

You rival Mark Worman in this car's resto!
 
I see trophies in your future, Jim. You sure deserve it! Probably the best, most detailed restoration down to every nut, bolt, fastener, hose, line, wire, and connector.

You rival Mark Worman in this car's resto!

I REALLY want to like that show, it is all Mopar but no matter how hard I try I can't watch it.
 
Worman is a little over the top but he sure does love his job and his cars look great. I can stand watching it for the Mopars and history lessons, but I generally dislike reality shows. One of my favorites right now is Wheeler Dealers.
 
Long morning of cleaning and polishing bright work. I did not try to fix/straighten anything, I am not that good. Someday I will take to a professional to have it straightened and done right. I figured if it is shiny enough nobody can look at it straight on and see the flaws anyway :)

DSC_0076.jpg
DSC_0077.jpg
DSC_0078.jpg
DSC_0079.jpg
DSC_0080.jpg
DSC_0081.jpg
DSC_0082.jpg
DSC_0083.jpg
DSC_0084.jpg
DSC_0085.jpg


Rocker trim was interesting.. The repro kit should have had 4 more clips in it for this car. I should have skipped one or two under the door and added the extras on the rear quarter panel as they are really needed to pull it in there. I did that on the drivers side and it worked much better..
 
Started to cleanup the dash as well. Man 25 years in storage sure saves the dash! All I did was clean and polish and it is like new again.

DSC_0089.jpg
DSC_0090.jpg
DSC_0091.jpg
DSC_0092.jpg
 
Finished buffing and polishing the whole car with all the bright work. Wow it looks sharp. After the Magnum rims and T/A radial fit in the budget it will be styling! The bright work is not show quality but for being 48 years old it looks great from 5 feet away.

DSC_0093.jpg DSC_0094.jpg DSC_0095.jpg DSC_0096.jpg DSC_0097.jpg DSC_0098.jpg DSC_0099.jpg DSC_0100.jpg DSC_0101.jpg DSC_0103.jpg
 
If you decide to quartz convert the clock there is a vendor in hemmings that does a fantastic job. He converted several clocks for friends. Did a great resto on a 1959 el Camino clock for one of my buddies.
 
Pretty rare options for speaker and rear defogger.
BTW I can restore the radio for you, and if you're really into originality, I know a speaker reconer in Colorado. I still restore old radios, juke boxes, and pinball machines for friends. Just finished a Studebaker radio a few weeks back.
 
Pretty rare options for speaker and rear defogger.
BTW I can restore the radio for you, and if you're really into originality, I know a speaker reconer in Colorado. I still restore old radios, juke boxes, and pinball machines for friends. Just finished a Studebaker radio a few weeks back.

I am struggling on the Radio. I am almost convincing myself that is one thing that should be updated. Bluetooth and USB port with modern PLL radio operated with the original controls. I like it.

http://www.turnswitch.com

oh and 45W per channel plus auto channel finding based on how many speakers it found.
 
Are those old Tektronix scope plugins on your shelf?

I guess because I appreciate old radios I'd stay original. I'm odd in that I'd do classic air and efi, yet keep the radio original.
 
Are those old Tektronix scope plugins on your shelf?

I guess because I appreciate old radios I'd stay original. I'm odd in that I'd do classic air and efi, yet keep the radio original.

Why yes they are :) 7704 and one for parts. 7A13 diff amp with like new probes, 7D20 digital plug in, logic analyzer plug in, several analog timebase and vertical plugins.

Yea I can see your point. Old radios are like religion to some people. I want good sounding tunes and not as interested in the originality there.
 
At one time I had the ultra rare spectrum analyzer plug in, but was offered a BIG profit by one of my old ham radio friends and sold it. Ended up building my own home brew spectrum analyzer for my scope out of a double balanced mixer and a tracking generator. What fun.

As long as harnesses are not hacked away an updated radio is nice. The only big advantage of yesterday's radios was the sensitivity on the AM band (and maybe a bit more reliable).
 
Jim-real late to thread,BUT, now I know who to ask with any questions on my '68 Bee.Great looking build.
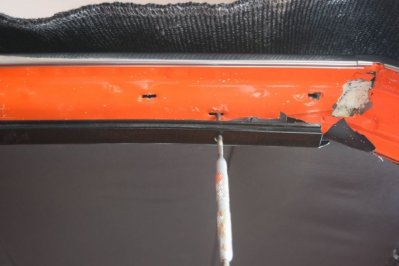
 
Well it was time to go inside today. There was as illusion that the headliner was done. It was not. The rear window was fighting me. The first thing I did was file the shark teeth around the back window to make them sharp enough to puncture the headliner. Just a little filing worked.
DSC_0111.jpg


I then dug out the interior moulding that trim the headliner to the door frame. Well it turns out they interlock with the chrome channel so... out it came again... for the 3rd time. I simply polished the original trim with the buffing wheel and installed it. It was too nice to strip and refinish. Note that you should remove the headlining material near the clips. The clips have teeth on them to bite into the metal and if the headlining is there the teeth grab the headliner and try to drag it along, which it can't.

DSC_0112.jpg


There is one screw in the front of the trim that will be installed after the plastic A pillar trim is installed (after dash). For now just use something to make sure it is lined up with the slotted hole.

DSC_0114.jpg


DSC_0115.jpg


All installed and blurry. The headliner is tighter than that now after I hit it with a heat gun.

DSC_0116.jpg


Here is how the interior trim interlocks with the gasket seal frame. It is not interlocked here.

DSC_0117.jpg


Now it is. There is play in the screws, as can be seen in the photo, to jockey the gasket frame around.

DSC_0118.jpg
DSC_0113.jpg
 
Also installed the old speaker, along with the new harness and ran the new harnesses along the wire chase. Installed the rear window defogger and decided the rear package tray needed a refresh. Some of the stitching was failing so I used trim glue and paper clamps to hold it till it dried. I then hit it with SEM Satin Black.

I did a lot of other little detail things that will all come together tomorrow. Also I found my first casualty of the assembly. I can't find the damn screws for the sun visors. I restored them and found where the holes need to go in the headliner but no screws. I can't believe I would have thrown them out as I have been very careful to put anything that I find that I don't know what it is into bags. This is 6 screws missing. Guess I need to go to the hardware store.
DSC_0119.jpg
DSC_0120.jpg
DSC_0121.jpg
DSC_0122.jpg
 
It was a http://www.southernpolyurethanes.com kind of day. First I sprayed the underbody with SPI Orange. Laying on your back spraying paint upside down sucks. I got a good even finish where it matters in the wheel wells and frame that can be seen through the wheel opening.

After that I mixed up some SPI Universal Clear and put 2 coat over the Seymours Stainless Steel I sprayed on the natural metal parts the other day on the rear suspension and rear axle.

I then got ambitious and mixed up the SPI black and shot the rear axle, what a shine that Universal Clear creates! I started to think about mocking up the parts to see what they looked like together and ended up assembling the whole damn thing!

View attachment 349787 View attachment 349788 View attachment 349789 View attachment 349790 View attachment 349791 View attachment 349792 View attachment 349793 View attachment 349794 View attachment 349795 View attachment 349796


Beautifully done!
 
Auto Transport Service
Back
Top