• When you click on links to various merchants on this site and make a purchase, this can result in this site earning a commission. Affiliate programs and affiliations include, but are not limited to, the eBay Partner Network.

1969 Road Runner facelift

Wow! That all brings back some recent precious memories. All I can say is.......Hell Ya, tear it up Dave!!! Looks like you're set on supplies till 2050..lol

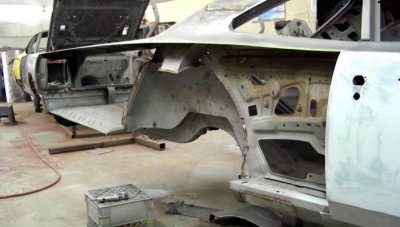
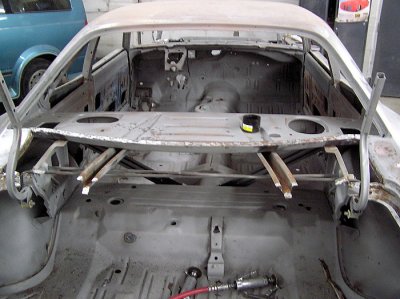
Your rockers....Patch them if you can. Inner rockers are not too bad to patch, they're flat. Cut out some 18-20 Gauge and graft in..The outer rockers are pinch/goobered welded between the interior framing and inner rocker in that back area. Definitely a pain in the *** to get a part. I ended up buying both new outer rocker for my RR from AMD. Not Cheap, but I ended up replacing a great majority of both rockers. I'm not sure if anyone sells patch sections for outer rockers. Did you or are you planning on changing out both rockers?

You could give it a shot to make your own patches back there, if your not looking to buy whole new outer rockers and can't buy repair sections. A trick I've used in the past to fabricate sections of panels, and didn't have no serious equipment to properly bend/break metal...If you got a decent sized vise, tac in some 3/4" square tubing across the lips of the vise and a couple inches longer than the patch to be fabricated. Secure the fresh metal in the vise and start working down towards the angle you're looking for. I don't hit the fresh tin directly with a hammer. I use a piece of 2" square tubing. That way the impact is spread out across the metal and helps bend down a uniformed bend. Work the metal down back and forth like a typewriter. Once you get the metal close to the angle you desire, switch to a piece of 1" or 3/4" tubing your hitting your hammer on. After that, fine tune with a body hammer and dolly. That 3/4" tubing that was tac'd in the vise will help create a soft yet fine curved edge that's uniformed and doesn't look wobbley all the way down the bend..

Just my 2 cents....

Definitely enjoying the show! :sixpack:
 
Last edited:
Thanks prop.

I think I'll peal the passenger side tonight in hopes that there is more rocker intact where the quarter onerlays it and reaches forward under the door jam.

2 reasons i think it should be more intact, fistly the car was hit on the passenger side at one time which split seams and distorted the fit of things, allowing road slop and water in this area to rot the metal out faster. Secondly, being raised in the rust belt we know that the driver's side of a car see's more salty road slop than the passenger side due to meeting traffic on sloppy roads. Typically I've experienced more rot on the driver's side than on the passenger side when working on old cars and trucks.

I'm hoping to find the passenger side more intact so I can copy it and create new patch sections.
 
Looks like you have hit the point of no return Dave. Just think how much lighter and faster the car will be without all the extra weight of bondo.
 
It never ceases to amaze me the shovel loads of dirt, rust, bondo flakes a guy has to pick up off the floor when you start peeling tin off these old cars.

I’m looking at my wheel house situation, there are definitely some bad areas, but I am contemplating a partial replacement of the inner and outer wheel house on that driver’s side.

Thinking roughly something like this.

Remove the area in red cross hatch.

wheelhouse.jpg


Cut my new wheel house to fit the removed area with butt weld.

Rather than splitting all the structure, especially the forward stuff.

The rest of the wheel house is really solid, it’s just where it got smashed and ended up splitting. And of course the wheel opening lip where the quarter attaches is junk too.

Any thoughts on jigsaw puzzling my wheel house together?
 
I just signed for my body panels.

Big thanks to Jeff at 521 restorations!

All the panels are loaded in the back of my truck. Wooo!
 
Great looking project! It will look even better with your paint choice.

Are you keeping the Keystones?
 
I think I will keep the keystones for a while. They are in nice shape and the previous owner who may be checking in here to watch progress (Hi Dave! :) ) He fit the wheels recently with new rubber and it's all just in such good shape I think I will stick with the wheel and tire combo for a while.

If I change sometime down the road I will go to 15" wheels but i'm just not certain what look I'm after.

Has anybody ever seen chromed police wheels with dog dish center caps?

I've been thinking about a set of chromed 15" police style wheels, maybe 9" - 10" wide in the back and go with the 275 60's back there.

Hard to beat a nice set of 5 spokes though.
 
You're right Dave, try to skip removal of the spot welds in the front side of those wheel house's. I'm sure you already seen they're pinched between the interior framing and inner wheel house. You'll also notice the spot welds up there are almost a continous stitch weld. A guy would pretty much butcher that area trying to get them out..

For a good look at how that area looks dissected, check out Matt or Donny's threads
 
Man, you got your hands full haven't you! I've got a bunch of scraps you might be interested in my friend. I'll have to dig through all of it and pick out the stuff you could use for patchwork and take some pics and you can tell me if you want any of it. Keep it up brother!
 
Our internet is out at home. But I did some stuff, I'll post pics from work tomorrow.

Sent from my crackberry phone
 
I shed a few more pounds off the roadrunner last night.

Passenger side skin is off.

102_5681.jpg


I did my best to save the mural to hang up on the shop wall and maybe bring along to some of the small town cruise in type shows we like to go to. maybe display the cut and trimmed mural portion with a project book with pictures, slide some trim lock over the cut edges or something.

102_5689.jpg


Rocker is much better on this side, now I have a reference for making patches for the driver’s side.

102_5680.jpg


During this particular excavation effort I managed to unearth some new prizes for my creative bodywork archives.

For me personally this is a brand new one, I've never seen this application before. So I was pretty excited. :grin:

This to me looks like wire mesh from an automotive air filter, possibly fram? :grin:

102_5685.jpg


That's the crown jewel right there, pretty proud of that find.

Then there is the old marine fiberglass resin with no backer which somehow spanned a void in a panel which was overlaid with body filler and ultimately this groovy paint job. :grin:


102_5686.jpg


102_5687.jpg


Alright, on to more important stuff.

The outer wheel house is questionable, I'm seriously considering ordering an outer from Jeff to use as a repair for the area where it connects to the wheel opening lip on the quarter.

102_5682.jpg


102_5684.jpg


I opened up a can of trunk-b-gone and let it loose.

102_5692.jpg


102_5693.jpg


102_5695.jpg


102_5701.jpg


102_5697.jpg


102_5700.jpg


I see I have some concerns at the tail ends of the trunk extensions and some minor rust issues at the lower tail pan area as well.

102_5698.jpg


102_5699.jpg
 
So, are some of these parts the goods I need to patch up those rear cross member ends?

rearxmember.jpg
 
So, are some of these parts the goods I need to patch up those rear cross member ends?

That would do it Dave!

Great to see all the carnage and destruction, going on here......:thumbsup:
 
It was ear plug territory in Dave's garage last night. :grin:
 
Man, you got your hands full haven't you! I've got a bunch of scraps you might be interested in my friend. I'll have to dig through all of it and pick out the stuff you could use for patchwork and take some pics and you can tell me if you want any of it. Keep it up brother!

you don't have the rear section of a drivers side rocker laying around do ya? :grin:


I ordered a passenger side outer wheel house from Jeff today and a pair of rear crossmember extensions.

My "budget" is officially wiped out.

Tonight I hope to trim and clean up some of the barbaric work I've been doing. Clean the loose crap out of the rear frame rails, grind my spot weld areas, drill my more delicate spot welds like in the door jams and at the ail pan areas, the forward trunk floor spot welds, wheel house to trunk floor etc.

Get things ready to roll the car outside the shop and hit some of the inner frame rails, tailpan, trunk gutter etc with the media blaster (yes i have a small one that I keep around just for these little jobs)

If all goes well i'll be painting the insides of my frame rails & related exposed structure with POR15, coating my weld areas with weld through primer and soon I'll be fitting panels starting with the trunk floor first.

trunk floor, tail pan repairs, wheel house repairs, trunk ext replacement then finally the quarter skins.

And that will just be a scratch at the surface of the project lol!!

Front and rear glass have to come out, most of the interior has to come out, I'm thinking the engine is coming out to paint the inner fenders and firewall... holy crap there is a lot of work left to do even after I get the back half of this car buttoned back together.
 
What was your deadline? HaHa. I'll sift through my stash tomorrow, swamped with work right now!
 
Boy do I remember those days! It was a ton of time, money and work but was worth every bit of it. Good luck with your project!!
 

Attachments

  • missing.jpg
    missing.jpg
    35.4 KB · Views: 1,070
  • November 23, 2005 049.jpg
    November 23, 2005 049.jpg
    141.6 KB · Views: 1,063
  • P2210196.jpg
    P2210196.jpg
    105.5 KB · Views: 1,079
Wow great pictures and beautiful car.

It looks like your RH quarter is trimmed above the top body line? Did you fit a quarter skin with the weld seam above the top body line? up on top?

I really want to try placing my weld seams in that area on this project (close to the top body line bend for strength of course)
 
Well it was one of those nights where you work plenty but if nobody knew any better they would have a hard time figuring out what you got done lol!

I cleaned the top surfaces of my frame rails some and did some more trimming on the front edge of my trunk floor. I'm thinking about splicing the trunk floor here mostly because I have a one piece trunk floor and i will be limited as to how much of it I will be able to fit into the trunk without having the tail pan completely gone or a wheel house completely gone.

Picture004.jpg


Picture003.jpg


I decided to use the full length of the new trunk floor in back where it lays over the rear crossmember and connects to the tail pan.

Picture001.jpg


I had to shut it down early last night to go to a birthday party. i'll work on drilling my inner wheel house to trunk floor welds tonight and i'll start mapping out a plan for the wheel house repairs, drill and seperate the quarter to door jamb area as well as the quarter to tail light pan area.

Then it will be time to hail the little chunks and scraps out and sweep up under the car again.
 
Auto Transport Service
Back
Top