• When you click on links to various merchants on this site and make a purchase, this can result in this site earning a commission. Affiliate programs and affiliations include, but are not limited to, the eBay Partner Network.

1972 Roadrunner Restoration

Questions:
- With regards to "restoring" some of the parts, what sources did you use to figure out the dash rebuild and how to paint certain parts like the light bezels, etc?
- Is there any specific type of paint you use? I know you mention filler primer to smooth things out, but are you just talking rustoleum off the shelves of Home Depot? What about the parts that were frame color? Did you get some mopar frame color paint online to paint those parts?
- How did you "restore" those interior panels? Most of mine were in good shape, but they look like they could be brought up to date. What about the seats, what was your source info for building those back up?
Enough questions for now, I have at least 4 years of work to get cracking on if your adventure is any measure.
 
Everyone has there own opinions on how to strip down a body ...
And here's mine ..lol..
Do a search to see if anybody in your area has an alkaline tank that can fit your car ..not a acid tank but alkaline...

I had my 73 charger dipped , took 6 weeks cost the same or less as sandblasting, 1600. For everything except the doors ..

And after seeing the results, I will never sandblast anything that cant fit in a blasting cabinet..
And theres no threat of a unskilled blaster warping your sheetmetal...

Just my 2 cents worth ..
Pics on page 3 of my build post

https://www.forbbodiesonly.com/moparforum/threads/73-charger-rallye-edition-factory-440.112665/
 
Questions:
- With regards to "restoring" some of the parts, what sources did you use to figure out the dash rebuild and how to paint certain parts like the light bezels, etc?
- Is there any specific type of paint you use? I know you mention filler primer to smooth things out, but are you just talking rustoleum off the shelves of Home Depot? What about the parts that were frame color? Did you get some mopar frame color paint online to paint those parts?
- How did you "restore" those interior panels? Most of mine were in good shape, but they look like they could be brought up to date. What about the seats, what was your source info for building those back up?
Enough questions for now, I have at least 4 years of work to get cracking on if your adventure is any measure.

Hi csilko, I'm sorry, I didn't see your post and your questions. I will try to answer your questions as best I can but most of my stuff was done by trial and error and trust me... there was a lot of error haha.

- With regards to "restoring" some of the parts, what sources did you use to figure out the dash rebuild and how to paint certain parts like the light bezels, etc?

On my dash, all I did was take some acrylic tester paint and paint the needles back to a florescent orange. I used acrylic vs enamel so the brush strokes would be less visible. After the fact, i learned you can use a little thinner on enamel and get the same effect. I had a hard time finding florescent orange in acrylic so I recommend the enamel way. For the decals, I just follow the directions on the decal package. Make sure you tape everything off and paint it flat black and make sure you have all dirt and bumps out. I had to redo mine because I didn't like it. I painted the bezel with chrome spray paint to avoid brush strokes but it was way to hard for the result I got in m opinion. I would buy a chrome paint pen and do it that way. The inside is just a flat black.

- Is there any specific type of paint you use? I know you mention filler primer to smooth things out, but are you just talking rustoleum off the shelves of Home Depot? What about the parts that were frame color? Did you get some mopar frame color paint online to paint those parts?

No, I just played around until I found what I liked best. For the dash frame, I just used a nice satin black automotive paint. Unfortunately I don't have the name of the paint I used. For the filler I just used the stuff from AutoZone items to skim coat the dash frame and smooth out imperfections then I primered. The ash tray was a real bear and took several trys to match. I would bet Mopar frame color would work well.


- How did you "restore" those interior panels? Most of mine were in good shape, but they look like they could be brought up to date. What about the seats, what was your source info for building those back up?

The panels were a lot of fun to do. I removed the old ones from the frame, painted the frames and glued the new ones on. I glues sections at a time to keep them nice and tight to "sloppy" areas. The only real thing to look out for is making sure they are lined up on the metal panel so they are not crooked when they are installed on the car. I would also lightly glue the area around where the cardboard meets the metal so you don't get the line showing through when finished. I bought new fuzzies for the outer window part and riveted them on vs using the factory staples. There was no way I was going to be able to get those through the factory stapled spot so I used rivets in stead. It worked great. Word of warning, not all fuzzies are made equally. I went cheap on those from EBay and the felt didn't last to install nor did the rears fit. I bought new ones from Year One and those do seem to be much nicer and a better fit. Spend the extra, it's worth it.

All my seat stuff was sourced from Year One at the time except for the pads & burlap which I got from EBay/michaels. If I could go back, I would have spent extra for Legendary's stuff. I am not sure if they are one in the same now but mine was sourced from PPG (I think that's the name) and while the quality is more than satisfactory to me, I have seen the Legendary materials in person and it's just that much better. That's just my opinion and experience though. It just seems thicker and the grain looks more authentic in my opinion.

Note on the seats. If you do them, make sure the seams line up on the upper and lower before you hog ring them back. one the 71-72's, the seams are horizontal to vertical and it's very noticeable if you the lines are off. I redid mine 3 times before I was satisfied.

Hopefully this helps and I will be posting more pictures of progress very soon.
 
Last edited:
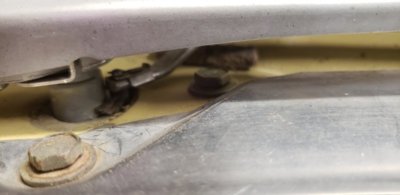
I dont see where you ever got a reply on the wiper arm clip, this is what it looks like, not sure where to get one at ..

Resized_20191001_145945.jpeg
 
I dont see where you ever got a reply on the wiper arm clip, this is what it looks like, not sure where to get one at ..

View attachment 843422

Thanks so much for the picture! I actually contacted specialty R/T last week and he had a used b body one that he sold me. Per him, The E-Bodies and B-Bodies are not interchangeable as the E-bodies are slightly smaller.
 
Thanks so much for the picture! I actually contacted specialty R/T last week and he had a used b body one that he sold me. Per him, The E-Bodies and B-Bodies are not interchangeable as the E-bodies are slightly smaller.
good to know
 
Well, I am starting to see my to do list shrink and shrink. I would have had the carpet in but I made a mistake in cutting the front part (badly) and now I need to redo the whole thing. Thankfully carpet is not a huge huge cost to buy again. While I am waiting for that to come in, I have been going through wiring and testing items and I have a lot left to go through. I did a system check the other night and got headlights, taillights, instrument cluster but that was about it.

I also will have to pull the dang gauge cluster again. It turns out the tachometer doesnt sit in the lenses area properly and and the green turn signal indicator plastic came off or more likely it was never on.

Here is a pic I took when I turned the lights on. Hard to believe it has some power now.

20191007_201958.jpg
 
Your headlights are bright, is that with the engine running or not?

I had to add extra ground wires to both front turn signals, even though the screws contacted bare metal (the lamps were shedding some very weak light until the change). I should add some extra ground wires to the tail lights also. The passenger side tail light is not as bright as the driver's side.

i decided to use the stock lamps for the dash lights (in lieu of LED) but they seem to be very weak, can't hardly read the instruments at night. I drove my parent's new '71 Road Runner back in high school and I remember the dash lights being plenty bright. Not sure if it's the 64 year-old eyes of mine or another ground problem there.

It may just be the picture because I was thinking they looked pretty dim in person. This is with the car off. I may have to do the same because my passenger side light never came on. I have a lot of trouble shooting to do!

I used regular cluster lights as well and it was dimmer than I thought they would be but it could be because the engine was not running. The dome light worked really well though.

I've had good success brightening things up in the past by using relays for the headlights. Brightens up the rest of the lights too & takes a load off the wiring harness. But I do like LEDs for the dash.
 
I have the headlight relay changeover in my vehicle (and the wiring switch from ammeter to voltmeter). And my dome light is very bright at least.
 
Well it's been some time since I updated last but I have finally got the car on the road and driving it working out the last of the bugs. I have to say this car has fought me every step of the way in one way or another and has been a major pain in the butt but now that I am driving it, it was worth every moment. I always find reasons to take it out and enjoy the heck out of it. I am going to create a few more posts of of the things that went wrong so others might benefit from my ignorance as well as potential issues that I had with after market parts. After that I will post some final pictures and a video of it on its first drive home in 16 years.
 
Engine Issues:

I am sure those that are experienced in building engines will read this and think I am a complete idiot. I am sure that most of the issues I had are due to beginner mistakes and while expensive, I would have done it again because I learned a lot from these experiences and that is what makes it worth it to me. I'm not afraid to admit my mistakes and want to share in case it can help someone else who like to try.

When I built the engine, I wanted to go with a roller lifter/rocker set up so I would not have to ever worry about what kind of oil I used. Turns out that was a bigger headache than I could have imagined for an LA 340 (at least for me). First, I had clearance issues with the push rods not clearing the cylinder wall on the head due to the changed angle from the hydraulic roller lifters being much higher than a flat tappet lifter. I had the holes in the aluminum Edelbrock RPM heads milled out but the machine shop that did it went straight up and down and did not fix the clearance issue. They also drilled into the exhaust port and had to sleeve Unfortunately I did not find out until after the initial start up but no damage was thankfully done but I ended up going with a flat tappet cam in the end.

Well fast forward to the first start up and I got it started but it was running very rough and I ended up with more critical issues / failures. It turns out, that when I measured my push rods for the new set up, I accidentally set the measuring lifter at the wrong length and ordered too long. Thankfully it was close enough and I did not damage and of the valves when I started it but it was long enough to hurt compression in 4 of the 8 cylinders and also cause a lot of issues with backfiring. This in turn broke my torque converter ring gear multiple times. I was wondering why I was not getting the compression at times and that would definitely explain. To be honest, I am not sure how I every got the dang thing started. I thought it was the alignment of my starter but it was the lack of compression in the cylinders that cause the back firing and broke the ring gears. This one is all on my and I can not describe how stupid I felt when I found out. Once I broke the 2nd ring gear and not knowing what it was at the time, I got wise and hired help because I was over my head and throwing money away at this point. For anyone in DFW, there is a shop in Mansfield called House of Hot Rods and they are good people. There is a mechanic there that specializes in Mopars and he helped me diagnose all of my mistakes.

Anyways, he told me why I wasn't getting compression and that I had another even bigger issue that I was unaware of. It was a blessing in disguise because if I had not taken it in when I did, I would have destroyed my engine. When I purchased everything for the rebuild, I thought I bought standard sized rings but they were file fit and not gapped properly. This was a big newbie mistake I made and will never make it again and the same goes for the push rods.

Once he got that fixed everything went back together nicely. Overall I did good job with assembly but if you don't measure properly that does not amount to much as I found out. Well once we (meaning he) got the engine back in, the 727 transmission immediately failed. I was going to change this out anyways for a modern overdrive unit but since it was going to be expensive to go that route, I decided on a 5 speed TKO swap from Silver Sport. That is the best money spent on this car yet in my opinion. I was going to do this myself but HoH gave me such a great deal that I had them do it. I will say that my car also fought them as well so I don't feel so bad about all the crap I went through before hahaha. Going 75 mph at 1900 RPMs with 3.55 gears is pretty awesome.

So they get the transmission installed and they think its ready to go but wait a minute, there's more! My rebuilt power steering box from firm feel is leaking really bad from the top! I had my unit rebuilt in early 2017 and never used it but because so much time had passed, there was nothing they could (would) do. I did call and speak with Matt and he alluded to a cracked case (although they should have tested it before rebuilding it) because of where it was leaking. He gave me instructions on how to take it apart to check the O-Ring or said I could pay to ship it back and they would look at it before but I would be out of pocket for what they had to do. I completely understand why they have policy but it didn't set right with me because I knew I had never used it or dropped it. I said eff it and bought a Borgeson replacement unit with the Bergman attachment that does not require drilling. I talked with the person and Bergman and he was super helpful and is also a vendor here. I got the car home and installed the unit with the coupler and it went very smoothly. With the money I spent at firm feel and the referrals they had, I truly expected more from them and can say that I would not recommend them especially versus brand new replacement. The header clearance and road feel is worth the extra money you will have to spend in my opinion.
 
Last edited:
Wheel Issues:

This will not apply if you are using drum brakes but if you are considering buy 15 inch Wheel Vintiques 84 Series Magnum 500 Road Wheels 84-5712044 for your car, know they will not fit rear axles with disc conversions. While they are 15" rims, the center is based on the 14" casting and will not clear the back without a small spacer and longer wheel studs. Very nice rims but that was a big headache when I purchased them back in 2018. I ended up having to use hub centric spacers and could only do 265s on the back so I did not rub the fender. They fit my front discs just fine.
 
looks great! Love the Pistol Grip, but I need to find a Hurst T handle one of these days.
 
Awesome build! Just don’t go back and add up the receipts, lol, enjoy the car, it turned out beautiful.
 
Auto Transport Service
Back
Top