• When you click on links to various merchants on this site and make a purchase, this can result in this site earning a commission. Affiliate programs and affiliations include, but are not limited to, the eBay Partner Network.

66 Coronet Deluxe

Looks like your brother is getting everything cleaned up and painted up real nice.
 
Come on now, you got me all primed up for an update...hehe


:grin::poke:
 
Grzilly Attack!!

As you wish - Update!

We heard a ruckus in the shop and found a Grizzly bear rootin' around in my car! I think he was hoping to find some snackies under the seat but no luck - haha!...........Oh wait........that's my crazy intern (a.k.a. - my brother)! :jerk:
.
.
.
.
.
.
.
.
.
.
.
.
.
.
.
.
.
:naka:
.
.
.
.
.
.
.
.
.
.
.
.
.
.
.
.
.

.
Grizzly1.jpg


He tore it up good;

Grizzly2.jpg


Then he found this;
(I think this is one a'dem buildini sheet thingies all the exper'twars is carryin on about so now I see why they call me 'special'.....yah I'm 'gifted' alright.......There was another one under the back seat bottom too but it all looks like lowroglyphics to me)

Grizzly3.jpg


And this;

OhPoopie.jpg


And this sweet little exhaust hanger hackery;

HangerButch2.jpg


Plus a little bliss here;

Sweetness.jpg


Then Grizzly got out his claws and got after it with the Crud Thug;

Grizzly4.jpg


Worst spot was Rt Rear under lower seat cushion area. Not a gash you're seeing there, just one tiny pinhole that you can't see. Grizzly determined the pinhole was caused by muffler cooking through the undercoating in one spot near tunnel but I was too lazy to get under there and confirm his thesis. Anyway, I'm thinking this is a gift really, if that's all I have to worry about, we're golden with the floor.......

RtRRFloor.jpg


First round with our soon-to-be-patented "Super Grizzly Acid Wash", yah, looking good so far;

AcidWash.jpg


Maybe I'm nutz, but I think I'm actually liking the rust hole over the t-bar xmember. After cutting it open, we should have decent access to attack the xmember rust from both sides before the safe-t cap repair thingy goes on the underside. Later the floor will get a "Grizzly Patch" and then it's more beer/pizza/prOn for everyone!!..... :icon_pidu:

RustCrusty.jpg


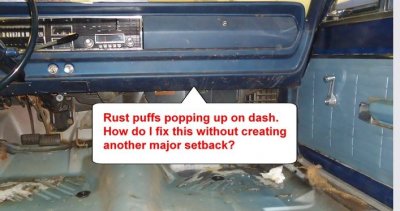
OK, now what to do with the rust puffs on the dash?? I can't afford another project within a project, my brain hurts already and I really aint even done nuthin yet!! :headbang:

RustPuffs.jpg


More fun stuff coming soon if I can keep Grizzly from going back into hibernation....
 
Last edited:
Because I know for a fact you recently acquired some goodies (hehe I Deliver apparently)...I think we all need updates as these aforementioned goodies get placed in their home.

btw, I forgot to collect on those hemi badges...i do wanna stick one on that gas tank hump :headbang:
 
dash.JPG


Depends on what you consider a major set back.... 1) Best bet would be to pull the dash, have it blasted primed and repainted. All the corners, edges and tight spots make that about your best option. 2) Pull the dash, wire wheel/sand it, prime and repaint. 3) spend 4 hours spot sanding the 100 spots of rust, mask, prime and repaint in the car. 4) Touch up paint over the rust to hold you over for a year, after which you'll be looking at touch up paint with rust coming through. 5) Leave it alone till option 1 looks better....Good luck
 
Well, after poking around under the dash, this falls under the major setback category for me, I see no way for my routine hackery to make this look decent, the dash would have to come out and there's no way in hell my timeline can afford that. As it stands now, I'm moving about 8 times slower than a normal person and it looks to me like the windshield has to come out to get the dash frame out so there's now way to do this properly for now. So, I think I'll add that to the list of things the next guy can do after I'm pushing up daisies.
 
UPDATE! Heater Case

Another update, finally getting after the leaking heater core. My intern/brother ripped out the heater case and got after it. I bought a basic reseal kit from DMT and disappointed that they include the cowl vent seal for the other side, but not the cowl vent seal for the ACTUAL HEATER CASE! Pretty stupid I think, I figure a kit for the case would come with the seal for the case, not the SEPARATE vent box on the other side of the car (driver's side), but yah, what do I know, I'm just a customer......

Before - Note the mouse nest in there, no pieces of meeces though, thankfully....

Before.jpg


PiecesOfMeeces.jpg


Pretty crusty in there, but my bro took care of it. Bead blasted, acid prep and paint, see follow up pic below. We got a little silly with the order, completely painting everything except the case and stuff riveted to it but it's nice knowing that something might have been done right and most of the musty mouse nest smell should be gone now.

FreshAirBlendDoorBEFORE.jpg


Grizzly bear at work doing the acid wash....I thank heavens for this guy...
GrizzlyBear.jpg


Repairing a crack and missing chunk....sheetmetal reinf on underside;

Repair1.jpg


Repair2.jpg


She looks lonely back there....

WIP.jpg


WIP1.jpg


FreshAirBlendDoorAFTER.jpg


Almost done, just need the cowl seal......

After.jpg


Decided to make my own cowl seal, copied what I saw from the factory piece using a chunk from a weatherstrip I had in the garage. Yes, there's a seam there, just like the factory and no, I don't care how it looks, just like the factory. I think it will work.

DIYSeal.jpg
 
Last edited:
That thing looks just plain sweet....brand new. By the way, if you need parts in the future, I have 3 of those heater boxes LOL.

I think I need to borrow your grizzly bear for a while...
 
Thanks bud!
Be careful what you wish for, Grizzly boy can eat A LOT of pizza! I think half my car budget went in his belly already!:toothy9:
 
UPDATE! Defrost Vent Repair and a little PAINT!!

Noticed both the defroster vents hanging down on one end, definitely zero budget for replacements, so I opened the butcher shop again......a couple of bondo spreaders were sacrificed to make new tabs. A couple of rivets and fender washers, done deal, see you in 50 years.

Defrost.jpg


Defrost1.jpg


Defrost2.jpg


DoneDeal1.jpg


DoneDeal2.jpg


- - - Updated - - -

Inspired by the mad engine bay work of my regional tech advisory kb67mopar, I got after the engine compartment rust that was really gnawing at me. I was going to blow this off since the OE paint looked so nice in there, but I figured it would be nice to take care of this now so the next guy can can just spot in the rest on the next go-round.......

Here's what I was after;

Before1.jpg


My other intern, my nephew at work here;

Keef.jpg


A little of this and that and it's shaping up;

Before2.jpg


Then the rust lurking under the battery tray started calling and the work expanded into the upper apron;

Apron.jpg


I dragged my pal into this mess too, poor guy, bad enough that my car is taking up some of his shop space! I work for this guy sometimes, trying to fix cars, I don't know schlitz about cars though, so that aint going too good :eek:

WIPx.jpg


Primed and sealed;

PrimedAndSealed.jpg


Far from perfect......perfect from far. I couldn't be happier with the results :icon_sunny:

Done11.jpg


Done22.jpg
 
Hey good work Sprag. Coming along quite nicely! Wearing Bears apparel around here would pretty much be the equivalent of running around town in a Department of Corrections cat suite...lol
 
Dang....that was quick. Two updates in a day....I thought I was really making progress...keep the grizzlies a workin!
 
Just read this whole thread. Very cool car and re-do!!! Love that color on that body style. Someday i woukld like one of these.
Keep posting the updates and don't forget to video tape the unveiling to the mrs. when the day comes.
John
 
Everything is looking good. Where did you get your foam at? Doing my heater also and need to get some for mine.
 
The foam was part of the Heater Box Restoration kit I got from Detroit Muscle Tech, they advertise (sponsor?) on the forum here, look on the right edge of any page here and you should see their advertisement. They make a very nice kit and their instructions actually make sense and include a lot of pics. Their heater kits are HERE.
When you get ready to do yours, I suggest you look yours over before you order the a kit, you might get away with the basic kit like I did if you don't need the screws, cowl seal or blower motor tube (the last two you can buy separately in the 66-70 'Misc' section HERE).
 
Thanks, the only thing I need is the foam. Everything I got is good to go.
 
The Great Outdoors!

It don't look like we'll get on the rack any time soon, so out she goes!:angryfire:

Two weeks to the delayed deadline and only eleventy million things left to do! So much for deadlines huh? Nervous breakdown to commence shortly..................

BackOutside.jpg


BackOutsideMay112013.jpg


Got the bowl work butchery done and started the electrical upgrades.
Now that things are starting to come together, things should start coming apart any time now....wish me luck!:icon_eyes:


67BowlWork.jpg


LoadCenter.jpg
 
Auto Transport Service
Back
Top