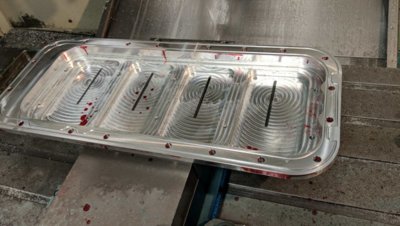
I wasn't sure if you were just laying a string in and cutting it.
You are using an out of date browser. It may not display this or other websites correctly.
You should upgrade or use an alternative browser.
You should upgrade or use an alternative browser.
70 Hemi Superbird Restoration..................errr.....scratch that........
- Thread starter Hemirunner
- Start date
Hemirunner
Well-Known Member
We’ll lay the actual o-ring stock in and get the length right. They need to be slightly smaller than the groove in this case so they stay in place. I have a vacuum pump so once assembled, I plan to draw it down and see how well it holds.I wasn't sure if you were just laying a string in and cutting it.
Hemirunner
Well-Known Member
With the crank in, I thought I’d add the “shaft of cams” mainly to get it off the bench and out of the way but also to make sure a standard timing gear set would work without being sloppy since we line honed.


Once in the timing set was added. This is a JP 9 position unit with a Torrington bearing on the back.

It fit well. I ran a bead of Ultra Grey around the timing cover area and added the timing cover frame. Since I already had the number one piston and rod assembled, I couldn’t resist dropping it in.

Now I should be set to degree the cam.
Once in the timing set was added. This is a JP 9 position unit with a Torrington bearing on the back.
It fit well. I ran a bead of Ultra Grey around the timing cover area and added the timing cover frame. Since I already had the number one piston and rod assembled, I couldn’t resist dropping it in.
Now I should be set to degree the cam.
Last edited:
Engine ****, I like it!
Hemirunner
Well-Known Member
Ha ha yeah there’s gonna be a lot of it for a while!Engine ****, I like it!
Hemirunner
Well-Known Member
Put in 3 more....

I think the pins will be stiff enough!

Added an aluminum fuel pump block off plate.

I think the pins will be stiff enough!
Added an aluminum fuel pump block off plate.
Hemirunner
Well-Known Member
Yes. The block is upside down in that shot.Is that block off plate on the pass. side?
Hemirunner
Well-Known Member
All 8 are in!


Better than a blue pill right there!
Hemirunner
Well-Known Member
Mark B
Well-Known Member
Wow Mike that is looking great. I am just going to have to take the time to stop back down and see you (and more importantly your car) again.
Hemirunner
Well-Known Member
You’re welcome anytime Mark! Bring the vert!Wow Mike that is looking great. I am just going to have to take the time to stop back down and see you (and more importantly your car) again.
The $625 bill for o-ringing this and both valve covers offset those sweet dreams lol.put that under you pillow tonight and have sweet dreams
Hemirunner
Well-Known Member
Got the rod bolts stretched today. L-19 bolts are always a PIA and I hate wearing latex gloves so that doesn’t make it more fun lol.

I bolted the drive unit for the oil pump on and torqued those bolts. It seals with o-rings as well, so no gasket. Trying to go gasket free here.

I took the time to degree the cam. That confirmed that everything was machined properly when it came out to a 110 centerline while installed in the zero position.

I had to face off the cam bolts as the cover is kinda shallow. It clears the water pump housing by about 3/16 so there’s really no reason why it couldn’t be an 1/8” deeper.

I used a comp cams nylon thrust button and had to shorten that up as well. There’s two hours of labor that could have been avoided if the cover was deeper.

I set up the indicator in the valley and recorded cam thrust.

There’s enough flex in the cover that I felt it should be run tight. This works.

All ready for a billet dry sump pan. I should have that back tomorrow night. Can’t wait to button this up.
I bolted the drive unit for the oil pump on and torqued those bolts. It seals with o-rings as well, so no gasket. Trying to go gasket free here.
I took the time to degree the cam. That confirmed that everything was machined properly when it came out to a 110 centerline while installed in the zero position.
I had to face off the cam bolts as the cover is kinda shallow. It clears the water pump housing by about 3/16 so there’s really no reason why it couldn’t be an 1/8” deeper.
I used a comp cams nylon thrust button and had to shorten that up as well. There’s two hours of labor that could have been avoided if the cover was deeper.
I set up the indicator in the valley and recorded cam thrust.
There’s enough flex in the cover that I felt it should be run tight. This works.
All ready for a billet dry sump pan. I should have that back tomorrow night. Can’t wait to button this up.
Hemirunner
Well-Known Member
Thank you! I’m liking the way it’s coming together. It should be unique.That's a thing of beauty inside and out.
Super clean, and amazing work as always - I'm a fan!
Hemirunner
Well-Known Member
Thank you! Stay tuned as it comes together!Super clean, and amazing work as always - I'm a fan!
If you can, I'd like to know what it weighs when assembled.
Similar threads
- Replies
- 29
- Views
- 927
- Replies
- 86
- Views
- 3K
- Replies
- 41
- Views
- 5K
- Replies
- 47
- Views
- 3K
- Replies
- 19
- Views
- 612


