• When you click on links to various merchants on this site and make a purchase, this can result in this site earning a commission. Affiliate programs and affiliations include, but are not limited to, the eBay Partner Network.

71 Road Runner Restoration Started

Here's how the rolling chassis looks now. It was dusty from the body work I had been doing on the cab, with all the sanding and such.
IMG_1817.JPG

Since these pictures were taken, the misses has cleaned it up and now it looks good as new.
IMG_1818.JPG

This truck came from the factory with some serious tires on it. These rims are 10 inches wide !!!
I have the radiator core support and the hood hinges blasted down to bare metal and primed in epoxy.
These parts still need to be painted white. They are light gray in these pictures.
IMG_1819.JPG

The hinges are just held on with some fencing wire.
 
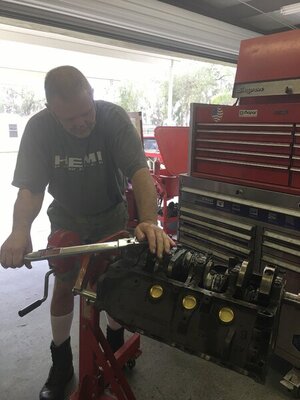
Here's the basic block. Nothing fancy here, its a 5.9 L Mopar V8.
IMG_1813.JPG

I had Express Engines in Deland do the machine work. The block was bored .030 over, the crank was in great shape and only needed polishing. Since I went with some aftermarket Eagle rods, and Keith Black hypereutectic pistons, I had them balanced it too.
IMG_1827.JPG

These guys did it in record time, since they knew what we were going through, John and Fritz didn't want me to wait. I thought this was very good of them, and it was sincerely appreciated. Here I have the wife cleaning the block. She's a real trooper, and the best part has been working on this project together. I know it's not a B Body, but a lot of this stuff will be the same..........
IMG_1868.JPG

The pistons and rods are the floating type, so I had to install these little buggers. Spiro lock clips are not too bad to install if you take your time and go gently. They do make a specialty tool for this, but I don't have it. So I went the old school way using a tiny screw driver VERY carefully.
IMG_1834.JPG

IMG_1828.JPG

Once I had everything oriented properly and the rings installed, this is how things looked.
IMG_1854.JPG

Now it was time to pop these babies in place. Using this Wiseco piston ring compressor makes it a breeze and you don't have to worry too much about breaking a ring, like you do with the old school type of compressor. I have a set for the 340 / 360 at 030 over, and another one for 440's also at 030 over. If you are going to be building an engine, do yourself a huge favor and pick one of these tools up. After using this setup, I don't know how I have lasted so long without one.
IMG_1872.JPG

In no time flat, with help from the misses, I had all 8 cylinders plugged with fresh pistons and rods.
IMG_1873.JPG
IMG_1874.JPG

Here I am putting the final torque on the rods.
IMG_1871.JPG
The short block is now done, and today was spent prepping the heads.

Stay tuned for another update. I'll try my best to post up something on here again very soon. Thanks for following along with this.
 
Louis, great to see you back! the Dakota is looking awesome! Great to see your wife out there plugging away on it! She’s going to have a blast driving it again. Prayers sent to you and yours!!
 
Glad you can post again on here with all your work. Yes, the Challenger running on the engine stand was very impressive, chills on my spine. Like Louis we both love the sound of a good healthy Mopar. Nice to see you back my friend. We will return 3/5 through 3/16. See you and Sandy then.
 
IMG_6597.jpeg


It’s been a long time since I’ve been logged in here. I’m happy to report that we have finished my wife’s Dakota R/T and that I have started working on my Challenger again.

Here’s a few pictures of the truck afterwards. This was completely taken apart down to the last bolt and nut and everything was stripped to bare metal.

I rebuilt or replaced everything. It is a brand new truck.

This isn’t a B Body nor is the Challenger but since they’re both Mopars I didn’t think you would mind.

I hope to be more active on here now, so please check back for updates.

Thanks !

IMG_6598.jpeg


IMG_6599.jpeg


IMG_6600.jpeg


IMG_6602.jpeg


IMG_6604.jpeg


IMG_6605.jpeg


IMG_6607.jpeg


IMG_6608.jpeg
 
Hi Louis, welcome back. The truck looks absolutely incredible. Must have been a labor of love, that's for sure.
I do hope you post your Challenger build on here. I know it's not a B body, but it would be great to see it. Last time I saw you post about it, all the sheet metal was off it.
 
Thanks everyone for the warm welcome back. Here’s a quick update.

We had a problem with the AC unit in our house. The sad thing about this situation is that the unit itself was completely replaced about 2.5 years ago. Luckily it was covered by the warranty but we still had to pay for the labor. Oh well. $h1T happens right ?

On to the good stuff now.

I’m building two sets of 8 3/4 carriers. Both are the 489 case and I always install the crush sleeve eliminator and I use American made Timken bearings. I know that they are occasionally packaged with parts from Mexico and other places but if you look at the back of the bearings you can see “MADE IN THE USA”. These are the ones that you want to use. You could probably get by with some other brands as long as they’re still a quality product.

But that’s getting to be a hard thing to find anywhere lately. Quality. A thing of the past. Geez. I’m sounding like a grumpy old man !

I have already set up the pinion depth on both, and pressed the new Timken bearings on the rear of the pinion. It’s super easy with a set up bearing and the proper tools. You can’t do it without the setup bearings because of how the shims are located behind the rear pinion bearing.

The front pinion bearing is also pretty hard to put on and off and it has a slight interference fit. Normally you would not have to worry about it because of the crush washer.

But I eliminated it. So I have to install the shim spacers and then turn the pinion to make sure that the pre load is correct on the pinion bearings.

This is always a trial and error thing. I usually measure the original crush washer and use it as the starting point. Necessity is the mother of invention.

I needed a good setup bearing for the front of the pinion too. I took a new Timken bearing and carefully honed it out so that now it slips on and off without much trouble. It took forever with a brake cylinder hone, but I managed to get it done in this century !

I also made the handy dandy carrier holding fixture, using some scrap metal I had left over from building the frame rail jig.

So I had to paint it with a Mopar color. I had some Chrysler Corporate Blue left over from a previous engine build.

Chrysler Blue it is then !!!

One gear set is a 3:23 and the other is a 3:55. Both are going to get an Auburn differential.

IMG_1063.jpeg


IMG_1064.jpeg


IMG_1065.jpeg


I have been busy with fabrication work. I have made a killer dash frame stand. I’ll post up some pictures of it later.

In true fashion it’s been painted in Mopar colors too. The frame itself is Black and Aluminum color. But the holding straps are Hemi Orange.

I had to…. Just couldn’t resist.

Thanks for stopping by.
 
Last edited:
Thanks everyone for the warm welcome back. Here’s a quick update.

We had a problem with the AC unit in our house. The sad thing about this situation is that the unit itself was completely replaced about 2.5 years ago. Luckily it was covered by the warranty but we still had to pay for the labor. Oh well. $h1T happens right ?

On to the good stuff now.

I’m building two sets of 8 3/4 carriers. Both are the 489 case and I always install the crush sleeve eliminator and I use American made Timken bearings. I know that they are occasionally packaged with parts from Mexico and other places but if you look at the back of the bearings you can see “MADE IN THE USA”. These are the ones that you want to use. You could probably get by with some other brands as long as they’re still a quality product.

But that’s getting to be a hard thing to find anywhere lately. Quality. A thing of the past. Geez. I’m sounding like a grumpy old man !

I have already set up the pinion depth on both, and pressed the new Timken bearings on the rear of the pinion. It’s super easy with a set up bearing and the proper tools. You can’t do it without the setup bearings because of how the shims are located behind the rear pinion bearing.

The front pinion bearing is also pretty hard to put on and off and it has a slight interference fit. Normally you would not have to worry about it because of the crush washer.

But I eliminated it. So I have to install the shim spacers and then turn the pinion to make sure that the pre load is correct on the pinion bearings.

This is always a trial and error thing. I usually measure the original crush washer and use it as the starting point. Necessity is the mother of invention.

I needed a good setup bearing for the front of the pinion too. I took a new Timken bearing and carefully honed it out so that now it slips on and off without much trouble. It took forever with a brake cylinder hone, but I managed to get it done in this century !

I also made the handy dandy carrier holding fixture, using some scrap metal I had left over from building the frame rail jig.

So I had to paint it with a Mopar color. I had some Chrysler Corporate Blue left over from a previous engine build.

Chrysler Blue it is then !!!

One gear set is a 3:23 and the other is a 3:55. Both are going to get an Auburn differential.

View attachment 1635105

View attachment 1635106

View attachment 1635107


I have been busy with fabrication work. I have made a killer dash frame stand. I’ll post up some pictures of it later.

In true fashion it’s been painted in Mopar colors too. The frame itself is Black and Aluminum color. But the holding straps are Hemi Orange.

I had to…. Just couldn’t resist.

Thanks for stopping by.
Boy, so that's sure is clean but not for long, huh?
 
I have just finished building two different gear sets. Both are 489 cases for the 8 3/4 rear ends.

These are basically the original 489 large pinion gear case housings that have all brand new quality parts installed on them. I always use a good quality bearing set, and try to get American made parts whenever possible.

But this is getting harder to find lately. Unfortunately for us it seems that everything we get is made out of Chineseium. Quality seems to be a thing of the past.

I have installed billet steel crush sleeve eliminators in both.

One set is a 3:23 ratio and the other is a 3:55. Both have the large Mopar 7290 u joint with the U bolts used in place of the original strap style of U joint cap retainers for the drive shaft.

I have used a brand new Auburn differential for both of them as well.

Previously I had already set the pinion depth to the height indicated on the pinion gear.

Here’s a few pictures of the process.

IMG_1388.jpeg


IMG_1391.jpeg


IMG_1394.jpeg


IMG_1393.jpeg


IMG_1396.jpeg


IMG_1395.jpeg


IMG_1398.jpeg


IMG_1397.jpeg


IMG_1400.jpeg


IMG_1399.jpeg
 
Last edited:
As mentioned above in a previous post, I took a new Timken Made In USA outer pinion bearing and honed it out to use as a setup bearing for use in determining the correct thickness of shims needed for the crush sleeve eliminator.

Once I had finished honing it I was able to slip it on and off easily without having to worry about the interference fit on the stock bearing.

It made things much easier to determine the correct thickness of shims needed to install the crush sleeve eliminator.

Now I have two different setup bearings to use for setting up the 489 cases. I have one for the larger inner pinion bearing and now I have made one that is used for the smaller outer bearing.

Both of these can be slipped on and off easily by hand. It’s necessary for picking out the right size of shims that are needed for properly setting up the new gears.

I always start out with the factory shims and then go from there to get them spot on.

I will also take the original crush sleeve and then measure it for overall length. This will help get you where you need to be a little bit faster than not.

It usually takes me about 5-6 times of taking it apart before I can get the proper bearing pre load set. This is why I made the setup bearing.

I’m replacing the setup bearing with an identical one made by the exact same manufacturer so it usually works well.

Just to be safe I always double check the preload settings with the seal not installed yet.

The seal will affect your final torque value settings so you should always check it without a seal installed. You should also check your pinion preload setting when rolling the pinion around. This should be the average when you are physically turning the pinion over with your inch pound torque wrench. You should also use a beam style inch pound torque wrench to check the setting.

I was only able to post 10 pictures on my previous post so I’m going to add some more pictures on this one.

IMG_1402.jpeg


IMG_1413.jpeg


IMG_1415.jpeg


IMG_1414.jpeg


IMG_1417.jpeg


IMG_1420.jpeg


IMG_1421.jpeg


IMG_1418.jpeg


IMG_1419.jpeg
 
Last edited:
More goodness to report. I got the wiper motors restored and they have arrived in the mail today.

One is for the 73 Challenger and the other one is for my Lime Green 70 Challenger.

They look killer and I’m super stoked about getting them back so soon.

As always comments are always welcome and even encouraged.

Thanks for stopping by.

IMG_1526.jpeg
 
Today I finally got around to building the heater controls. I had a new reproduction Rally Dash bezel for a non AC car. I had a few old spare bezels that were trashed but they still had good parts.

So after some elbow grease and some time this part is now ready to install on the dash frame.

As always comments are welcomed. Thanks for stopping by.

IMG_2312.jpeg


IMG_2311.jpeg


IMG_2310.jpeg


IMG_2309.jpeg
 
Auto Transport Service
Back
Top