• When you click on links to various merchants on this site and make a purchase, this can result in this site earning a commission. Affiliate programs and affiliations include, but are not limited to, the eBay Partner Network.

Ammeter pegged but voltage at 14v

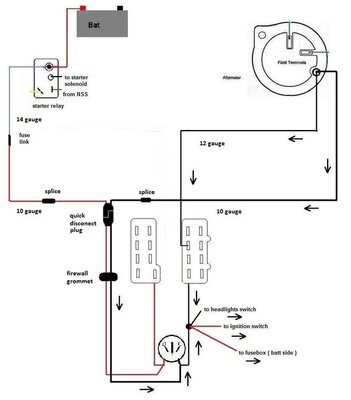
Ammeters were fine when these cars had reasonably new and clean (no rust/corrosion, etc.) bulkhead connectors. Best thing to do is by-pass that potential weak spot with a direct 6/8 ga. red line from Alt. to Bat. All accessories tapped into the wire from bulkhead to ammeter will stay put and work fine, but heavy bat. charging will flow through the new heavy line and not the bulkhead connector, saving a total melt-down.

And why no fix it to get it back to a new and clean conections? Just like when your engine belts get dryed or broken and you replace it for a new one!

when your brake pads get worn, you replace the pads, not the calipers or cylinders!

When your block gets worn, you overbore the cylinders and fit new pistons to the new size.

And I can go on with hundred of examples to ilustrate the same.

With a difference... fix wiring is way cheaper and easier than any of those examples. But most of ppl here is lazy enough to go for the laziest "fix", without even take care on understand how it works.
 
I don't mind the ammeter because that's the stock setup but previous owner of my car had at one point drilled out the main feed for the ammeter in the bulkhead connector and fed 8 gauge wire through it. Must've had issues but curiously he did not switch to voltmeter. I installed all new harnesses from year one including the bulkhead using dielectric grease to go completely stock. Hope it will last another 50 years.

I noticed that once I started keeping the battery on a tender the ammeter needle barely moves.
 
while the batt keeps charged, the ammeter won’t ( or barelly ) sense anything. Ammeter reads what comes in or out from batt. Of course if the batt is full, the amm won’t register charge. Hence the importance of get a good alt able to feed as much as posible all the car needs at the minimun speed posible.

Neither get accesories being feeded from batt. That will be registered as a Charge, which is not really charge. But will keep stressing unnecessarily the ammeter giving a “wrong” reading.
 
Neither get accesories being feeded from batt. That will be registered as a Charge, which is not really charge. But will keep stressing unnecessarily the ammeter giving a “wrong” reading.

It is important to make a distinction between rite or right from wrong in life or automobiles....But....sometimes up is down and down is up....and sometimes wrong is right or wright is wrong....but who determines wrong from right or rite or correct.... I guess its up to the individual's own preferences and opinions or interpretation and understanding....or skill and ability......etc.
BOB RENTON
 
Ammeters were fine when these cars had reasonably new and clean (no rust/corrosion, etc.) bulkhead connectors. Best thing to do is by-pass that potential weak spot with a direct 6/8 ga. red line from Alt. to Bat. All accessories tapped into the wire from bulkhead to ammeter will stay put and work fine, but heavy bat. charging will flow through the new heavy line and not the bulkhead connector, saving a total melt-down.

So, your method is to leave everything as is, just tap off the same alt lug directly to the pos battery terminal and the path of least resistance will do the rest...?
 
Ammeters were fine when these cars had reasonably new and clean (no rust/corrosion, etc.) bulkhead connectors. Best thing to do is by-pass that potential weak spot with a direct 6/8 ga. red line from Alt. to Bat. All accessories tapped into the wire from bulkhead to ammeter will stay put and work fine, but heavy bat. charging will flow through the new heavy line and not the bulkhead connector, saving a total melt-down.

Unfortunately that's NOT exactly the way electronics work. You've now created a parallel circuit that will have current flow through both branches. It can be calculated what the flow through each will be, but it takes a little math.

So, your method is to leave everything as is, just tap off the same alt lug directly to the pos battery terminal and the path of least resistance will do the rest...?

As stated above, this will reduce the current flow through the ammeter circuit, but it will not eliminate all of it. Way too many people believe this "electrical stuff" is simple when they don't have a thorough understanding of "electrical principles and theory". Often the supposed "remedy" they incorporate may create new problems.
 
It is possible (as others have alluded to) to continue running the stock ammeter in these things.
With the possibilities of carnage always present in the back of one's mind, routine maintenance
and stewardship of these cars means you always cast a wary eye towards the original wiring,
looking for signs of problems, but if all is well (verified), the stock gauge works fine if everything
else is close to stock.
 
Mainly if the alt is able to feed everything at the less speed as possible. On that stage everything will be fine with the ammeter
 
Unfortunately that's NOT exactly the way electronics work. You've now created a parallel circuit that will have current flow through both branches. It can be calculated what the flow through each will be, but it takes a little math.


As stated above, this will reduce the current flow through the ammeter circuit, but it will not eliminate all of it. Way too many people believe this "electrical stuff" is simple when they don't have a thorough understanding of "electrical principles and theory". Often the supposed "remedy" they incorporate may create new problems.

I intended to go this route posted by Nacho-RT74 on another site (maybe on here to...?) and get the higher amp alternator I suppose. I found this little beauty cleaning and re-greasing my bulkhead

IMG_20210925_100439454_HDR~2[1].jpg Alt feeding COMPLETELLY the car, with parallel wires2.jpg
 
I have the same problem on my 68 Roadrunner my ammeter shows overcharging on the gauge but when I test it only show 14.5v at 2000 RPMs and then at idle it goes back down to about 12.5v. Changed 3 VRs and 2 alternators but still the same
 
I have the same problem on my 68 Roadrunner my ammeter shows overcharging on the gauge but when I test it only show 14.5v at 2000 RPMs and then at idle it goes back down to about 12.5v. Changed 3 VRs and 2 alternators but still the same
You need to go back and re-read (or just read)this whole thread. Batt needs to be checked, tested, fully charged by someone that knows batteries.
This particular fellows issue is he twisted the amp gauge stud, making the gauge show incorrectly.
 
Thanks for the posts guys. Issue was that being more idiot than backyard mechanic I was working on the headlight switch with the battery connected...which caused an arc and as these ammeter gauges are basically just a tiny magnet. That has caused it to become "overcharged" on the needle itself. Resolution == tear the dash cluster back out, remove ammeter gauge and very gingerly shake the needle until it lets go of some of the magnetism. Reassemble...works like a champ. Lesson is take the 2 seconds to disconnect the battery or be prepared to spend 4 hours ripping the dash apart ...AGAIN.

Thanks for all the help.
 
Auto Transport Service
Back
Top