• When you click on links to various merchants on this site and make a purchase, this can result in this site earning a commission. Affiliate programs and affiliations include, but are not limited to, the eBay Partner Network.

Dr Diff front disc conversion 68 Road Runner

Billccm

FBBO Gold Member
FBBO Gold Member
Local time
1:35 AM
Joined
Aug 3, 2016
Messages
3,799
Reaction score
4,594
Location
Tucson
Hello all:

Well, weekend one is complete for my Dr Diff front disc conversion. I'm a little over my head on this project, and may call in reinforcements soon. Not ready to give up, but the job is going very slowly. I can turn a wrench, but never performed any steering, or suspension work.

After about 12 hours, or so of working on the car (including two trips to O'Rielly auto parts), I have completed the following:

1) Both sides Drum brakes are off.
2) Both sides spindles are off.
3) Passenger side spindle is on with caliper mount.

Here are the items slowing the progress:

1) The shields seem to be miss drilled. I've seen the 'odyssey' thread on FBBO where a Dremel is required to open up the ball joint access holes, but on these shields it looks as if they are correct. It's the three shield mounting holes that are off. It seems two of the three holes do not line up by about 3 to 5 degrees. I have a help email into Dr Diff to see what he recommends.

2) The left front brake hard line was really rounded off (not by me) at the rubber hose clip. I have that line off the car now. It broke loose easily from the proportioning block. What I can't break loose is the four other lines. I have soaked them with TriFlow, even ran the engine today 15 minutes to add some heat (it hasn't run in two weeks and it needed that anyway), but they won't budge and I don't want to round them off. I'm really not in a position to replace all brake lines right now.

3) I tried all of the 'just wack it here hard' to get the tie rod end loose suggestions. In fact, I spent over an hour doing this Friday night. Bought a super cheap 'tie rod separator' tool at O'Rielly and these came off.

4) I also tried the 'just wack it here hard when it's turned' suggestion for the knuckle at the upper joint. No dice after an hour. Bought a 'pit arm tool' from O'Rielly and these came loose easily.

I did not damage any boots, so I guess I am doing something right, at least so far.

While there, I replaced many zerk fittings and did a really good lube job.

I also had a delay trying to get the proper torque and access to the cotter pin hole on the upper joint. It seems the knuckle on the disc version is a little more than 1/8 inch taller than what I removed. The washer between the castle nut on the upper joint knuckle is also a little over 1/8 inch think. I wanted to use the washer and not did the castle nut into the knuckle. Final decision was to torque to 85-90 ft lbs rather than the spec of 100-120 ft lbs and use 'half' of a cotter pin.

Long post, but somebody out there might benefit from a shade tree experience I had this weekend.

Any advice, moral support, or sympathy is appreciated!
 
1) The shields seem to be miss drilled.
I would leave them off. Their sole purpose was to protect the rotor from mud, rocks and road grime. Do you plan to drive the car like you would drive your everyday car? I leave these off of every car that I convert to disc brakes.

2) The left front brake hard line was really rounded off (not by me) at the rubber hose clip. I have that line off the car now. It broke loose easily from the proportioning block. What I can't break loose is the four other lines.
Do you have a "line wrench"? Get a quality one, not a Harbor Freight, not one from Auto Zone either. Even the NAPA stuff has gone Chinese. You may need to see a Snap-On, a Matco or Mac tool dealer.

3) I tried all of the 'just wack it here hard' to get the tie rod end loose suggestions. In fact, I spent over an hour doing this Friday night. Bought a super cheap 'tie rod separator' tool at O'Rielly and these came off.
So, no help needed ?

4) I also tried the 'just wack it here hard when it's turned' suggestion for the knuckle at the upper joint. No dice after an hour. Bought a 'pit arm tool' from O'Rielly and these came loose easily.

I did not damage any boots, so I guess I am doing something right, at least so far.

While there, I replaced many zerk fittings and did a really good lube job.

I also had a delay trying to get the proper torque and access to the cotter pin hole on the upper joint. It seems the knuckle on the disc version is a little more than 1/8 inch taller than what I removed. The washer between the castle nut on the upper joint knuckle is also a little over 1/8 inch think. I wanted to use the washer and not did the castle nut into the knuckle. Final decision was to torque to 85-90 ft lbs rather than the spec of 100-120 ft lbs and use 'half' of a cotter pin.
A washer where? Under the castle nut? That may have been included for use only if needed. Sometimes a washer is used if when assembled the cotter key hole sits up and out of the notches in the castle nut. If the cotter key will fit through and sit in the recesses of the castle nut, the washer is not needed.

Any advice, moral support, or sympathy is appreciated!

Read the highlighted points. Good luck and report back!
 
I have the same kit and installed it last year with no issues. I remember thinking my shields were miss drilled as well but it turned out I had them on wrong. I can't remember what I needed to change to make them fit but I can take a picture of the finished product if you want.
 
Thanks for your reply, Kern Dog.

I'll answer your highlights below:

1) I may just leave the shields off. You and many others have suggested the same.

2) I've got a really nice set of Craftsman flare nut wrenches. Having said that, the lines on the proportioning block are not budging. One line broke loose easily, the others are not moving.

3) The Tie Rod and Pitman arm separator tools from O'Rielly did the job, although I'm taking the Tie Rod tool back for either a refund, or replacement. On the second Tie Rod (which came loose eventually), the bolt in the tool actually cracked.

4) The washer was used on the original knuckle, so I thought I needed it on the replacement knuckle. I did not want the castle nut to dig into the knuckle.

I'm going to soak the proportioning block lines again mid week and try again to break them loose next Friday night.

Thanks again for the advice!
 
1. It's your choice on the dust shields. If you want to leave them on, use a Dremel or something to open up the holes, I did. Mine was rubbing on the disc so I bent mine away and turns freely without rubbing.

2. Are you changing the hard brake lines? If so, then you might as well change the lines and proportioning valve, so I wouldn't be concerned about them being rounded off. I like using something like Aerokroil for anything to help stubborn nuts/bolts, etc.

3. O'reillys has a "rent a tool". I wouldn't buy one especially for if only using it rarely. You might need to heat the joint up. I had to to remove one of mine but I prevailed on that one.

4. Heat might be needed on this one as well. Also, consider replacing any joint being dis-assembled.

As Kern Dog said, report back. And ask anything, everyone is here to help.
 
I have the same kit and installed it last year with no issues. I remember thinking my shields were miss drilled as well but it turned out I had them on wrong. I can't remember what I needed to change to make them fit but I can take a picture of the finished product if you want.
I've tried every combination; the two are marked with part numbers that end in "P" and "D" (safe to assume passenger and driver side). I've put them on forwards and backwards, yet two of the three mounting holes are several degrees off.
 
Last edited:
Then it's possible you were shipped the wrong ones then. I noticed in one of your posts, they are black, least that's what it looks like. Maybe I have my posts incorrect(?)
 
Cass will make it right with you. Just be patient and try to contact him again
 
Cass will make it right with you. Just be patient and try to contact him again
I've been fairly satisfied with his response times, but this one he just says to 'open up the ball joint access holes'. They are wide open already!
 
A few updates.

I took the cracked tie rod extractor tool back to O'Riellys for an exchange. I had the receipt and thought this would be a simple in and out swap. The counter guy studied the tool for what seemed like 5 minutes, and said "the tool is worn, but still usable". I pointed out the multiple hairline cracks in the bolt. He said, "yea, but still usable". Now I was ready to debate. Yes, it's only a $14.99 tool, but it has 'lifetime warranty' written on the package in three places, and as far as I was concerned it was broken. Now it's a principle thing. I didn't want a refund, and although I don't need another tool, I wanted a new one anyway!

So, I said something like 'you know I buy something in this store every other weekend, or even more often lately, and I do not think I'm being unreasonable to exchange this for another one'. He slowly walks into the back area of the store, grabs another one, and starts the exchange by filling out a red 'defect' tag.

Okay, back to the important stuff.

Cass replied today and basically said he had test fitted the shields and only the bottom ball joint holes need to be elongated. I give up on this one; I'll go without shields, or I'll make a video and send out to see what I'm doing wrong.

Fellow motorhead at work might come over Saturday and assist. I'll update you guys if any progress.

Thanks for listening!
 
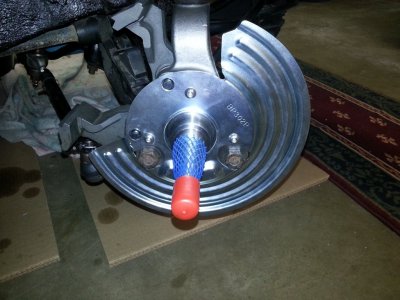
I decided to rat tail file the two mounting holes that were off oh so slightly and the shield fits.
Soaked the proportioning block brake lines with PB Blaster again tonight. We will see what happens tomorrow.
Thanks for all of the advice and support.
 
Progress is SLOW, but at least some progress.

Shield.jpg
 
Slow progress is better than no progress. Lookin good though
 
Well I'm bound and determined to make progress tonight. I have good news and bad news. The bad news is no brake lines will come loose from the proportioning block (other than one for the left front).

I heated the block, tried the flare nut wrench, heated the block, tried the flare nut wrench, sprayed PB Blaster and waited a half hour, tried the flare nut wrench. I finally put the wrench on the back line and gave it my all, and of course just rounded off the nut. Need some ideas on a plan here, please.

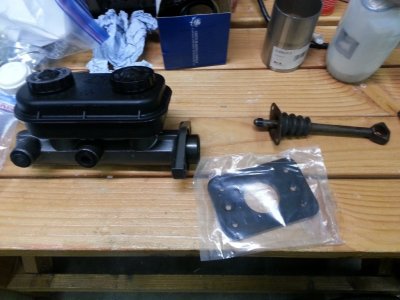
So, I tackled the master cylinder. YES, all four nuts were in place. I removed the back up light switch, placed a swivel on my socket, contorted myself in various positions, and could not break it loose. I grabbed my distributor hold down curvy wrench, and broke it loose enough to get my fingers to take the nut out. The rest was so easy compared to that one nut. I assume three bolts will go back on the replacement master cylinder, correct?

Now I need some help. I'm not sure how the new master cylinder mates with the old rod? The adapter plate looks straightforward, but does the rod just go back into the master cylinder without mounting the rod plate? I'll email Dr Diff, but probably won't get a reply for at least 48 hours.

Sure appreciate any help. Thanks.

20170324_202042.jpg
 
This just in from Dr Diff:


Discard the old boot and plug the rod into the back side of the master cylinder. The rubber clip will hold it in.
 
Auto Transport Service
Back
Top