• When you click on links to various merchants on this site and make a purchase, this can result in this site earning a commission. Affiliate programs and affiliations include, but are not limited to, the eBay Partner Network.

For the Love for my Father, My 69 GTX Restoration

Status
Not open for further replies.
Interestingly enough the brakes lines required less effort and time.....Mainly just bending...
DSC04266.JPG
DSC04267.JPG
DSC04268.JPG
DSC04269.JPG
DSC04270.JPG
 
Now the fun part placing them on the car.....Since I am a stickler for correctness I am going to display some variations between the OE hardware and the vendors hardware kits....Small differences but it is all about correctness for me....
The pictures speak for themselves on the minor variations. The new kit is from retro motive, the old kit is about 4 years old from in line tube. I did not list the brake line kits because they had the same variations....

###those new "S" clips for the fuel lines, based on the length can be deadly to a shiny paint job####

I sent out all original hardware to be restored in the correct finishes....

Common items with almost every fuel/brake line order and no idea why they just cannot take the time to offer a correct kit....
DSC04244.jpg
DSC04250.JPG
DSC04251.JPG
DSC04252.JPG
DSC04253.JPG
DSC04254.JPG
View attachment 404532
 
Good work!


Like I've asked before, why is it that they can get the repro stuff 95% correct, but not 100% correct?
 
Good work!


Like I've asked before, why is it that they can get the repro stuff 95% correct, but not 100% correct?
Mark,

Thank you!

I completely agree. Especially, when it comes to items that continually move off the shelf....
 
I bought some "OE" authorized restoration approved door handles. The "door handles" had metric studs and bolts, didn't fit right, operated 2 times till one broke AND chipped paint :mad:
 
I bought some "OE" authorized restoration approved door handles. The "door handles" had metric studs and bolts, didn't fit right, operated 2 times till one broke AND chipped paint :mad:
Sorry, to hear about that and it is very frustrating. Especially, when a lot of dough is involved....

I have good luck with the ones from Dale's Cuda Shop also a nice vendor as well.

Make sure to replace the new mechanisms with your old ones. The part where the release rod attached to. New ones are wrong and change the angle causing binding and eventually the rod either pops off or a part in the handle breaks.

I may have a pair if you need them....just pm me...
 
Glad I kept all my original hardware.
Exactly.....Never ever throw anything away until your finished....

I take what's left over, box it up, label it and pack it away.....I reuse virtually almost everything and whats left will fit in a 10 X 10 X 10 box.....
 
Never understood why someone would go through the time and expense to get these parts retooled and not make sure they are correct. Seems like on most it's just as easy to make it right as it is to make it wrong
 
Never understood why someone would go through the time and expense to get these parts retooled and not make sure they are correct. Seems like on most it's just as easy to make it right as it is to make it wrong

As far as the companies "making" them, I think it's because they know there is a market, people will buy their products. Bottom line is they pump the products out just to make a buck
 
Lines are all installed.....Tape is cheap but scratches are not........
DSC04358.JPG
DSC04359.JPG
DSC04360.JPG
DSC04361.JPG
DSC04362.JPG
DSC04363.JPG
DSC04287.JPG


Opps...I forgot about these push in clips...They were the same as the originals..
DSC04357.JPG
DSC04356.JPG
 
Lets us talk a bit about the proportioning valve....I searched high and low for an NOS unit and had no luck whatsoever. There are not many people that are able to rebuild these units properly.

The company that was able to do this rebuild it was Brake and Equipment Warehouse
http://www.brakeandequipment.com
If you do call you have to select the "Shop" option

They also rebuilt my MC and WC's...They resleeved them with stainless steel sleeves and rebuild them with the proper components. Another thing they offer is rebounding brake shoes. Either riveted or glued like the originals. I sent them the original frames for a spare set to rebound and they turned out amazing. The cleaning process they do is phenomenal...When I get to the WC's and MC you will see how well the steel looks.

So below is the original proportion valve from the GTX. The car is manual 11" drum. Has the correct "W" stamp for the manufacturer Westinghouse and the 2 patent numbers. As you can see around the bolt hole area a special locking bolt was used with teeth to grab, they wrenched them pretty tight as you can see. The date code is on the back side and it is stamped 2818 for 281st day of 68 which coordinates with the late 68 build date of my GTX. The two o rings are the old ones and the copper cones go into the four small line holes for a more proper seal...and you do not have to wrench the crap out of them to seal. Lastly, I shined the unit up with 0000 steel wool and applied a corrosion inhibitor called Boeshield T9 and that is used on all of my bare metal parts....
DSC02402.JPG

There is the valve prior to removal.....
DSC04274.JPG
DSC04275.JPG
DSC04279.JPG
 
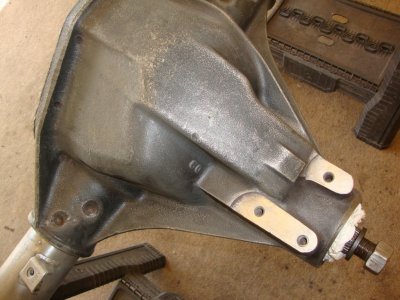
My next step is to tackle the Dana 60. I was very fortunate that this rear was in fantastic shape. It had no rust or pitting. Years ago I got away from blasting the rear housings and utilized old methods that were less caustic to the metal. The big key of doing that is to find hidden factory markings. Needless to say, it was completely disassembled and the housing was power washed with degreaser. Once all degreased it was cleaned with lacquer thinner. Then I employed a wide variety of wire wheels, red scotch bright pads and sandpaper. Then it got prepared for primer and paint. The paint I utilized was Duplicator Semi Gloss black. Once it was all coated I baked the housing with a painters heat lamp.
DSC02607.JPG
DSC02613.JPG
DSC02772.JPG
DSC02773.JPG
DSC02774.JPG
DSC02775.JPG
DSC02776.JPG
DSC02777.JPG
DSC02778.JPG
DSC02779.JPG
 
The axle flanges and hardware was sent out to get the proper phosphates. The Axle bearings were replaced with Timkens from Brewers performance....
DSC02837.JPG
DSC02838.JPG
DSC02839.JPG
DSC02840.JPG
DSC02841.JPG
DSC02842.JPG
DSC02843.JPG
DSC02844.JPG
DSC02845.JPG
DSC02846.JPG
 
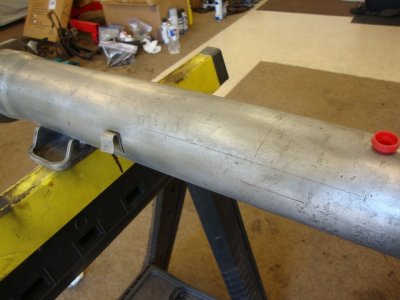
After power washing, cleaning etc...You can see what factory markings showed up after some scrubbing and washing. First lets focus on the axle tubes. On the drivers tube you notice the white(596) that number coordinates to the actual axle code for a 69 B 3.54 Dana 11" drum and A833 four speed. That code was placed on the tube during assembly of the tubes to the housing. The black paint was on top of the white. The passenger side has a white (11-6) which I have not been able to discern and I asked multiple people. It too was under the black paint. Needless to say there is no need to replace because they were intended to be painted over anyhow.

On the top of the housing you will see something like (ER) but it was a lineman poor hand for the actual (23) for 23 spline. The white stripe below the snubber pad was a completion mark for the front end of the housing I believe. On the Driver tube is some remnants of the paper axle strap which mine ends in 596. The passenger tube you will notice remnants of a yellow 596 stamping. In a previous post above to the left of rear cover is the original red plug in the threaded hole. You could find a red, green(clover), or blue. Personally, I have only seen the red ones and these should be installed prior to paint.

The snubber pad area and the pinion area was machined after the rear was painted and is natural metal finish...
DSC03230.JPG
DSC03231.JPG
DSC03232.JPG
DSC03233.JPG
DSC03234.JPG
DSC03242.JPG
DSC03243.JPG

DSC03261.JPG
DSC03262.JPG
 
Last edited:
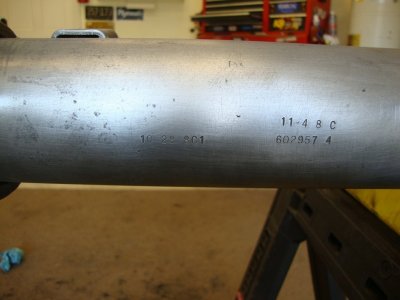
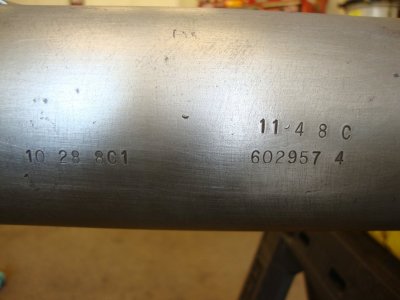
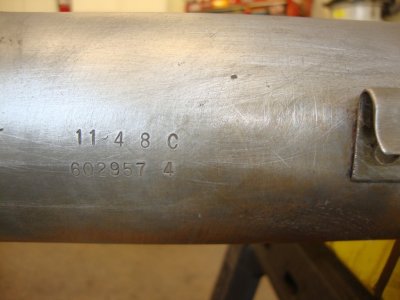
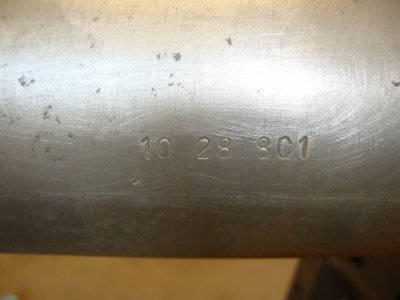
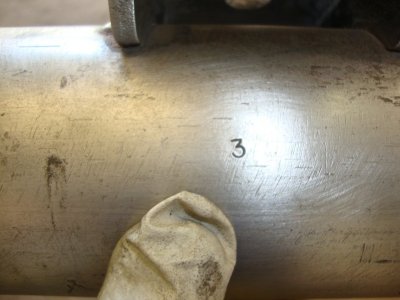
Getting it ready for primer at this point and to show the stampings on the axle tubes. The date stamp is on the passenger tube listed as 10 28 8C1 is the carrier assembly date and the date 11 4 8C is the axle assembly date and the 602957 4 is for a 3.54 gear ratio, the 4 is very important to denote that. The other two individual stamps are unknown factory stamps.

DSC03281.JPG DSC03282.JPG DSC03283.JPG DSC03284.JPG DSC03285.JPG DSC03286.JPG View attachment 404989 View attachment 404991 DSC03290.JPG
DSC03291.JPG
 
Last edited:
Rebuilding the internals at this point....Save everything and document as needed....
DSC03199.JPG
DSC03200.JPG
DSC03201.JPG
DSC03202.JPG
DSC03203.JPG
DSC03251.JPG
DSC03252.JPG
DSC03253.JPG
DSC03254.JPG
 
Status
Not open for further replies.
Auto Transport Service
Back
Top