• When you click on links to various merchants on this site and make a purchase, this can result in this site earning a commission. Affiliate programs and affiliations include, but are not limited to, the eBay Partner Network.

Hawk-Rod Part 1: Get Back on the Road

Slow Progress...

Mind you, I'm not complaining that I have a job, but lately it's been killing me with how little time I have for the car...:angryfire:

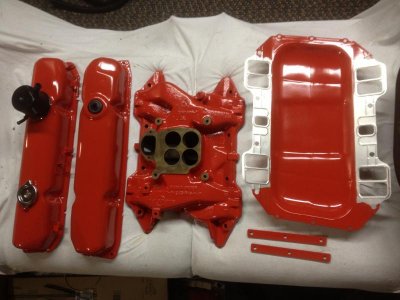
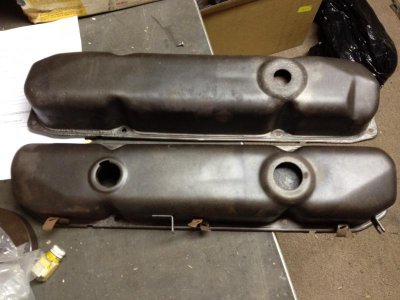
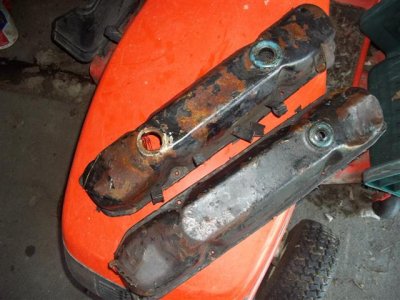
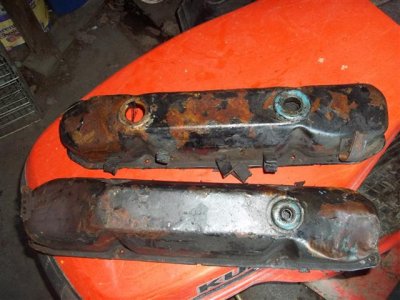
So I did some work cleaning up a few parts off the top of the engine. As I said, the valve covers were really rusted and beat up. I tried to clean them up as best as I could to make them at least semi-respectable. (By the way, I have LOADS of respect for good body and paint professionals. The concepts are easy, but good results are hard...)

Anyway, below are some pictures of my handy work. I just need to paint the throttle bracket and clean up the hardware and I am ready to put it all back.

Valve covers getting worked on:
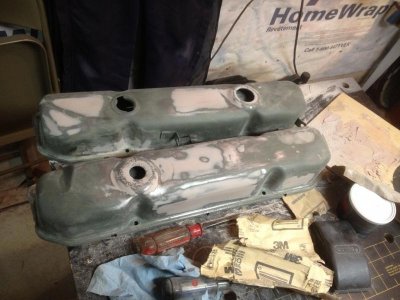
IMG_0669.jpg

End Results:
IMG_0674.jpg
 
(Mostly) Back Together

So I got most of the engine assembled today before I ran out of time.

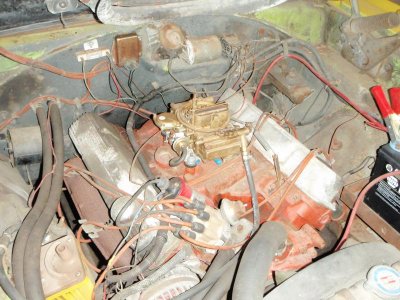
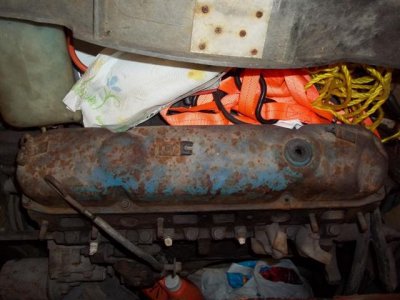
Here is a shot of the engine before I started (with my rusted valley pan - although the hole is hidden in the back):
20110219_3.jpg

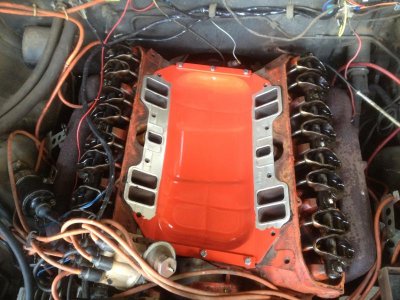
Since the manifold and valve covers were off, I figured I would clean up the manifold and put proper valve covers back on.
Note my homemade valley pan end straps since the originals were missing. They're nothing special, but they get the job done.
IMG_0686.jpg

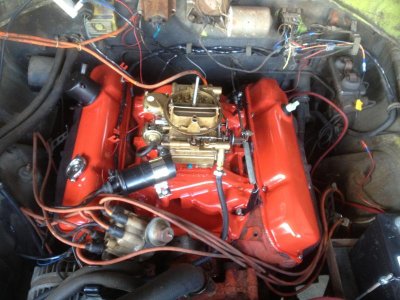
Here is the engine (mostly) assembled. I still have a few hoses to plumb, and my fuel line is temporary. The spark plug wires haven't been replaced and are horrible looking. These need to get cleaned up before I start it again. Either way, PROGRESS!!!
IMG_0690.jpg
 
Mind you, I'm not complaining that I have a job, but lately it's been killing me with how little time I have for the car...:angryfire:

So I did some work cleaning up a few parts off the top of the engine. As I said, the valve covers were really rusted and beat up. I tried to clean them up as best as I could to make them at least semi-respectable. (By the way, I have LOADS of respect for good body and paint professionals. The concepts are easy, but good results are hard...)

Anyway, below are some pictures of my handy work. I just need to paint the throttle bracket and clean up the hardware and I am ready to put it all back.

Valve covers getting worked on:
View attachment 113122

End Results:
View attachment 113123

Not being a good mech i don't know if this will work, But i may have a set of 440 valve covers here that ill gladly give you if they will work on a 383, both BB engines but i wanted to ask.. let me know if they will work and ill make sure there still here and in good shape and there yours if you want to pay the shipping, i could be wrong but bondo on valve covers with the heat may not last long, just a thought.... You sure have everything looking good!
 
Not being a good mech i don't know if this will work, But i may have a set of 440 valve covers here that ill gladly give you if they will work on a 383, both BB engines but i wanted to ask.. let me know if they will work and ill make sure there still here and in good shape and there yours if you want to pay the shipping, i could be wrong but bondo on valve covers with the heat may not last long, just a thought.... You sure have everything looking good!

Ron,

That is extremely kind and much appreciated! Yes all big block valve covers are the same for these year Mopars. The only problem is that Chrysler changed them just about every year. I think 1970 is unique. Do the valve covers you have look the same as mine? Here is a better picture of them where you can see their shape.

IMG_0139.jpg
 
ill try go out sometime tomorrow, i really need to visit my Ma, shes been in a bad way but ill check and see if there shaped the same and in good shape, if my camera will work right this time ill take a picture and show them to you no problem at all, I could check my 400, as long as the 440 ones will work on it and the 400 IS the same shape as yours, ill switch them with the 440 ones and give the ones from the 400 to you for your 383, i understand where your coming from and myself i don't care if the 400 has different shaped ones, heck, i have no car to numbers match with it anyway! lol... If i don't get home until late, don't worry, ill go out first thing Monday AM and will see what we can do and get back to you as quickly as i can...
 
ill try go out sometime tomorrow, i really need to visit my Ma, shes been in a bad way but ill check and see if there shaped the same and in good shape, if my camera will work right this time ill take a picture and show them to you no problem at all, I could check my 400, as long as the 440 ones will work on it and the 400 IS the same shape as yours, ill switch them with the 440 ones and give the ones from the 400 to you for your 383, i understand where your coming from and myself i don't care if the 400 has different shaped ones, heck, i have no car to numbers match with it anyway! lol... If i don't get home until late, don't worry, ill go out first thing Monday AM and will see what we can do and get back to you as quickly as i can...

Go visit Ma. That's important; family must come first!

There is absolutely no rush on the valve covers. If you have a nice set, I'll gladly pay a fair price for them too. Let me know how it works out.

I am a bit torn with this car. On the one hand, it is missing its fender tag and build sheet, so it will always be "suspect" as far as most options. On the other hand, there is no doubt the motor and trans are original, and by looking at the "patina" of the rest of the car, it certainly looks original everywhere else.

My long range goal is to put it back to its original color (Lime Light), and make it pretty correct looking. But I do see myself adding power steering and disk brakes. Turning these old cars in parking lots with fatter radial tires is a lot of work! We'll see. Let me drive it a bit and see what I like and don't like.

Also, thanks to all for the kind comments on the car. I do think it is a pretty neat find, and I am really excited about it. I am a bit disappointed that I need to finish the 'Vette first. But that car is mine and my Dad's, and I need to get that done so we can have some time enjoying it together before it is too late. Plus, I have to admit that I won't be overly sad to pilot a 1960 Corvette around either. I might prefer the Road Runner, but I guess I can suffer with the 'Vette too!
 
I went out and dug those out, and they are not good at all, one is bent in and actually looks like someone hammered on it, like i said, there yours IF you want them but they are not near as good as the ones you already have, its a bit dark in that building but they didn't appear to have any rust in them, some surface rust on top, but solid.. That 400 is on my engine stand in the corner of the garage and stuff piled up all over it, i cant clean it off right now to get one of the valve cover pictures, honestly the camera was acting up again, i think i was lucky to manage these, guess a new picture taker is going to be needed.. And thats a nice car, i wouldn't get all upset over not knowing the complete list of options, fix her up and enjoy it! If you do want these, PM me your address and ill send them to you, i don't want anything for them... Middle picture, left side 400..

Picture 172 (Small).jpgPicture 173 (Small).jpgPicture 171 (Small).jpg

- - - Updated - - -

Just talked with Ma, she doesn't feel well enough for company, maybe Thursday but your right, Family first but i did say i would get these, and it didn't take long.. have a good day, Pm if you would want them..
 
Hawk, just a suggestion. Try finding as much literature as you can on your year of car and see what they have for options (light package, trim package, paint code, etc...) Write everything down as to what your car has on it. Then when you have all the info, you can find someone to stamp a fender tag for you. That would be one less thing you have to worry about. Having a broadcast sheet would be nice, but we all know that after 40 years, Broadcast sheet= mouse nest in most/some cases.
 
I went out and dug those out, and they are not good at all, one is bent in and actually looks like someone hammered on it, like i said, there yours IF you want them but they are not near as good as the ones you already have, its a bit dark in that building but they didn't appear to have any rust in them, some surface rust on top, but solid.. That 400 is on my engine stand in the corner of the garage and stuff piled up all over it, i cant clean it off right now to get one of the valve cover pictures, honestly the camera was acting up again, i think i was lucky to manage these, guess a new picture taker is going to be needed.. And thats a nice car, i wouldn't get all upset over not knowing the complete list of options, fix her up and enjoy it! If you do want these, PM me your address and ill send them to you, i don't want anything for them... Middle picture, left side 400..

Just talked with Ma, she doesn't feel well enough for company, maybe Thursday but your right, Family first but i did say i would get these, and it didn't take long.. have a good day, Pm if you would want them..

Ron,

Thanks for digging out the valve covers. Most of all, thank you for the offer to send them to me. I think it is great for us car guys and gals to help each other out and fight the crazy prices that help to keep many "real" people out of the hobby. (I was able to send one member a rear speaker knob a while back. I was never going to use it, so I gave it to him - why gouge the poor guy for a small part I will never use?)

Unfortunately, the valve covers you have do not look like 70 covers. They have a slightly different shape and wire looms attached in different places. I now have a "20 footer" set of valve covers that are serviceable. With my lousy metal work skills, I think I need a pretty nice set otherwise I am apt to just screw them up worse!

Thanks again for the offer!

Here's hoping Ma feels better soon... :eusa_pray:

- - - Updated - - -

Hawk, just a suggestion. Try finding as much literature as you can on your year of car and see what they have for options (light package, trim package, paint code, etc...) Write everything down as to what your car has on it. Then when you have all the info, you can find someone to stamp a fender tag for you. That would be one less thing you have to worry about. Having a broadcast sheet would be nice, but we all know that after 40 years, Broadcast sheet= mouse nest in most/some cases.

Thanks. Yes, I have pretty much gone through all the codes and think I have the actual options this car was built with. It was a Limelight car without the stripe package, the standard black bench interior, four speed, A31 (3.55 sure grip, Hemi suspension and H/D cooling) and A01 packages, as well as the Tick Tock Tack. It has everything correctly installed for the air grabber EXCEPT the hole is not drilled in the firewall for the proper routing of the hoses. However, even the hood is Limelight followed by Yellow and without a black stripe, so it certainly seems like this air grabber hood has at least been on the car almost since new. Was it a dealer add on? Was the hole just not drilled at the factory? Who knows.

The bottom line is that I don't think I will stamp another fender tag. I really never plan to get rid of the car, and even if I do, I have no intention of trying to trick anybody anyway. I'll have photo evidence as to what the car looked like when I got it...
 
Looks like a great project, have fun... nice Vette too
 
So I finished plumbing up all the lines the way they are supposed to be and started the car.

The good news is that it fired right up and idles nicely - no leaks or issues seen. However, when I took it around the block, it was really bucking when accelerating, I swear it also backfired on me too.

So my first inclination is the timing. The vacuum advance was not hooked up previously, and now I hooked it up. I haven't had the chance to check the timing, but I guess I need to check that out. OK it has been awhile, so go easy on me. Is the process below correct (distributor is a later electronic ignition unit)?

1) Disconnect Vacuum advance. Check timing at idle. According to the service manual, base timing is set at TDC??? Should I go with that or set it a couple of degrees BTDC?
2) Rev it up to check centrifugal advance. According to the service manual, mechanical advance should be:
0 - 4.6 deg at 600 RPM
5.6 - 7.6 deg at 800 RPM
10 - 12 deg at 2300 RPM
3) Connect Vacuum advance to a controlled vacuum source and check vacuum advance. If I recall, adjustment of this is through the vacuum advance nipple with an allen wrench? Here, the specs are:
0.5 - 4.3 deg at 10.5" Vacuum
9.7 - 15 deg at 15.5" Vacuum

I would greatly appreciate any tips or suggestions to modify the process or the specs. Engine is a stock 383 as built by Ma Mopar with 80,000 miles.

Thanks
 
Last edited:
So i timed the engine (gave it about 8 Deg initial) and then left well enough alone. I needed to drive the car from my parents' garage to mine since they are selling their Florida house and they now need the garage space.

The good news is that it made it just fine to my house. First time on the roads, and it drove nice and straight, with no funny vibrations, pulls or other nonsense.

I still need to do some work to make it run well. It backfired and stumbled with even very small acceleration, but I can work on that next weekend. For now, time to head to Florida and drive a rental truck back up to PA...

Thanks for the help and encouragement so far!
 
FINALLY!!!

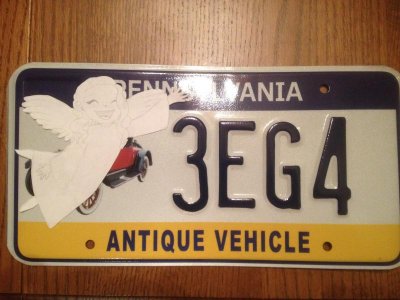
After 2 years of slow progress dealing with various states, legal stupidity and alike, my car is finally 100% legal. I have the title in my name, I have insurance, and today I got my antique plate and registration.

In the picture below, my daughter added a sketch she drew to celebrate its arrival, since she knows how long I have been waiting for it.

I can now finally take it out on the road legally and tune it, mess with it, and drive it!

Yes, I know it's a beater, but it's MINE and I got plans!!!:eek:ccasion14:

IMG_0781.jpg
 
FINALLY!!!

After 2 years of slow progress dealing with various states, legal stupidity and alike, my car is finally 100% legal. I have the title in my name, I have insurance, and today I got my antique plate and registration.

In the picture below, my daughter added a sketch she drew to celebrate its arrival, since she knows how long I have been waiting for it.

I can now finally take it out on the road legally and tune it, mess with it, and drive it!

Yes, I know it's a beater, but it's MINE and I got plans!!!:eek:ccasion14:

It's not a beater it's a "work in progress"... Congrats on your registration finally, that's good to hear....
 
So I have been working on my "work in progress" car's brake lights, as part of that I replaced the turn signal switch and solved two problems. I am making progress! However, I still have a problem with the brake lights, and think it may have to do with the emergency flasher.

The problem is, I can't find the darn flasher! I know that the wires leading to it are Pink and Pink with a tracer - I have the service manual. The problem is that I don't know where physically the flasher itself is mounted under the dash. I could be mine is missing.

Where under the dash is the connector/emergency flasher located on a 1970 Road Runner? (Not the turn signal flasher, I have found that)

Appreciate the help!

Hawk

- - - Updated - - -

Never mind - I finally found it after I pulled the glove box liner out.

For those who want to know, it sits near the ash tray. It is a rectangular silver metal "box" that is clipped to the bottom edge of the dash. If you look under the dash, you can see the clip that slides through a hole and holds it in place.

Now to try and figure out what is going on. I at least have a flasher - now to keep tracing the circuit...
 
All Lights Working!

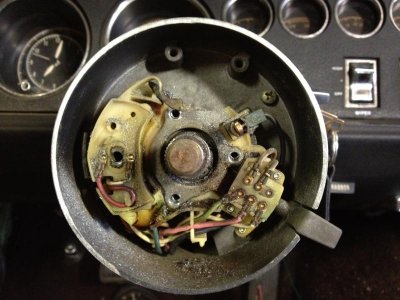
I replaced the turn signal switch, as it had multiple problems. For one, one of the nylon clips was broken off, so it wouldn't hold, but there was also current feeding back through it in a funny way. When I took the steering off, I think a reason became evident: There was metal filings in the thing! What someone was doing filing in there, and what they filed, I don't know. But either way, the switch had to come out.

Guts of steering:
IMG_0784.jpg

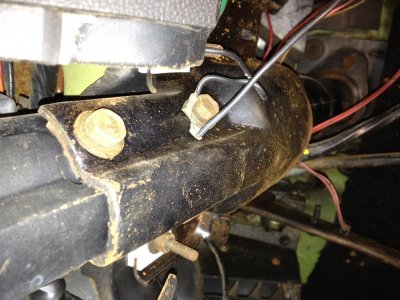
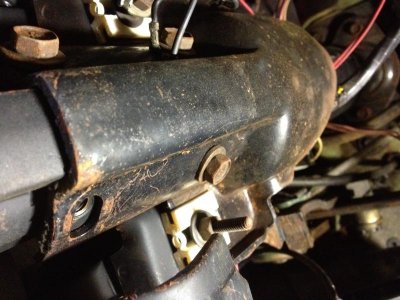
To get switch out, the steering column support and cover need to come off too.
IMG_0785.jpg

IMG_0786.jpg

After fixing a blown fuse, cleaning A LOT of grounds and replacing the switch, all exterior lights now work properly: Headlights, running lights, turn signals, brakes and hazards.:hello2:

Lesson relearned here: 90% of the tine with goofy electrical issues on a car that has sat for awhile: Poor grounds! If you are chasing electrical gremlins in a car that has sat around, do yourself a favor and clean up grounds. You will probably solve most of your issues...
 
So it has been awhile since I added a post here, but I have been steadily working on the "Hawk Rod".

I have pulled the instrument cluster out and I also replaced my under dash wiring harness. I didn't "restore" my instrument cluster per se, but did some cleaning and checking to make sure everything worked well. I won't share the tons of pictures I took of the back side of my instrument cluster and wiring because I am sure they are boring, but I will share some work I did on my dimmer switch.

My dash lights were not working, and it turned out to be my dimmer switch. They are quite expensive, so I cleaned mine up with great success. Here is what I did:

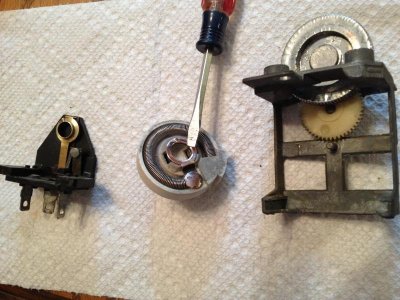
To pull the dimmer apart, the plastic piece with the contacts slide in to the metal retainer with the thumb wheel. The metal is bent over at the top, so unbend the metal and slide the plastic piece with the contacts out. NOW CLEAN!!! Use steel wool to brighten all the contacts. The circular "spring" provides variable resistance, so clean this. In addition, you need to clean the center where it makes contact - see screw driver in this picture:
IMG_1001.jpg

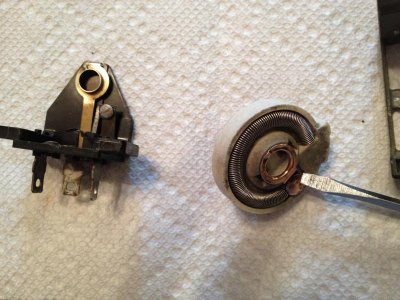
Also make sure this point is clean at the end of the resistor. This is the full brightness contact:
IMG_1002.jpg

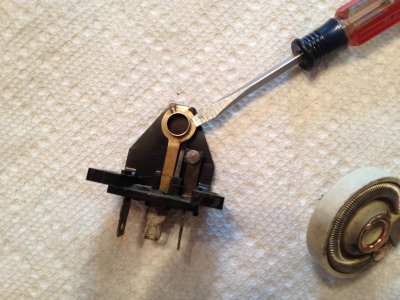
The plastic piece also has a few key contacts that must be cleaned up. The one in this picture contacts the ring on the resistor:
IMG_1003.jpg

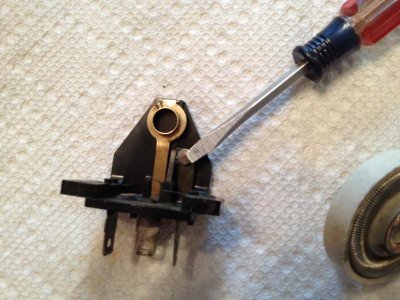
This is another contact to clean:
IMG_1004.jpg

There is also a contact on the end of the plastic piece that turns on the dome light. I don't have a picture of this, but this needs cleaning too. After using steel wool, carefully remove all traces of steel wool pieces as they will conduct electricity!

Finally, be sure to coat all contacts lightly with dielectric grease. I also LIGHTLY greased the mechanism so it would turn nice and easy. I have been asked before if dielectric grease conducts electricity. The answer is no it does not. The purpose of dielectric grease is to keep the contacts clean.

I hope this helps others who may be considering doing this. It is really not that hard and provided great results!

Hawk
 
Auto Transport Service
Back
Top