You are using an out of date browser. It may not display this or other websites correctly.
You should upgrade or use an alternative browser.
You should upgrade or use an alternative browser.
Hawk-Rod Part 1: Get Back on the Road
- Thread starter HawkRod
- Start date
Headers In!
So my TTI headers finally arrived!!! :headbang:
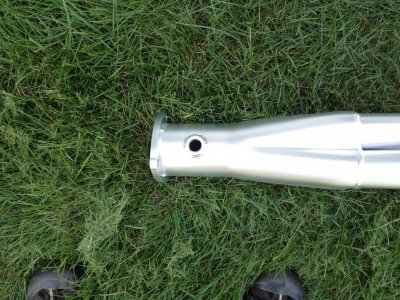
It took extra time because I had O2 sensor bungs installed. I don't have any use for them yet, but might put fuel injection on the car in the future. The $36 is cheap now, so now I am ready if and when I install the FI system.
I have a question below, but first some pictures...
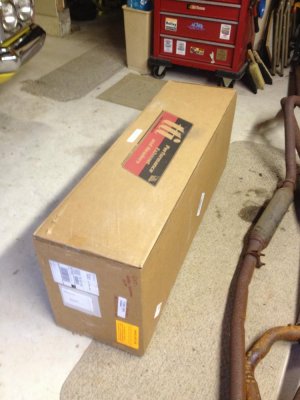
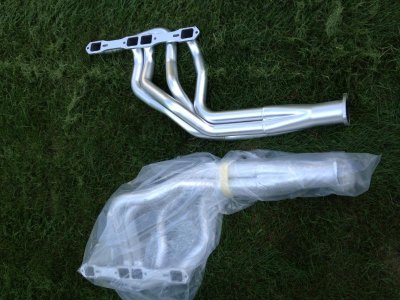
Here are some pictures of how TTI shipped the headers. Very nicely packed!
O2 sensor bung location:
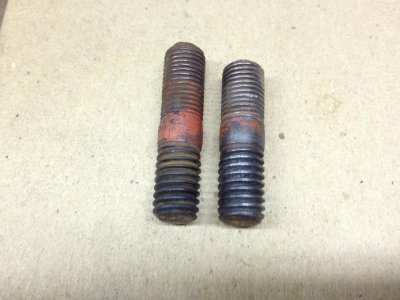
I decided to use the existing studs instead of header bolts so that if I have to loosen a header I won't have antifreeze all over the place. Using studs requires that the second one on each side be shortened for clearance.
I only had one minor clearance issue on the passenger side header. A tab on the bellhousing just barely hit the header...
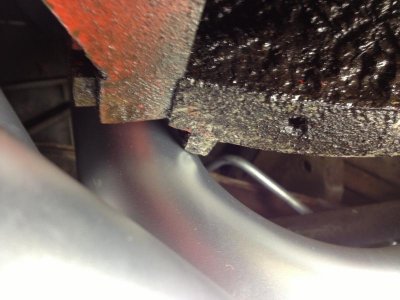
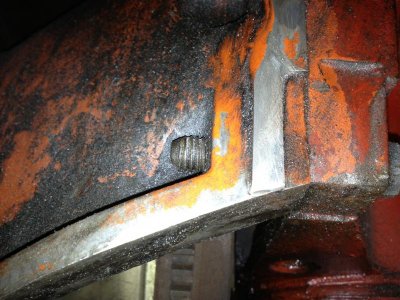
The tab has no bolt holes and isn't used for anything that I can tell, so I filed that down and that took care of the problem:
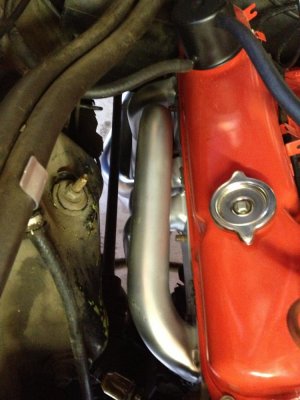
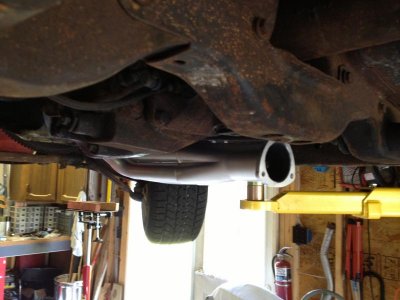
The passenger header fit VERY nicely, and has plenty of ground clearance too. Here is the header from above:
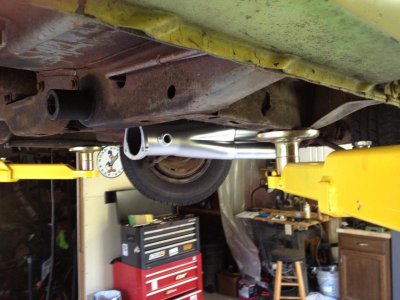
And the view from below. Note O2 bung.
The driver side header will be harder, with more stuff to remove. I have to replace my starter too with a mini starter.
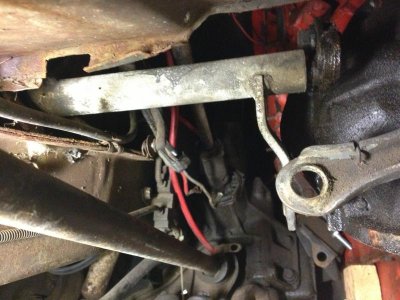
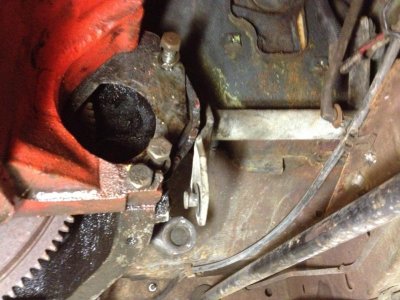
So here is my question: The z-bar needs to be removed to install the headers (yes, you must - I tried without removing it!:icon_sad: Below are pictures of the "z-bar" It is what engages the clutch.
What is the easiest way to remove it? It does not seem easy...
As always, help from the experts is much appreciated!
So my TTI headers finally arrived!!! :headbang:
It took extra time because I had O2 sensor bungs installed. I don't have any use for them yet, but might put fuel injection on the car in the future. The $36 is cheap now, so now I am ready if and when I install the FI system.
I have a question below, but first some pictures...
Here are some pictures of how TTI shipped the headers. Very nicely packed!


O2 sensor bung location:

I decided to use the existing studs instead of header bolts so that if I have to loosen a header I won't have antifreeze all over the place. Using studs requires that the second one on each side be shortened for clearance.

I only had one minor clearance issue on the passenger side header. A tab on the bellhousing just barely hit the header...

The tab has no bolt holes and isn't used for anything that I can tell, so I filed that down and that took care of the problem:

The passenger header fit VERY nicely, and has plenty of ground clearance too. Here is the header from above:

And the view from below. Note O2 bung.


The driver side header will be harder, with more stuff to remove. I have to replace my starter too with a mini starter.
So here is my question: The z-bar needs to be removed to install the headers (yes, you must - I tried without removing it!:icon_sad: Below are pictures of the "z-bar" It is what engages the clutch.
What is the easiest way to remove it? It does not seem easy...
As always, help from the experts is much appreciated!


Headers Done!
Sorry for the long time delay - have had computer issues, family stuff with my kid going off to college, work stuff, etc. All this stuff that gets in the way of car work!!! :angryfire:
Anyway, I got the headers and new exhaust installed and working great. While the passenger side header was a breeze to install, the drivers side was a PITA. I had to use a mini starter, but even with that, I had to lay the starter in the "pocket" area of the header and then slide both up an into position. The engine also has to be raised to get some extra clearance too. (It might have been possible to do it separately if the steering center link is disconnected - not sure.).
By the way, I used blue painters tape to help protect the header from minor scratches and greasy fingers - you can see it in one of the pictures. It seemed to work well and was easy to remove.
After I got is all connected, I drove it around briefly and then stalled a few miles from home. My fuel filters were totally clogged with crud from my old tank. I bit the bullet and bought and installed a new gas tank. The major hassle I had here was that the old tank had about 13 gallons of fuel that looked like apple cider. I had to filter it three times to try and reduce the crap floating in it, but still had a rough time getting it really clean.
Finally now back on the road, with all gauges working! I may need a carb rebuild very soon to get rid of the crap from the bad gas, but it runs for now...
Assembling and fitting...
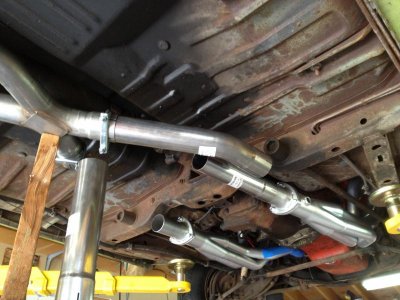
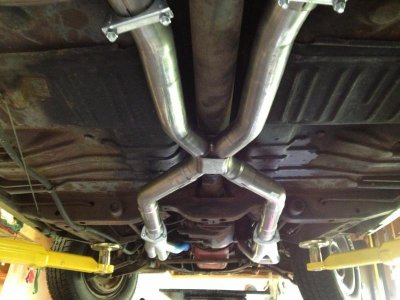
X-Pipe fit in place before welding it permanently
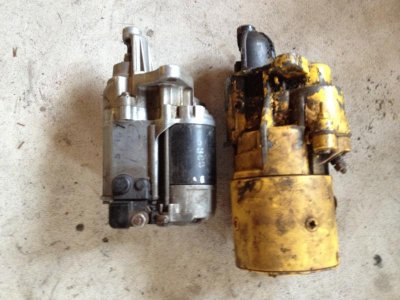
Mini starter next to an OEM size starter
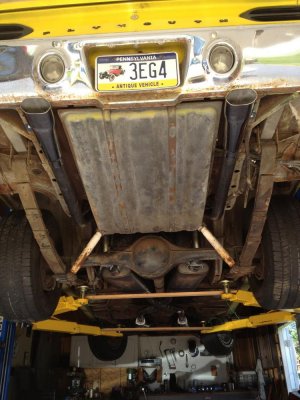
Picture with exhaust done from the back (before new gas tank)
Sorry for the long time delay - have had computer issues, family stuff with my kid going off to college, work stuff, etc. All this stuff that gets in the way of car work!!! :angryfire:
Anyway, I got the headers and new exhaust installed and working great. While the passenger side header was a breeze to install, the drivers side was a PITA. I had to use a mini starter, but even with that, I had to lay the starter in the "pocket" area of the header and then slide both up an into position. The engine also has to be raised to get some extra clearance too. (It might have been possible to do it separately if the steering center link is disconnected - not sure.).
By the way, I used blue painters tape to help protect the header from minor scratches and greasy fingers - you can see it in one of the pictures. It seemed to work well and was easy to remove.
After I got is all connected, I drove it around briefly and then stalled a few miles from home. My fuel filters were totally clogged with crud from my old tank. I bit the bullet and bought and installed a new gas tank. The major hassle I had here was that the old tank had about 13 gallons of fuel that looked like apple cider. I had to filter it three times to try and reduce the crap floating in it, but still had a rough time getting it really clean.
Finally now back on the road, with all gauges working! I may need a carb rebuild very soon to get rid of the crap from the bad gas, but it runs for now...
Assembling and fitting...

X-Pipe fit in place before welding it permanently

Mini starter next to an OEM size starter

Picture with exhaust done from the back (before new gas tank)

- Local time
- 12:36 PM
- Joined
- Mar 10, 2010
- Messages
- 31,106
- Reaction score
- 55,733
- Location
- Hanover, Pennslyvania
Hey Hawk, this is a good thread!
It's great to see someone posting their progress on what they have a passion for. I'm getting the impression that you have been doing this for awhile. And if you haven't, you have what it takes. Common sence, patients and good mechanical skills.
The header install is the norm for most cars, I see you figured out the z bar r and r. The headlight switch reconditioning was "over the top"! Most wouldn't go through all of that but a lot if switches can be saved if the contacts aren't burnt. It takes patients to do this.
Thanks for taking the time to share and post your pictures. I'm sure a lot will benefit from your efforts and you too when you are injoying your cool ride!
Hey Hawk, this is a good thread!
It's great to see someone posting their progress on what they have a passion for. I'm getting the impression that you have been doing this for awhile. And if you haven't, you have what it takes. Common sence, patients and good mechanical skills.
The header install is the norm for most cars, I see you figured out the z bar r and r. The headlight switch reconditioning was "over the top"! Most wouldn't go through all of that but a lot if switches can be saved if the contacts aren't burnt. It takes patients to do this.
Thanks for taking the time to share and post your pictures. I'm sure a lot will benefit from your efforts and you too when you are injoying your cool ride!
Thanks for the kind words. I have been a "car guy" for many years, and have never been afraid to get my hands dirty. Having said that, I still have a lot to learn. I am still a "shade tree mechanic" and I have certainly benefited from all the great advice on this forum. Because of that, my hope is that I can help others too by posting pictures of stuff I have done - even if it is because I screwed up! Better to share the lesson than have others make the same mistake I have made!
P.S. Today was the first real day that I drove the car any real distance since it's 17+ year hibernation. I put about 35 miles on the car today, and I am thrilled that now all gauges, electrical and mechanical things seem to work OK. The best part was when I put my foot in it today. WOW! I was surprised at how quick the car felt. At one point, I hit the accelerator hard from a stop and I was burning rubber into second gear!
I am sure I will have to continue to work through little gremlins that will pop up, but I had a blast today!!!
Redhorse719
Well-Known Member
Hawk, the RR is looking good. Pictures of the underside are fantastic. I wish my Belvedere looked that good. Are you going to Fall Carlisle?
- Local time
- 11:36 AM
- Joined
- Jan 1, 2013
- Messages
- 8,050
- Reaction score
- 3,461
- Location
- Mascoutah, Illinois
Congratulations Hawk I'll bet that was satisfying
Hawk, the RR is looking good. Pictures of the underside are fantastic. I wish my Belvedere looked that good. Are you going to Fall Carlisle?
Thanks. The car is coming along! Regarding Carlisle: I have tentatively taken the day off, so I may actually be able to make it...
Speaking of gremlins... So I found that the carb is leaking fuel. It is dripping from the accelerator pump so most likely it is coming from the front bowl area. I kind of expected to have to rebuild the carb after all the crap fuel that it has had to withstand, so I guess I am not too upset. The only downer is I had so much fun driving it around the other day, and now I need to rebuild something again. I definitely don't want to drive it with a fuel leak - not worth burning the car down!
Luckily a quick dis-assembly,cleaning and gasket refresh isn't too hard on a Holley. This is the original California spec Holley, so hopefully there are no goofy gaskets that I can't find...
Rear A-833 Yoke Seal Advice?
Good news: I took the front carb bowl off and replaced the accelerator pump diaphragm/gasket thingy iamwithstupid: whatever it is called...), the bowl gasket and the four small gaskets that fit around the screws that hold the bowl on. I put it back on and it looks like that took care of the leak. Great! :hello2:
Next task: Looks like my A-833 transmission is leaking oil at the extension housing yoke seal and slinging oil around the underside (rust protection!).
Here is my Question: The FSM talks about tool C-3985 to remove the seal. The tool looks like a wide pickle fork. Do I need the tool? Is this easy to get out while the trans is in the car?
Any advice from those who have done this job would be much appreciated.
Good news: I took the front carb bowl off and replaced the accelerator pump diaphragm/gasket thingy
Next task: Looks like my A-833 transmission is leaking oil at the extension housing yoke seal and slinging oil around the underside (rust protection!).
Here is my Question: The FSM talks about tool C-3985 to remove the seal. The tool looks like a wide pickle fork. Do I need the tool? Is this easy to get out while the trans is in the car?
Any advice from those who have done this job would be much appreciated.
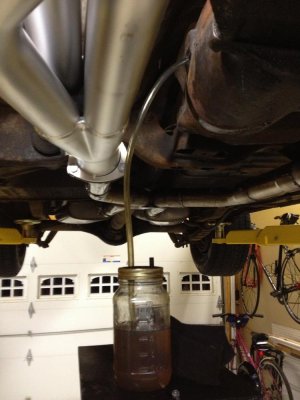
I needed to add gear oil to my transmission. It is not easy to pour from a bottle when the hole is up in the transmission tunnel. Here is what I did:
I took a clean mason jar and put the gear oil in that. The lid has one nipple on it and one hole. Through the hole I put the clear plastic tube (it has to be tight so you can build pressure in the jar). I then gently pressurized the mason jar to force the gear oil up the plastic tube and into the fill hole.
Pretty basic but I figured I would share...
Here is the setup with the jar and the plastic tubing.
Kinda cheap and dirty, but I just used an air chuck and my air compressor to pressurize the jar.
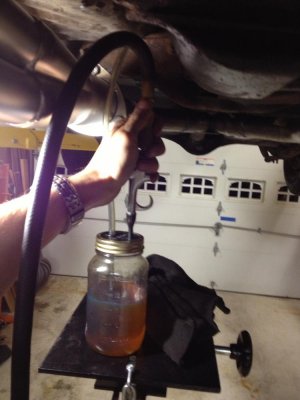
I took a clean mason jar and put the gear oil in that. The lid has one nipple on it and one hole. Through the hole I put the clear plastic tube (it has to be tight so you can build pressure in the jar). I then gently pressurized the mason jar to force the gear oil up the plastic tube and into the fill hole.
Pretty basic but I figured I would share...
Here is the setup with the jar and the plastic tubing.

Kinda cheap and dirty, but I just used an air chuck and my air compressor to pressurize the jar.

roadrunnerman
Well-Known Member
Hey, whatever works. I know I wouldn't have thought of that, but now I know what I will do the next time I need to.
kdtjb
Well-Known Member
- Local time
- 10:36 AM
- Joined
- Jan 24, 2010
- Messages
- 2,062
- Reaction score
- 319
- Location
- In a van, down by the river,
That sure is looking good.
- Local time
- 12:36 PM
- Joined
- Mar 10, 2010
- Messages
- 31,106
- Reaction score
- 55,733
- Location
- Hanover, Pennslyvania
Good idea on the jar, professor!
Ron 73
Deceased, But not forgotton
Pretty cool idea there Hawk! That exhaust looks good, i bet that sounds great with the headers..
That exhaust looks good, i bet that sounds great with the headers..
It is a Pypes 2 1/2" exhaust system with TTI headers. I am really pleased with the whole system. First of all, the change from a set of low performance C body exhaust manifolds and 2" pipes to the new system really woke up the car's performance. I am also really pleased with the way the car sounds. It has a deep, powerful sound, but at idle and with limited acceleration it is not too loud. I don't want my car to sound like a race car, but neither do I want it too quiet. This has a nice loudness right in the middle...
Ron 73
Deceased, But not forgotton
It is a Pypes 2 1/2" exhaust system with TTI headers. I am really pleased with the whole system. First of all, the change from a set of low performance C body exhaust manifolds and 2" pipes to the new system really woke up the car's performance. I am also really pleased with the way the car sounds. It has a deep, powerful sound, but at idle and with limited acceleration it is not too loud. I don't want my car to sound like a race car, but neither do I want it too quiet. This has a nice loudness right in the middle...
I can only imagine.. The sound you describe is what i like as well, i had planned on a new exhaust for my car just to get that sound (SB but healthy) but im working on something else for now so it is on hold. I had a lot tied up in my 73 and when it came time to do the exhaust there was two brand new cherry bombs in the boxes that came with the car, something i would have loved at the ripe age of 18 but i figured they would do for awhile, them with the full headers make way to much noise to me but it did save me some money at the time. I still plan on the new quiet outfit but for now its on hold..
Ron73, I hear you with the budget woes. It certainly is easy to sink A LOT of money in these cars very quickly. I had the original exhaust manifolds and was going to reuse those, at least temporarily, but it turned out to be very expensive to connect them up to the Pypes exhaust I bought, so I bought headers instead. The %$#! TTI headers was almost a grand once supping and everything else was figured in! OUCH!!! They do fit like a glove and work really well, so it wasn't wasted money, but it put an unexpected dent in the budget I built up to work on the car - now I have to save that elsewhere...
Ron 73
Deceased, But not forgotton
I kind of figured the TTI headers were expensive but ive heard nothing but good with them, Some of the parts for these cars can take there toll quick with the wallets for sure.. Good choice though!
- Local time
- 9:36 AM
- Joined
- Jan 16, 2011
- Messages
- 74,330
- Reaction score
- 114,282
- Location
- NorCal Sierras
I needed to add gear oil to my transmission. It is not easy to pour from a bottle when the hole is up in the transmission tunnel. Here is what I did:
I took a clean mason jar and put the gear oil in that. The lid has one nipple on it and one hole. Through the hole I put the clear plastic tube (it has to be tight so you can build pressure in the jar). I then gently pressurized the mason jar to force the gear oil up the plastic tube and into the fill hole.
Pretty basic but I figured I would share...
Here is the setup with the jar and the plastic tubing.
View attachment 142702
Kinda cheap and dirty, but I just used an air chuck and my air compressor to pressurize the jar.
View attachment 142703
Ingenuity at it's best, great idea...
Similar threads
- Replies
- 78
- Views
- 4K
- Replies
- 4
- Views
- 312
- Replies
- 10
- Views
- 828


