• When you click on links to various merchants on this site and make a purchase, this can result in this site earning a commission. Affiliate programs and affiliations include, but are not limited to, the eBay Partner Network.

Hawk's First 727 Transmission Rebuild

I actually enjoy rebuilding the 727's, they don't really require anything special in the line of tools plus the removable valve body really opens them up. Another cool thing about them is you can take a rubber tipped blow gun to the ports before installing the valve body and test the function of all the clutches, bands etc.

Enjoy
 
Everything looks great! Not mucked up, no sludge. I don't know if I'd put glass bead in all of the nooks & Crannies though.
I'd be afraid I would miss two or three of the little Buggers when cleaning it! You're Killing It!
 
It looks like you are doing a great, careful 727 disassembly there, Hawk. Lots of clear pictures as well. I will offer some suggestions, based on what has worked for me. I have rebuilt a lot of these things over 35 years, both for myself and friends. Since most of these have been for performance cars, I have almost always included a shift kit.
It is good to see the 4 gear planetaries, as this is what the good 440 transmissions come with as well. I have never had a problem with these, but I see other guys have torn the splines out of them. More h.p. than my customers have had, I guess. Be sure to check your front drum and rear output shaft support for wear by the seal rings. I find that the rear band rarely has to be changed, but the front one should always be replaced. I noticed that you have the low performance heavy governor weight. The heavier the weight is, the lower the Rpm that the trans will upshift. A&A Transmissions have weight sets for different upshift speeds. The front servo assembly is also a low performance piece. As the 70's progressed, Chrysler made changes to the 727 to soften the shifts, and this was one of them. If you have access to an earlier 727 with the front piston with smaller diameter push rod and inner and outer spring, this is the one to use. Toss the outer spring and use just the inner one. As an alternative to this, Mopar Performance used to offer an upgraded front servo piston assembly with a red spring. A&A still have these available. I could not tell by looking at the picture of the rear band servo piston whether it has a spacer inside the spring. Some shift kits come with this spacer. The purpose of this spacer is to not let the spring compress, thereby speeding up the band apply. I have have found if this is not used, and other shift kit modifications are are done, the 1 to 2 shift feels like it binds up. I also use the 4.2 lever when I can, but the 3.8 is also good. I also like the steel core moulded A-518 pan gasket. They are expensive because you can only get them at the Dodge store, but the molded bolt hole o-rings reduce leaks. They are also reusable.
 
I actually enjoy rebuilding the 727's, they don't really require anything special in the line of tools plus the removable valve body really opens them up. Another cool thing about them is you can take a rubber tipped blow gun to the ports before installing the valve body and test the function of all the clutches, bands etc.
Enjoy
Thanks for the tip about using a blow gun to check! It's a fun project, and I'm learning a lot.

Everything looks great! Not mucked up, no sludge. I don't know if I'd put glass bead in all of the nooks & Crannies though.
I'd be afraid I would miss two or three of the little Buggers when cleaning it! You're Killing It!
Thanks. I think it looks pretty good, so the resulting big block 727 might actually work OK when these pieces go into it.
As far as using glass bead: Yes, it is a royal pain in the arse to get out. My father-in-law insists that soap, water and mechanical action is what is needed to get all the glass out. Yes, it will NOT be good if any is left inside the case. Below is the case after glass beading. It was very difficult to blast it since it was really too big for my cabinet, but I think I got all the critical parts.
20211120_201001.jpg


Here is another view:
20211120_201022.jpg


I have now done my first wash to get the heavy stuff out. The picture below is after my first wash, where I scrubbed every surface with soap and water. Tomorrow, I will wash it at least twice more, and will also use little bristle brushes through every orifice and hole! Yes, cleaning will be a hassle! :mad:
20211120_202453.jpg


It looks like you are doing a great, careful 727 disassembly there, Hawk. Lots of clear pictures as well. I will offer some suggestions, based on what has worked for me. I have rebuilt a lot of these things over 35 years, both for myself and friends. Since most of these have been for performance cars, I have almost always included a shift kit.
It is good to see the 4 gear planetaries, as this is what the good 440 transmissions come with as well. I have never had a problem with these, but I see other guys have torn the splines out of them. More h.p. than my customers have had, I guess. Be sure to check your front drum and rear output shaft support for wear by the seal rings. I find that the rear band rarely has to be changed, but the front one should always be replaced. I noticed that you have the low performance heavy governor weight. The heavier the weight is, the lower the Rpm that the trans will upshift. A&A Transmissions have weight sets for different upshift speeds. The front servo assembly is also a low performance piece. As the 70's progressed, Chrysler made changes to the 727 to soften the shifts, and this was one of them. If you have access to an earlier 727 with the front piston with smaller diameter push rod and inner and outer spring, this is the one to use. Toss the outer spring and use just the inner one. As an alternative to this, Mopar Performance used to offer an upgraded front servo piston assembly with a red spring. A&A still have these available. I could not tell by looking at the picture of the rear band servo piston whether it has a spacer inside the spring. Some shift kits come with this spacer. The purpose of this spacer is to not let the spring compress, thereby speeding up the band apply. I have have found if this is not used, and other shift kit modifications are are done, the 1 to 2 shift feels like it binds up. I also use the 4.2 lever when I can, but the 3.8 is also good. I also like the steel core moulded A-518 pan gasket. They are expensive because you can only get them at the Dodge store, but the molded bolt hole o-rings reduce leaks. They are also reusable.

Dave: A big thank you for all the advice above AND for explaining why! One thing to remember - most of the parts taken out of this transmission will not be used. See, I have the fun of now disassembling a second (but big block) transmission. This was built to handle a 600+ horsepower big block. It has a manual valve body and (hopefully) some stout parts. I am planning to use these parts (except I don't want a manual valve body) to put into my small block 727 I just cleaned. Once I check out these parts, I could really use your help and the help of others to assure that I have the right combination or parts that will make for a good, stout, street transmission.

Now time to sign off. It's been a busy day and now time for a cold beer! :drinks:
 
I don't know a dang thing about auto transmissions, but I sure am enjoying this thread. :thumbsup:
 
I don't know a dang thing about auto transmissions...
Me neither! But that's what is great about this site. There are people willing to help share their knowledge so I can do something like this! :thankyou:

Speaking of sharing knowledge. While I am cleaning the case today, a couple of questions to prepare for assembly:
Question 1:
I know I need some kind of assembly lube. The below is what I use on engines. Can I use this for the transmission or should I use something different?
20211121_074030.jpg


Question 2:
I have a complete seal kit as pictured below. It goes without saying that once I disassemble the other big block transmission I need to inspect parts for damage, wear, etc. But are there some parts that I definitely need no matter what?
20211121_080057.jpg


As always, I greatly appreciate the help!

OK. Now to get my butt outside in the cold to do a lot more boring cleaning - it's a necessary evil if I want this transmission to live more than a few miles!

Hawk
 
The main components you need, but, can be swapped between cases if the other has more heavy duty pieces or for example case hardened shafts, steel clutch cases etc. The ratio levers can be swapped if one has a higher one like 3.8 or 4.2 and one case may be less worn in certain places than the other too... all of the other parts and seals can be replaced with no issues and you should use the best parts that you can afford or can find. I used two trannies as well and combined one out of the best parts. Above all, as you clearly know, cleanliness is the deal. It doesn't take much to screw the thing up once it's in use. I cleaned mine by hand after it went to the car wash and my pressure washer. Testing with air pressure is also key before closing it up..
 
Also I read ahead in the manual before touching the thing. I read all of it, the tips and tricks, trying to understand how the various subassemblies went together so I would be familiar before taking them apart....:D:luvplace:
 
The insides of that transmission are really clean. Nice to start out that way. Nice work.
 
Just use trans fluid to assemble it. No need to introduce some sticky **** that the clutch plates won't like! Looks like you have all of the consumables. When you take the big guy apart, it will tell you everything.
 
Yes, trans fluid. I put some in a squirt bottle and a sprayer. Very handy.
 
Thanks guys. Using transmission fluid for assembly is easy - I can do that! :thumbsup:

I finished the next cleaning cycle.

It may be hard to see in the picture, but there is glass bead in the bottom of this little gully in a corner. Now I didn't expect the first cleaning to get rid of everything, but this is why detailed cleaning is so important - those little glass bead bastards find ways to hide!
20211121_092401.jpg


Some tools I used for the next cleaning cycle (I also used some scotch brite, not shown):
20211121_095331.jpg


Then high pressure washing and squirting through every little orifice (luckily it wasn't too cold today - in the 40s).
20211121_094956.jpg


Followed by putting pipe cleaners, bristles, etc. through every hole and crevice and scrubbing as much as possible with scotch brite.
20211121_094307.jpg


Then a final rinse and let it dry in the sun. Once it is dry I will carefully inspect the case both visually and with my hands. If I feel or see any grit, it will get cleaned again. Once it passes that test, I will do a final assembly clean as I assemble with some Berkebile 2+2 to ensure there are no oils or crap on key surfaces.
 
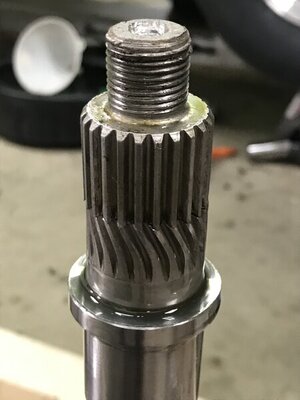
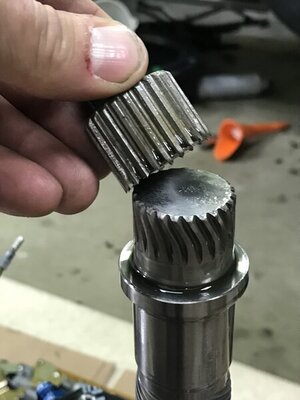
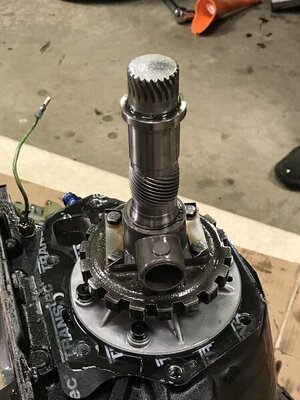
Great thread Hawk! I just went through this to swap out a “two-piece” out put shaft.

600D5483-DD07-4899-9E26-30FB005EFFE2.jpeg 7E11BC04-EBE6-411A-9130-4828E01E84BB.jpeg 3F5C157E-C401-4221-A34F-43A64B433C90.jpeg
 
Great write up! It's hard to say from the pics, but hope you didn't bead blast the machined area that the vb mounts to.
Also, most Trans rebuilders use a Trans assembly lube tub you can get at most parts stores. Or Trans shops.
 
...hope you didn't bead blast the machined area that the vb mounts to...
In general, I didn't bead blast inside the case. I did, however, very lightly bead blast the machined surface the VB mounts to to clean all residue off of it. Do you feel this is an issue?

I finished dismantling the big block transmission, and I have to say I saw a few surprises. Not that I know what I am looking at, but I've learned (I believe) that a 4 pinion planetary is better then a 3 pinion planetary. My small block 340 transmission has a 4 pinion planetary while the big block only had a 3.
20211121_143430.jpg


Also, a couple of other parts looked like they had some wear. Here is the pan. It had gray sludge in it. Not sure how bad of a sign that is?
20211121_140422.jpg


Also, some parts looked like they had noticeable wear. One example:
20211121_143547.jpg


What I will do now is start to take pictures of small vs. big block parts. Hopefully the knowledgeable crew here at FBBO can advise me of the best of each transmission.
 
OK Folks, here is where I could really use the help from the experts. I want to show comparison pictures of my small block vs. big block parts. I'll add my own commentary, but since I may not know what to look for, I greatly appreciate your help to pick the best part/ subassembly for my car.

I will always post the small block first/ to the left, big block last/to the right.

Overrunning Clutch Outer Race
Both look fine to me, I see very minimal wear on either, but the small block has bigger indentations from the rollers on the spring retainer. Both inner races (and rollers/springs) look good. My vote would be for big block here.
20211121_183203.jpg
20211121_183219.jpg


Output Shaft Support
The small block seems to have more wear from the governor, and also some more wear on the front. Neither have any wear I can feel with my finger, but my vote goes for big block. Edit: Also, the inside, that supports the output shaft, is nice as well, no galling or obvious wear, although, again, the big block looks a bit better (this is not able to be seen in the pictures).
20211121_184136.jpg
20211121_184141.jpg

20211121_184148.jpg
20211121_184156.jpg


These may be no brainers, but I'd still like to boost my confidence by getting some comments from folks on the forum. Of course, if there is something that you think needs replacing, then so be it - let me know that too.

Thanks,

Hawk
 
Last edited:
Next set of parts:
Low and reverse drum
The big block drum has noticeable wear from the clutch, you can even feel it with your finger. On the other hand, the small block drum still has machining marks left and extremely little wear. My vote here goes for the small block drum.
However: I notice that the small block drum has three holes drilled in it, while the big block does not. Not sure why?
20211121_183548.jpg
20211121_183556.jpg

20211121_183627.jpg


20211121_183648.jpg


Low/ Reverse Band
The small block band looks like a solid piece of metal with perhaps a coating on it (?). On the other hand, the big block looks a little bit like a brake drum pad. The small block has imperfections in it, so I don't like the way it looks (see center of the picture, bottom of band). The big block band looks fine, except three of the ribs look like they have gotten very hot. Winner here, maybe big block?
20211121_183902.jpg


20211121_183911.jpg


Thanks,

Hawk
 
Just check the support hub with a Mic to make sure it's round! Use some carb Cleaner and compressed air to finish cleaning your case! Buy a new Kevlar band!
 
Last edited:
Machined surfaces should never be blasted.
The problem in this case is;
No gasket
Thin fluid
Keeping the separate circuits separated.
Who knows what servo circuit might engage some other clutch pack in the wrong gear.
Might want to read up about that area in the book.
 
Auto Transport Service
Back
Top