• When you click on links to various merchants on this site and make a purchase, this can result in this site earning a commission. Affiliate programs and affiliations include, but are not limited to, the eBay Partner Network.

Just another 440

The block painting bit is actually old school drag racing stuff. The blocks are from a sand cast, and almost impossible to keep crap from working out, once the engine warms up. That stuff gets into the oil (of course), besides parts and pieces.
It's just a matter of preference. What's good for the goose...
Besides, I've always looked at dragging as a great testing ground, to see what works, and what doesn't.
At first, the guys used (can't remember the name) an electrical insulating paint, but it's not cheap. Then that particular Rustoleum was found. Either way, same deal applies, needs to be brushed on, and needs to cure 2-3 days, before allowing any oil on the surface. If you spray can it, you get a 'dusted' surface, which you don't want!

I cleaned that block several ways, and continued to get rust powder on my hands. Once painted...nothing...clean as a baby's butt. Anyway, enough on that bs, dealing with other parts now.
 
Glyptal is the electrical insulating paint you're thinking about. Good stuff. The cam is one that i like for a street engine and the heavy duty stamped rockers should work well with it, how ever, the stock type rockers(heavy duty or not) are usually all over the board with the ratio. Probably won't create any issues tho unless you are after perfection. On your heads, which ever ones you decided to use, make sure you clean up the bowls under the valve seats. The factory back cut just under the valves sucks big time on Mopars and just doing a pocket port job (bowl work) will free up a good deal of breathing. It helps even with a bone stock cam. Any other port work really isn't needed with a mild build.....and do you have any before pics of the block? It looks good now for sure!
 
Glyptal is the electrical insulating paint you're thinking about. Good stuff.

Thanks for that Cranky! Yeah, Glyptal it is.

Completely understand what your saying on the heads. My usual deal is to do a little porting/polishing on the exhausts, and leave the intakes alone, unless port matching needs to be done at the mating surfaces. I prefer the cast finish in the intakes, to help the fuel/air mix, at least on a simple street motor. This 440 will basicly be that. Don't have the pockets for blowing up parts, which I'm sure I would, since I've got a big foot.
I was gonna take a before pic, but camera bat was dead. Dang block kept rusting before my eye. Machine shop that re-cleaned the block for me was right. Half a day after shot blasting, it would re-rust.
 
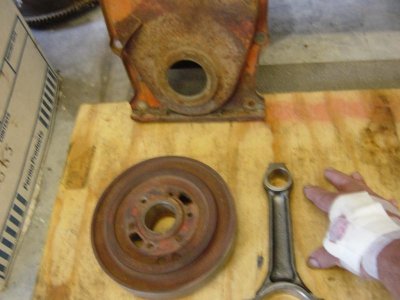
Maybe a clue on some of the parts I'm fooling with...
440 parts.jpg
Cover is going out the window, not worth looking at. But it gives you the idea what the motor looked like. Of course, I was after the internal parts!
The rod is after the initial wire wheel brushing, to get the rust and crap off. Next to the last rod, caught an edge, pulled my hand into the brush...gave some blood. Gonna slow down my rat killin'.
 
Now I know why I haven't plugged the block, yet.

The pickup tube oil port. The leg of it, where the tube screws in, is still crusted with heavy rust. Just reminding, this one was almost closed off with rust, and heavy carbon. Anyone ever run into one like this before?? Trying to figure where all the carbon comes from, not much all the rust.

Used a spiral wire brush, 9/16" drill bit (by hand), and scraped on this thing, with still no clean metal in sight.

Thinking seriously about going to a 1/2" pickup tube. Anyone done that...by hand? Open for comments, or suggestions.
 
Guess I'll take that as a no.

5/8" coming up, so 1/2" pickup tube will be a go. Don't see any probs created. Need to hit the references, to pick a pan that will fit my 64. Used the 64 BB crossmember.
 
I opened mine up by hand for a 1/2 pick up, it's was a pain, drilling no problem tapping the threads PIA, had to buy the tap for it and everything but the normal handles don't work had to do it with wrench, got some good threads but still used pipe tape for added seal and holding.
 
Thanks for that, Moparmatt72.

Yeah, methinks it will be fun. Had to do this sort of thing several times, so won't be the first. But, kinda thought things out. Once I start cutting, done deal. Gonna start with my tapered reamer, to get a start in the hole, then the 5/8"s bit. Not even sure if that will clear out the layer of rust, but we'll see. Plus the tapered cut at the top will help getting the tap to start.
 
True thats a better way then how I did it lol I just drilled and tapped, your way seems smarter. This was my first time doing it, should have just had the machine shop do mine when it was in getting the other work done.
 
Just makes getting the tap to start a little easier. Done deal. I like to use WD40 while cutting the threads, too. Came out with good clean threads.
Now I've gotta wait until I find a pan and pickup, in case I need to cut another thread, or two, to get the pickup installed right. Looking at a few pans at Jims parts, need to call to get more info. Like to find a 5 quart pan. Know about the site on 62-65, and their data.

What the heck, still have parts to rub on. Prefer doing my own, to my liking.
One kinda neat deal...with the block painted...drag it outside, spray it down with kerosene (to wash the cut metal off), doesn't bother that paint a bit. Won't close any holes on the block, until all cutting is done.
 
First time for everything!

Set my ARP rod bolts into my rods the other day. When I got to #6, thought I was seeing things!
Pushed the cap onto the rod...and there was a .010" gap on one edge of the mating surfaces! What the hell. In other words, the cap was fitting the rod crocked. After looking things over, even pulling the ARP bolts back out, and trying the stock bolts...same deal.
The locating hole in the rod cap had been drilled off, and angled.
No fix for that. Find another cap, or rod. What a deal.
 
Auto Transport Service
Back
Top