idrivemopar
Well-Known Member
Hi Everyone,
Just wanted to share some information about making door vapor barriers and quarter vapor barriers. I made these for my 73 RR but apply to any car with these installed. As most old cars the originals are rusted dirty and torn, so a new set is in order. If you have your originals, at least one side, the same cut out can go on either side since the plastic is clear.
1. Where to get the plastic? Some have suggested that your local hardware store has it, but this is made for landscaping or painting and is either not correct density, i.e., less then 4 mil or is white plastic not clear. Additionally its not the correct poly type plastic, as you want something that is resistant to tearing. So, my suggestion, go to your local furniture store, a mattress store is better and ask if you can get a mattress cover, queen size is plenty big to do two sets for any car. Its thick clear plastic, and is 6 mil and sturdy enough so it will not tear if you need to remove it from the strip caulk at some point. Its very close to original, a bit less clear but a bit stronger. If you ask nicely, you may be able to get a bag for free as I was able to!!!!
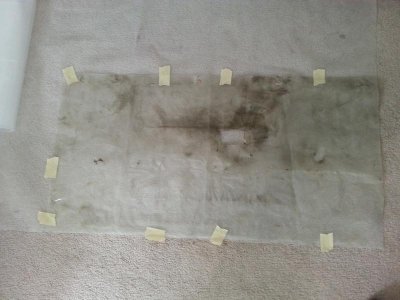
2. Laying out the plastic an cutting. Lay out your plastic that you will use to make new barriers, using a large piece of cardboard underneath so you have a good cutting surface. Lay out your original on top, and tape the edges so it is tight. Next, using a sharp utility knife or scissors cut out the middle sections for the door handle and window handles. Next if you have good scissors, you can push them along the edges to get a smooth even cut, rather then scissoring on the edge. Round the corners as needed with your original still attached. do this for both the doors and the quarter panel barriers.
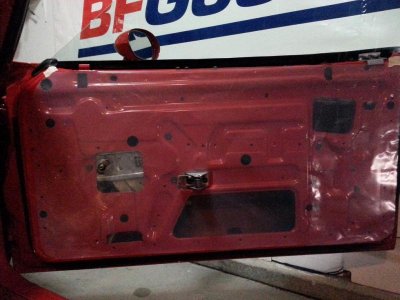
3. Attaching the barriers to doors. Using a piece of painters or masking tape hang the barrier on the door or quarter to get proper alignment. Use strip caulk or double sided tape on the top of the barrier, the door panel clips will hold the rest of the panel in place. Use a hole punch to make the holes for the door panel clips that are near the edge. Use a sharp knife and cut small "X" marks where the lower door screws go in, this will prevent the plastic from wrapping up or tearing when putting these screws in. Do the same for where the upper door panel clips go into the middle of the panel.
4. Attaching the barriers to the quarter panels area. Again use painters or masking tape to hang the barrier. Use strip caulk and run it around the sides of the barrier, the top was not attached, and the bottom used paper tape to attach it to the portion that juts out under the panel. I don't believe this was used in all applications, however, your old barrier should show you where the strip caulk was located before and you can follow it. Now with it in place, again use a sharp knife to "X" out the holes for the quarter panel screens and clips for the quarter lower and upper panels.
Here are some photos of the new barriers I made. Excuse the dirty carpet, but that's what happens when you have half a car in your house for a few years!!!
Door panel barrier attached to new plastic ready to cut, wheres my cardboard!
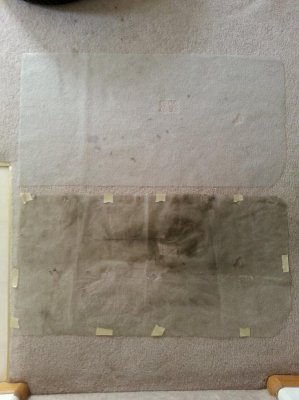
New and old, you can see why new ones were needed.
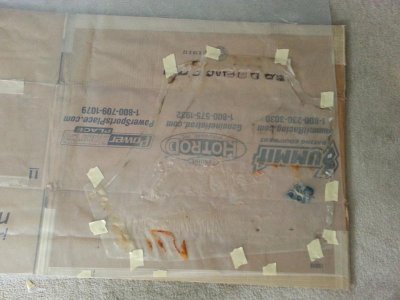
Quarter panel ready to cut
New and old, again, this was really why these needed replaced, rust and dirt!
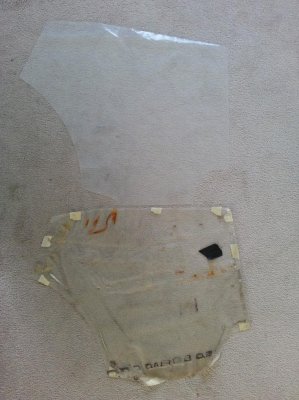
What it looks like on the door, temporarily hung you can see its very transparent. Next to attach and make holes for the panel clips and screws.
Good luck, I hope this is helpful!


Just wanted to share some information about making door vapor barriers and quarter vapor barriers. I made these for my 73 RR but apply to any car with these installed. As most old cars the originals are rusted dirty and torn, so a new set is in order. If you have your originals, at least one side, the same cut out can go on either side since the plastic is clear.
1. Where to get the plastic? Some have suggested that your local hardware store has it, but this is made for landscaping or painting and is either not correct density, i.e., less then 4 mil or is white plastic not clear. Additionally its not the correct poly type plastic, as you want something that is resistant to tearing. So, my suggestion, go to your local furniture store, a mattress store is better and ask if you can get a mattress cover, queen size is plenty big to do two sets for any car. Its thick clear plastic, and is 6 mil and sturdy enough so it will not tear if you need to remove it from the strip caulk at some point. Its very close to original, a bit less clear but a bit stronger. If you ask nicely, you may be able to get a bag for free as I was able to!!!!
2. Laying out the plastic an cutting. Lay out your plastic that you will use to make new barriers, using a large piece of cardboard underneath so you have a good cutting surface. Lay out your original on top, and tape the edges so it is tight. Next, using a sharp utility knife or scissors cut out the middle sections for the door handle and window handles. Next if you have good scissors, you can push them along the edges to get a smooth even cut, rather then scissoring on the edge. Round the corners as needed with your original still attached. do this for both the doors and the quarter panel barriers.
3. Attaching the barriers to doors. Using a piece of painters or masking tape hang the barrier on the door or quarter to get proper alignment. Use strip caulk or double sided tape on the top of the barrier, the door panel clips will hold the rest of the panel in place. Use a hole punch to make the holes for the door panel clips that are near the edge. Use a sharp knife and cut small "X" marks where the lower door screws go in, this will prevent the plastic from wrapping up or tearing when putting these screws in. Do the same for where the upper door panel clips go into the middle of the panel.
4. Attaching the barriers to the quarter panels area. Again use painters or masking tape to hang the barrier. Use strip caulk and run it around the sides of the barrier, the top was not attached, and the bottom used paper tape to attach it to the portion that juts out under the panel. I don't believe this was used in all applications, however, your old barrier should show you where the strip caulk was located before and you can follow it. Now with it in place, again use a sharp knife to "X" out the holes for the quarter panel screens and clips for the quarter lower and upper panels.
Here are some photos of the new barriers I made. Excuse the dirty carpet, but that's what happens when you have half a car in your house for a few years!!!
Door panel barrier attached to new plastic ready to cut, wheres my cardboard!

New and old, you can see why new ones were needed.

Quarter panel ready to cut

New and old, again, this was really why these needed replaced, rust and dirt!

What it looks like on the door, temporarily hung you can see its very transparent. Next to attach and make holes for the panel clips and screws.

Good luck, I hope this is helpful!


