• When you click on links to various merchants on this site and make a purchase, this can result in this site earning a commission. Affiliate programs and affiliations include, but are not limited to, the eBay Partner Network.

New member first project 65 satellite

Wow. Thanks Arland. Man that is very nice, I love that car color. Those pics will really help. I see you didn't paint the intake either, the other debate we were having. I like how it looks with the contrast and hint of performance, same route I think we'll go.

I painted that plate body color, wasn't really sure. When we pulled the car Sparta the previous owner did the Chevy-paint everything black treatment. I did change though to a dual mc as well. Thank you.
 
Auto Teach is exactly right about the giant black bulge on the steering column containing the shifter cables. The intake manifold is actually an aluminum Edelbrock Performer that I used with an Edelbrock carb. The set up is very stable and smooth for the street and is an improvement over 48 year old stock intake systems - my one concession to modern technology.
 
View attachment 90107

Hi,

I have the same car and still in metal repair stage, I see you have the same rust area at back window as showed in the picture.

Did you just piece in new metal there ? Was your drip rail rusted off at the bottom in that area, kinda looks it a little in the picture ? I am at that exact place in my repair and looking for ways of repairing ?

Beautiful colour choice.

- - - Updated - - -

Actually, as I look at the picture above and see the rust spot on the body line area , if that needs replacing, how/what is the best way to re create the body line that will need to be cut out ?

Do you remember what you used to form the body line when you replaced the metal at the side rear window under the drip edge area ?
 
Well got everything wet sanded except for the roof. Just going to wait to spring on that.

We put the blower/heater box back in, rear windows, and some small trim pieces.

Also started more work on the engine. Need to clean the block real well, and start the rest of the assembly.

sat69.jpg


sat68.jpg


sat67.jpg

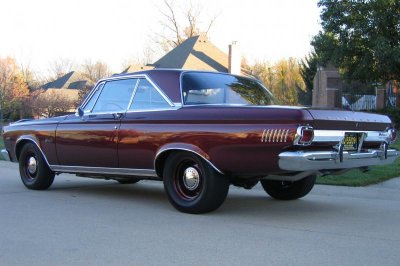
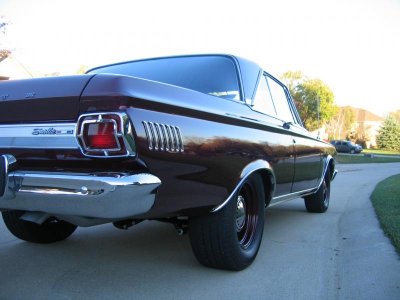
Ironside, Did you intentionally reverse the 7 "gills" at the rear of the quarter panel? I've heard some of the '65 Satellite guys say they like them reversed as if they're capturing air. The factory applied them in the same manner as louvers--but ultimately, it's YOUR preference! Beautiful car--NICE JOB! Bob
 
Moparsteve, for some reason your pm isnt coming through. I sent one back to you to try out. Maybe my account?

ilm65, nope didnt mean to reverse the gills. Im a nimrod. I put them on 3-4 times, and then I took the pic after the final time. Ron noticed it and changed them. I got the drivers side correct though.

Some more updates. Clean the block and all the passages. Those of you with a sharp eye might notice Ron gained some cubic inches, about 57 of them. The crank and rotating assembly all went in. Still have to degree the cam yet. Heads are done and waiting on a few small pieces and should be painted by the end of the week. Anyone in the SW MI area, the machine work was done by Dave Irwin out of Kalamazoo. Great quality. Every main is at .005, hone and finish on the cylinders is great and the rods as well were all within .001 of each other. Very smooth. The engine is .030 over and final compression should come in a little over 10:1. Should make for a good running engine.

sat71.jpg


sat72.jpg


sat74.jpg


sat73.jpg


The last couple nights I have been working on the rear panels as well. What a pain. The panels are from Legendary and really are very nice. I had to change over the stainless trim and the upper steel "caps" as well. Probably would have been smarter to send it all to legendary but oh well, they came out great I thought.

The one thing that did drive me nuts is the panels have holes in the board back where the trim SHOULD push through, but they arent lined up with where the trim is supposed to go on the front of the panel, so if you buy any be careful and watch that you dont just punch the holes.

I also bought a little buffer and stuff from eastwood, the small trim hammer you see in the pic too. I spent about 3-4 hrs knocking all the dings out of the trim, filing, finishing and bringing back to life. Sure is night and day verse the old stuff.

sat75.jpg


sat76.jpg


- - - Updated - - -

Do you remember what you used to form the body line when you replaced the metal at the side rear window under the drip edge area ?

Stanhope,
This is from an earlier post:
On the rear section I cut out everything on both sides and replaced with new metal. It took about 4hrs per piece. I have a small brake (harbor freight) and use that to form the solid bends. For the slight rolls and stuff I just use an acetylene tank. I also use the throat of my vise to help get some of the "rounder" bends.

It's hard to describe until you do it but the tough part is as the pice goes back it widens and flattens and "rolls" more to the top. Once you make some bends and just start fitting it comes around. Just takes time. Hope this helps.
 
What are you using for pistons? Most of those offered today are the low compression type.
 
The pistons are Speed Pro L2355F. I think they are now discontinued though. SOme of the compression is coming from that the block had some pitting around the water jacket on the deck face, so it needed to be decked some to get that cleaned up, not so much the intake had to be touched though so that was nice. With the closed chamber head, +7.00 on the piston and how little they are in the hole helped with the compression.

More done over the last several days. We got the headliner in and the upper roof rail trim and weatherstripping. Screw that headliner stuff. What a nightmare. It ended up coming out nice, but what an absolute pain. Next time we'll pay somebody.lol.

The motor is pretty close to buttoned up. Just have to put the distributor in, make the fuel line and some other little stuff. I also started on rebuilding the trans. This is the first time Ive ever gotten into and automatic. Aside from stuff being wore out, I dont think it'll need much more than a kit and some bands. No if I can just remember how it all went back together.haha

sat81.jpg


sat79.jpg


sat83.jpg


sat89.jpg


sat80.jpg


The old strut rods were also junk. They were bent all to death and the k member end threads were stripped. I had some chrome-moly tubing and rod ends so I made up a set of adjustable strut rods for the front. Again just to save money more than anything.

sat88.jpg
 
Ron and I sat the engine in the other day. Actually put it in from the bottom. Worked quite well. He's still waiting for some interior pieces. Alot of little stuff from here to really start finishing up.

sat90.jpg


sat91.jpg


sat92.jpg
 
My engines all disassembled and wish I was up to the same stage as your in right now.
One of the things I have been struggling with is engine color. Orange came to me right away as thats what a person would normally do. But seeing yours I think I would paint mine back to the ole blue. It is still the original 64 block.
Nice job your doing!!
 
Been a while since updates. The car is now running and driving for about the past 2 weeks. Runs great, catches alot of eyes. Still little stuff to do here and there but at least a major part of the hurdle is done.
I ran into some trans/shifter issues. The trans we have is for a 78, but were trying to use a factory console setup. Well the levers on the VB assembly on the 78 trans were wrong and the factory cable is specific to 63-65 trans so a bit of a pain. I found Imperial Services makes a new cable/bracket/lever to keep the original console. Nice piece overall but what a nightmare people to deal with. Over two months of no returned emails or calls and I was calling daily. I guess at least it finally showed but I will never deal with them again.

Anyway heres a couple new pics. I originally painted cop cars wheels to match and we assembled with those. I just dug the looks of some of the aftermarket wheels and bought some Rocket Racing Fuel wheels. Man they are nice. The rears arent here yet but when they do Ill update the photo.

IMG_0336_zpse1807221.jpg


IMG_0335_zpsdfe4d087.jpg


IMG_0334_zpsbd597600.jpg


IMG_0338_zpse49f8131.jpg

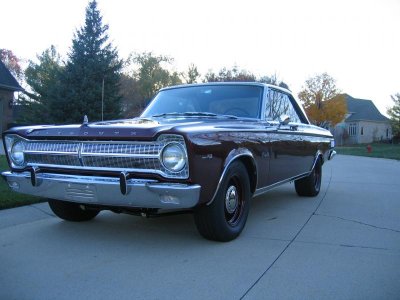
Amazing similarities--especially with the 15" slotted wheels and vented dog dish hubcaps; you've got a beautiful car there--but I'm just a little biased!!!
 

Attachments

  • 7. Satellite left-front.jpg
    7. Satellite left-front.jpg
    63.3 KB · Views: 218
  • 1. Satellite left-rear.jpg
    1. Satellite left-rear.jpg
    60.5 KB · Views: 228
  • 6. Satellite right-rear.jpg
    6. Satellite right-rear.jpg
    52.4 KB · Views: 230
Thanks.

Yeah ilm65, let's just say I've had those pics of your car saved on my phone for sometime. Ours isn't quite that nice-but definitely helped with direction of this car. Thank you-awesome car!
 
ironside, Thanks for the kind comment--but what you've done with your Satellite is absolutely beautiful and inspiring--I'd be privileged to park mine next to yours at any show. What's your final decision on wheels? Gotta say, I really like the look of the aftermarket wheels on the 65's. I've always liked the Torque Thrust (so similar to your Rocket Racing) and the Keystone mags--like those used by Sox & Martin for so many of their vehicles. Again, yours is a beautiful vehicle!!!! All the best, Bob
 
Last edited:
Final decision on the wheels was keep em? I finally got the rears in this week and different tires mounted on them. Those old FOrmula super stocks I was so worried might come apart and take out a fender or something. Took it out and snapped some pics today. First nice day here in MI in a week.

Wheel combo is:
Front 15x7 with 3-3/4BS with a 215/70/15
Rear 15x8 with 4-1/2BS with BFG 275/50/15/ Factory housing. Plenty of clearance.

IMG_0347_zps82e13bcc.jpg


IMG_0353_zps2c09b834.jpg


IMG_0351_zps617d2cab.jpg


IMG_0341_zps6e5921c5.jpg
 
Auto Transport Service
Back
Top