• When you click on links to various merchants on this site and make a purchase, this can result in this site earning a commission. Affiliate programs and affiliations include, but are not limited to, the eBay Partner Network.

Project Unicorn - 1968 Charger Restoration

Back to work and things have slowed down but got the doors and deck lid done and fenders are in the booth waiting to be done.

45654B8D-99AF-4A0C-935A-CC32C6697853.jpeg
06297B4E-0220-432A-88C2-68F6006E3702.jpeg
A6DB9ED5-3475-4F35-96F4-2C6A1C4258BB.jpeg
786E79E4-6BC1-4BFC-B1B6-B05F2592C24B.jpeg
CC11DA0A-69DC-4C80-8D6E-511E14AD9B80.jpeg
41D511C1-8549-4900-938F-8097BB4445F6.jpeg
964C62B7-B19C-44F5-89BB-CF3602DA95B1.jpeg
 
Be careful of spraying metallics in pieces. Sometimes they don’t lay down all the same. That causes them to flop in different directions when you look at the car outside. I spray the last colour coat with the car assembled then take apart and clear all individually. More work but all the panels flop the same. At the least paint parts hanging the way they are on the car. Hood/trunk flat, doors hanging etc. Be very careful of gun settings and how many coats your putting on. Even the colour of your undercoat can affect the topcoat. Hope you’re not too far along for this to help!
 
Be careful of spraying metallics in pieces. Sometimes they don’t lay down all the same. That causes them to flop in different directions when you look at the car outside. I spray the last colour coat with the car assembled then take apart and clear all individually. More work but all the panels flop the same. At the least paint parts hanging the way they are on the car. Hood/trunk flat, doors hanging etc. Be very careful of gun settings and how many coats your putting on. Even the colour of your undercoat can affect the topcoat. Hope you’re not too far along for this to help!

Thanks Jeff, it’s always a concern I think when doing the panels separately even crossing gallons. So far so good though, don’t think I’m running into any issues yet; hopefully not jinxing myself here. Have been careful with prepping all the panels in the exact same way, gun settings, paint mixture, # of coats, etc. Hopefully this avoids the pitfalls, just the fenders and hood left to go. Will get some updated pictures soon.
 
Working away on the cut and buff of the paint. Just showing here the paint on different panels at different times, think it’s all good.

AFB4706B-5DA9-4CFB-A838-5020F01A12FA.jpeg
B3064AF9-928D-4DC9-AA2F-C728D7F1024E.jpeg
 
I took a break for a bit; sometimes it’s best to step away and come back. Covid-19 and work being crazy busy didn’t help.

Anyway, back at it and sprayed the last of the panels yesterday. Just need to cut and buff and put them on. The rest of the car has also been cut and buffed. Looking forward to the assembly stage...

3ABA837B-74E7-47EC-A184-6C4C0689A41B.jpeg
323A54F2-2770-4FDF-80D4-D91123403263.jpeg
545FCC63-E671-40DC-BA29-6D243C42E87B.jpeg
 
Well, painting is finally done. The cut and buff process was the usual pain in the *** with few resprays (like the driver side fender) as a result of cutting through. I did 4 coats of clear, but got careless a couple of times and that costs you! (Like not taping the edges)

Next up is blacking out the grille area and restoring the grille.

I have a HUGE load of new parts that I ordered back in February before COVID-19 hit that were delivered to a shipping depot near the border and of course I haven’t been able to get them yet and likely won’t for some time. Very frustrating... anyway I have lots to do to keep me busy until then.

C3DD9B30-2562-4764-BFEF-939C411CF04A.jpeg
6DC7A9D3-3B24-4CAD-8A0B-5C5654C9EBE5.jpeg
85578058-F118-4CC5-BEDD-FCA106A6FA5D.jpeg
88381D14-112B-498D-883F-CEBA15717705.jpeg
C655BDC0-484E-4B24-9D74-FC9E9A3F30A9.jpeg
 
Well, painting is finally done. The cut and buff process was the usual pain in the *** with few resprays (like the driver side fender) as a result of cutting through. I did 4 coats of clear, but got careless a couple of times and that costs you! (Like not taping the edges)

Next up is blacking out the grille area and restoring the grille.

I have a HUGE load of new parts that I ordered back in February before COVID-19 hit that were delivered to a shipping depot near the border and of course I haven’t been able to get them yet and likely won’t for some time. Very frustrating... anyway I have lots to do to keep me busy until then.

View attachment 986426 View attachment 986427 View attachment 986428 View attachment 986429 View attachment 986430
 
Awesome job!! Looking at your paint booth; are you drawing air in from windows with the fans and across to the filters in the wall? Any concern with fans causing an explosion. I’ve read conflicting info on the web.

Thanks,

thanks man. Regarding the booth, the fans are pushing air outside and drawing fresh air across the booth through the filters on the other side. About the risk of explosion, didn’t think about this or hear of the risk, maybe I got lucky. :-O all my painting is done now. What I can say is that these fans are pretty purple now :)
 
thanks man. Regarding the booth, the fans are pushing air outside and drawing fresh air across the booth through the filters on the other side. About the risk of explosion, didn’t think about this or hear of the risk, maybe I got lucky. :-O all my painting is done now. What I can say is that these fans are pretty purple now :)
I used 2 cheap window fans, not sure but I think mine are brushless motors. I think as long as you have a good air flow before you start spraying the fumes won't build up enough to get blowed up, just my novice opinion.
 
Been awhile since I updated. Has been slow because of the parts waiting across the border that I can’t get because of COVID; since March!

anyway, have been doing what I can here and there. Heater box restored below, pretty rough start! Turns out it is a 66 box, came with the car in a parts pile. Working on sourcing the heater vent and bracket to switch it over so it will work in the right direction.
65D192E4-C551-49B2-8101-76E17A9D85D5.jpeg
7782C45D-D231-46C9-86A7-F64FBEA78B52.jpeg
8ADC526F-30EB-4146-A558-3059EF60662C.jpeg
613181F3-C394-4302-B318-B05CC28BC757.jpeg
DDAF5ED2-73D6-45BD-8228-4AAC2A819AB2.jpeg
F301B26F-F6C6-4389-ABB3-2CB8086937BC.jpeg
 
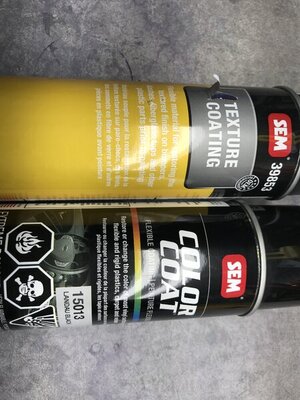
Well I think I figured out how to get the textured look for the dash and column without breaking my bank and ordering the $200USD PPG suede lacquer pint from instrument specialities. (+ shipping costs to me in canada and exchange for a grand total of $350!!) So if you’re looking for an affordable and great solution - here you go. I used the PPG suede on my cuda so I know what it was like, and it was a great finish no doubt - but I’m very happy with this result.


image.jpg
image.jpg
 
Other than a hot chick,there is nothing that looks finer from behind than a second generation Charger R/T!
 
Auto Transport Service
Back
Top