• When you click on links to various merchants on this site and make a purchase, this can result in this site earning a commission. Affiliate programs and affiliations include, but are not limited to, the eBay Partner Network.

Pulled a stupid move. Now I have to pay for it.

If this was your first dumb move, be prepared, there will be more to follow! Drill and tap would be my fix also. Good luck. ruffcut

Well Said!


a a a a bingo girl.gif
 
Well I think the problem was worse than I originally thought. I will have to put a Helicoil in the head. Tried cleaning the threads. Seems the only threads are at the very bottom of the hole.
 
Well I think the problem was worse than I originally thought. I will have to put a Helicoil in the head. Tried cleaning the threads. Seems the only threads are at the very bottom of the hole.
Oh dear....sorry to read that.
My two cents on replacement fasteners (I have a thread on here somewhere about this) when I did my own battles with leaky valve covers:
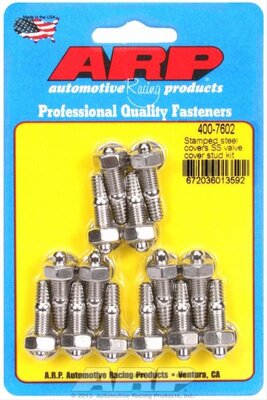
arp-400-7602_xl.jpg
ARP stud and nut kit for stamped steel valve covers (they have similar for cast covers)

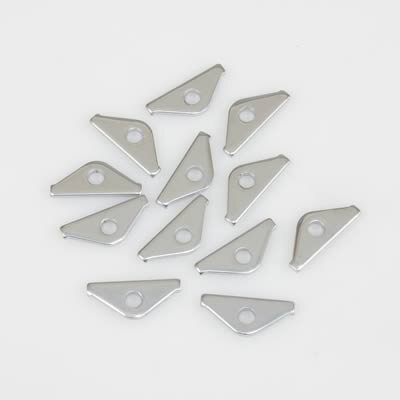
mopar 4349620 vc washers.jpg
Mopar 4349620 valve cover "load spreader" washers

I used both of these because 1) I wanted studs and nuts and 2)I had just procured a set of original factory '67 chrome valve covers and wanted it all to look "right".
 
I have Mopar Performance valve covers. Which leave little room for washers and nuts.
 
Yep – familiar with your pain replacing exhaust manifold gaskets on my truck last fall. Three broke and got two out after some haggling using a come-out and left drill; but ahh...not the last one impeded by the strut hardware where I couldn’t make a direct-straight shot to the stud with the punch and drill. Off-center or cocked attempt was a ‘don’t try it’ this way despite knowing. Well, a friend located a small right angle drill attachment that might have worked; but too late…damage was already done….Heli-coil it was…hours, cut knuckles, and multiple-dozens of expletives later..
 
I have Mopar Performance valve covers. Which leave little room for washers and nuts.
Again, ARP has stud and nut sets for cast valve covers too. The nuts aren't any bigger than the bolt heads they're
replacing from what I've found.

By the way....anybody mention yet how some of the bolt holes aren't exactly perpendicular to the head, either?
 
Again, ARP has stud and nut sets for cast valve covers too. The nuts aren't any bigger than the bolt heads they're
replacing from what I've found.

By the way....anybody mention yet how some of the bolt holes aren't exactly perpendicular to the head, either?
Nice parts..... but $35!?! If I have $5 in the studs in my post, I would be surprised and disappointed .(not counting the time invested in the spreaders I made)
And no, nobody mentioned it yet, but I'll bet the guys that have tried to put some of the fabbed covers on iron heads have found that out!
 
Go to the hardware store. buy some reverse drill bits. Choose a bit smaller than the bolt. Use a variable speed drill. Put the drill on reverse and go SLOW. When the bit gets a bite, it'll back out the allthread.
 
Nice parts..... but $35!?! If I have $5 in the studs in my post, I would be surprised and disappointed .(not counting the time invested in the spreaders I made)
And no, nobody mentioned it yet, but I'll bet the guys that have tried to put some of the fabbed covers on iron heads have found that out!
If I recall correctly, some judicious eBaying got me everything shipped here that I showed for less than $30...
and the install didn't involve any fabricobbling on my part, of course. Plug 'n" play...
Yeah, that weird angle on the fastener holes was a surprise to me (don't know why I never noticed before;
probably because I'd never run any aftermarket covers before).
 
Again, ARP has stud and nut sets for cast valve covers too. The nuts aren't any bigger than the bolt heads they're
replacing from what I've found.

By the way....anybody mention yet how some of the bolt holes aren't exactly perpendicular to the head, either?
I think this is the issue with these heads. I think the casting has the gasket surface a little canted.
 
I think this is the issue with these heads. I think the casting has the gasket surface a little canted.
It's whacky, whether it's the holes drilled at an angle or the surface being canted....that's for sure.
I never knew about this "phenomena" in all these years...just figured sometimes it was the luck of the draw?

I found my original thread on here when I got the '67 chrome covers and went through all this:
https://www.forbbodiesonly.com/mopa...l-valve-covers-studs-instead-of-bolts.157179/
Folks were a big help on it! @khryslerkid @33 IMP for example...:thumbsup:

I know one thing - it's inherently illogical for the clamping fasteners to not be perfectly perpendicular to the
sealing surface, but there it is - Ma apparently did it often on these. That one is a real head-scratcher...
Funny thing is.. I even put Moroso Permalign gaskets on which I boast about and even those failed. I have used those several times and 0 leaks. Not on the Road Runner..
 
OK got the thing tapped out and helicoiled. I still need to get a set of studs and nuts. But for now its fixed I also need to grab another set of valve cover gaskets. So I can do it all fresh and clean.
 
Only problem I am finding when trying to select the correct studs is most of the ARP stuff says for stamped steel valve covers. Not for the cast aluminum Mopar covers. I guess I need to get a total length.
 
Only problem I am finding when trying to select the correct studs is most of the ARP stuff says for stamped steel valve covers. Not for the cast aluminum Mopar covers. I guess I need to get a total length.
It looks like 1/2" thread In the head (a 906) so I ended up with a 1 1/4" length for my moroso covers . Figure 1/2 in the head, 1/4 for the gasket and 1/16 cover, 1/4 thick load spreader, 1/4 for the nut. Your results may vary.
Edit: looked at em again, might have used 1 1/2 shss.
 
shss Is socket head set screw. I just used what I had at work. For a pretty car, stainless is available, probably from McMaster Carr and others.
Home depot shows a ten pack of stainless 1 1/2 shss for $9.
 
Only problem I am finding when trying to select the correct studs is most of the ARP stuff says for stamped steel valve covers. Not for the cast aluminum Mopar covers. I guess I need to get a total length.

For cast aluminum valve covers...
200-7603_500x.jpg


I used the Felpro
Screenshot_20220404-221319_Gallery.jpg


Screenshot_20220404-221246_Gallery.jpg


The trick I use is to glue the gasket to the valve cover with 3M Black Super Weatherstrip adhesive.
Screenshot_20220404-221134_Gallery.jpg


Once dry use Permatex Ultra Black on the gasket. Just like the directions on the tube, apply a bead on the gasket, place the cover on the head, hand tighten fasteners until the sealant just starts to squeeze out. Then wait one hour and tighten to torque specs. (Hand tighten with a nut driver or 1/4" drive ratchet and extension. Just a good snug.) Wait 24 hours to let sealant cure before subjecting it to oil.
7160059_ptx_82180_pri_detl.jpg


You could try using "The Right Stuff" to cut down the 24 hour wait time but I haven't tried it on valve covers yet.
7740000_ptx_25229_pri_larg.jpg


My 452 heads were low on the lower front corners and one low spot at the rear. I had light showing through under the gasket without any sealant. The covers were perfectly flat.This procedure filled the void with complete success.
20180819_133629.jpg
 
For cast aluminum valve covers...
View attachment 1265040

I used the Felpro
View attachment 1265041

View attachment 1265042

The trick I use is to glue the gasket to the valve cover with 3M Black Super Weatherstrip adhesive.
View attachment 1265044

Once dry use Permatex Ultra Black on the gasket. Just like the directions on the tube, apply a bead on the gasket, place the cover on the head, hand tighten fasteners until the sealant just starts to squeeze out. Then wait one hour and tighten to torque specs. (Hand tighten with a nut driver or 1/4" drive ratchet and extension. Just a good snug.) Wait 24 hours to let sealant cure before subjecting it to oil.
View attachment 1265060

You could try using "The Right Stuff" to cut down the 24 hour wait time but I haven't tried it on valve covers yet.
View attachment 1265061

My 452 heads were low on the lower front corners and one low spot at the rear. I had light showing through under the gasket without any sealant. The covers were perfectly flat.This procedure filled the void with complete success.
View attachment 1265065
Ok cool those are what I have in my amazon cart...
 
Left handed drill bit will work.

I blew a bolt head off on the front driver side valve cover bolt one time. Tightening it with an extension and I made contact with the + battery and it melted the head right off lol.
 
Auto Transport Service
Back
Top