• When you click on links to various merchants on this site and make a purchase, this can result in this site earning a commission. Affiliate programs and affiliations include, but are not limited to, the eBay Partner Network.

Ready to start 5 speed swap on 69 Charger

Saturday 14th

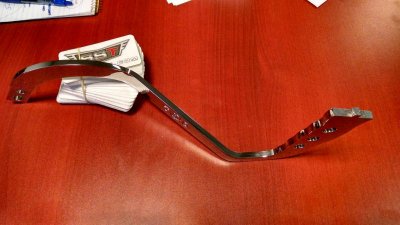
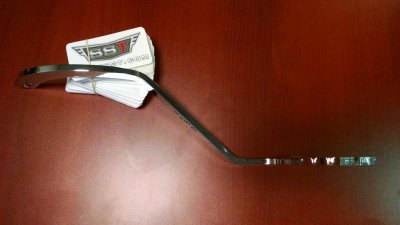
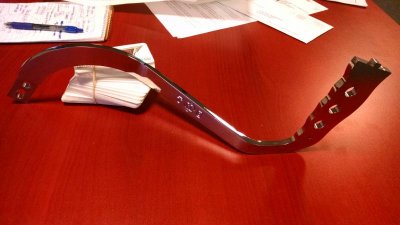
:disgust: I don't know why but everything today has been a real pain n the :icon_eyes: a double s.It started out with the new parts that came. The adaptor for shifter handle just doesn't fit my application. See pics
 

Attachments

  • image.jpg
    image.jpg
    132.5 KB · Views: 299
  • image.jpg
    image.jpg
    127.1 KB · Views: 300
  • image.jpg
    image.jpg
    141.7 KB · Views: 308
  • image.jpg
    image.jpg
    163.9 KB · Views: 297
Get a Handle on it!

Nothing to do now but make a bracket to get the handle on.I put console back in to get measurements.I got out some metal about 1/4 inch thick. I mounted it in a vice cut out a piece about 1 1/2 inch x 3 inch.Heated it up with a torch to bend it. I used the shifter as a template and drilled holes. I offset the holes for handle about 1/8 inch top to bottom.This tilts shifter away from dash.see pics
 

Attachments

  • image.jpg
    image.jpg
    189.7 KB · Views: 302
  • image.jpg
    image.jpg
    77 KB · Views: 314
  • image.jpg
    image.jpg
    128.4 KB · Views: 328
  • image.jpg
    image.jpg
    147 KB · Views: 317
  • image.jpg
    image.jpg
    107.1 KB · Views: 320
Losing my cool

:angryfire: I got the bracket mocked up.Shifter is on and looks like the console and shifter will live in harmony. One thing that is alittle awkward is shifter sits about 4 inches higher than normal. Stock It would have bolted up under floor . Now it bolts up above floor.Atleast the console hides the ugly homemade bracket and bolts. That's not what got me pee-ode.
The speedo was a total B TCH. This part had me thinking I should have never started this.Problem is The support bracket under tunnel is thick metal and it's in the way of speedo hook up.I don't want to cut the support so I used a 1 inch hole saw to drill a hole big enough for speedo gear to pass thru tunnel support.I have to line up the hole in floor board (perfectly)with speedo hole in tail shaft. since it's not a way to clear tunnel and route cable thru firewall,the idea is to run cable up thru tunnel under carpet and along console till gets under dash to instrument cluster.
OMG It was hard to pull off.It was by far the worst part of this project.At first when I saw what was up ,I was just going to plug it and no speedo.:bs:Thats not the way I want my street car. So if anyone out there plans to do this,maybe try to figure out a way to get things in order before trans is in car.
 

Attachments

  • image.jpg
    image.jpg
    129.2 KB · Views: 304
  • image.jpg
    image.jpg
    137.9 KB · Views: 312
GPS speedo, but this of coarse means an electric speedometer as well.
 
I'll be ending up with a GPS speedo too in one form or another (Either retro-fit my speedo with GPS instrumentation or spend the money and get a drop in from dakota digital)

You should have no problem selling the extra Pistol Grips you don't plan on using
 
Here is a shot of speedo cable from underneath tunnel. You can see not much room to play with. The gear itself was inserted through floorboard. I ran the cable under carpet up to console.

- - - Updated - - -

I cut a piece of metal to cover the old shifter hole. Used seam sealer to attach it.I didn't want a bunch of screws pionted down under floor board. A quick shot of paint from a rattle can on any exposed metal,just to keep any rust at bay.I made a gasket by splitting some rubber 3/8ths fuel line.Ran it around the new shifter hole. Ready to put carpet and console back in place.
I do have a bit of a job to look forward to. The speedo cable runs nicely under console,but it's a long cable to route under dash. Looks like getting it connected will require removing instrument cluster.. Maybe I'll tear into it while I wait for driveshaft.
 

Attachments

  • image.jpg
    image.jpg
    164 KB · Views: 290
  • image.jpg
    image.jpg
    137.4 KB · Views: 271
  • image.jpg
    image.jpg
    149.7 KB · Views: 288
  • image.jpg
    image.jpg
    130.6 KB · Views: 302
  • image.jpg
    image.jpg
    130.9 KB · Views: 283
  • image.jpg
    image.jpg
    149.2 KB · Views: 283
Last edited:
Drive Shaft

Drive Shaft is ready today. $200 bucks and I wasted no time getting it under there. Double checked all the bolts.Filled trans with mercon/ dextron 3 Qts. Still not done with console but bolted on shifter for a road test. First noticed clutch pedal lets out at bottom of floor. May need to adjust rod from pedal to master. Down the street I go. Shifts like slicing butter!:headbang:Its smooth 2nd to 3rd slick as a whistle! The shifter handle is to tall.I'm going to have to play with adaptor or handle to shorten it.5th was like coasting.Very pleased 1st time out.It was after dark so didn't go far .no burn outs or slam shifting yet. There is a little more tweaking to do to get it just right. Took a couple pics
 

Attachments

  • image.jpg
    image.jpg
    43.6 KB · Views: 297
  • image.jpg
    image.jpg
    62.4 KB · Views: 240
Good job man. Good to hear about the 2-3 shift. Enjoy. Loafing on the freeway is good.
 
Committed A Mopar Sin !

:evil4: Had to do something with the Big Shifter.Its so tall makes long sweep shifts.
looked at the shifter clearance in relation to console (boot) moving side to side ,front to back,how far from the dash in 1st,3rd,5th. How far up the Handle Can I CUT it off and Drill new mounting holes. Worried that If I get it wrong I waste a $$$ handle. Check out pics.

- - - Updated - - -

Pic of shifter in 5th close to dash and Reverse close to console. I drove it after getting shifter cut down and console back in .It helped a lot to shorten the The handle.
 

Attachments

  • image.jpg
    image.jpg
    51.2 KB · Views: 268
  • image.jpg
    image.jpg
    52 KB · Views: 266
  • image.jpg
    image.jpg
    70.2 KB · Views: 277
  • image.jpg
    image.jpg
    48 KB · Views: 265
  • image.jpg
    image.jpg
    52.4 KB · Views: 256
  • image.jpg
    image.jpg
    44.7 KB · Views: 290
  • image.jpg
    image.jpg
    63.9 KB · Views: 279
  • image.jpg
    image.jpg
    59.5 KB · Views: 271
  • image.jpg
    image.jpg
    49.9 KB · Views: 274
  • image.jpg
    image.jpg
    52.1 KB · Views: 278
:evil4: Had to do something with the Big Shifter.Its so tall makes long sweep shifts.
looked at the shifter clearance in relation to console (boot) moving side to side ,front to back,how far from the dash in 1st,3rd,5th. How far up the Handle Can I CUT it off and Drill new mounting holes. Worried that If I get it wrong I waste a $$$ handle. Check out pics.

- - - Updated - - -

Pic of shifter in 5th close to dash and Reverse close to console. I drove it after getting shifter cut down and console back in .It helped a lot to shorten the The handle.

The Hurst handle typically doesn't work well with the 5 speed installs since it's not bent properly. See attached photos of our shifter handle. IMG_20150319_081932991_HDR.jpgIMG_20150319_081941397.jpgIMG_20150319_081952656.jpg
 
What?We must have had a miscommunication! I called you guys a week ago to order that shifter handle and adaptor. I asked this specific question" What's the difference in your shifter and original hurst?"I was told no difference except for hurst logo. The price was the same so I opted for hurst. I regret that choice now that I have the correct info.Dont get me wrong I don't blame you guys It was my decision to make. If I had known it was bent differently unknow -yada yada
That sucks for us both- I could have had something that worked a lot better and you guys could have made a sale.Well, atleast anyone out there who plans to do a project like this can be informed. That's exactly why I created this thread.

I'm sorry you were misinformed and I'm schooling/scolding Ben as we speak. Hurst may indeed make a specific handle for the B body 5 speed install but it's hard to tell from the photos.

In either case, the throws will be long simply due to the handle length.
 
Hey Don't be to hard on Ben. He has helped me out a lot with the crossmember.He gave me good advice on speedo cable.Can't win em all.Besides This shifter Handle works great since I cut it.I am happy with it.
You are right about the long sweeping shifts. It's like swinging a machete to slice a stick of butter.Its one smooth shifting trans.Effortless -smooth.
I had a chance to drive again and still have a couple things to address.
Do you have any advice on clutch engagement at bottom of pedal stroke. It's right on floor.The adjustable rod only has about 1/4 inch thread left on both ends?So I can't lengthen it. Also,Ben mentioned to Be careful not to bottom-out the plunger in master cylinder. I guess I need a longer adjusting rod and maybe a stop on the pedal travel?
 
Hey Don't be to hard on Ben. He has helped me out a lot with the crossmember.He gave me good advise on speedo cable.Can't win em me all.Besides This shifter Handle works great since I cut it.I am happy with it.
You are right about the long sweeping shifts. It's like swinging a machete to slice stick of butter.Its one smooth shifting trans.Effortless -smooth.
I had a chance to drive again and still have a couple things to address.
Do you have any advise on clutch engagement at bottom of pedal stroke. The adjustable rod only has about 1/4 inch thread left on both ends?So I can't lengthen it. Also,Ben mentioned to Be careful not to bottom-out the plunger in master cylinder. I guess I need a longer adjusting rod end maybe a stop on the pedal?

I read where your hydraulic bearing height was within spec but what was the exact measurement? If we move the bearing a bit closer, it will disengage sooner and also raise the pedal height for engagement.
 
I have the keisler Hydraulic clutch slave cylinder . Had the same problem.
I lengthened my adjustment rod quite a bit. It works perfect and I didn't bottom out the plunger. I can take a pic if you want.
Its funny I cut my shifter down as well.LOL
Thanks,Joe
 
Thanks Overdrives I'd never thought of that. I did the clutch throw out bearing with 2 spacers. I measured and was at 1/2 inch difference. Then I added 3 rd spacer then measured 1/8 th difference.When I slid trans into place the throw out bearing was 1/8th from teeth on pressure plate.I believe a 4th spacer would make throw out bearing contact teeth constantly.I followed the set up instructions on the SST website. The set up was easy but to play with it Means pulling trans back out.
Thanks Average Joe -said the rod deal worked for him.
Weekend is here.I hope to get to work on it some. I'm going to look at it closer to see what's up.Thanks for the input
 
Wish I had just 1 more inch!

Got a chance yesterday to tinker with the project. Looked at clutch pedal and how it releases at the bottom of stroke just off floor board.
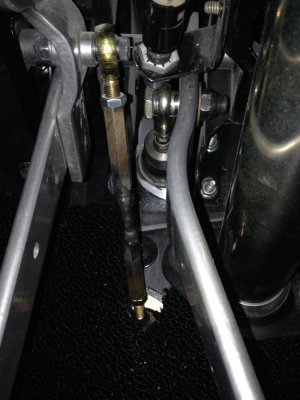
Average Joe was right on the money about lengthening the adjustable clutch rod. My clutch pedal currently does not return up to top of stroke (even with brake pedal). To start,I disconnected the adjustable rod and pulled pedal up even with brake pedal. I then measured from stud on master cylinder to himes joint mounted on clutch pedal. Looks like about 5 1/4 inches. I compare that to length of middle section of rod at 4 5/8 inches.
The center piece of adjustable rod has female fine thread on both ends.It hooks to master cylinder on one end and himes joint on other. Made of steel and is solid. I need to make it about 3/4 of an inch longer. By making it longer I can screw it in further to have more threads holding it instead of just a couple on end.
Couple of ways to lengthen it.Because it's 24x1 fine thread, I could not find any thing at hardware stores to screw something on end of it. It's a solid rod so I cut it in half.I used a 3/8ths steel nipple to make a sleeve. Making it the length I needed welded it back together.Its strait.Its strong.Its about 1 inch longer.It Still has correct threads.A coat of paint to hide the ugly.:tongue2::weg:

- - - Updated - - -

Guys I'm sorry the pictures are sideways and upside down.I use an IPad to take pics and then download to site.I'm not good with computers and this thread was my first attempt to post so I'm learning. I can not find any way to rotate the photos. When I look at them on my iPad they are correct. When I down load them online they turn sideways or upside down. I tried rotating camera. IDK?HELP!

- - - Updated - - -

So now it's back together. The pedal is almost at top of stroke and looks even with brake pedal. I depressed clutch with my hand to see if I feel it bottom out in master cylender. Nope ,It's perfect now. Time to go for a test drive.
Its right on the money. Clutch is now releasing in middle of stroke not on floor.Finished length of middle rod is 5 1/2 (was 4 5/8).
Thanks again for the input -Average Joe
 

Attachments

  • image.jpg
    image.jpg
    94.1 KB · Views: 226
  • image.jpg
    image.jpg
    61.1 KB · Views: 209
  • image.jpg
    image.jpg
    58.3 KB · Views: 215
  • image.jpg
    image.jpg
    69.5 KB · Views: 218
  • image.jpg
    image.jpg
    70.5 KB · Views: 210
heck of a nice job......... I just hope the reward is worth the effort. the fab work is top notch. postcar
 
That's same thing I did.LOL
My shifter is a little different cause I have the TKO 600 and I am not using a console.
If you want I can take a pic for you to see the difference.

IMG_0381.jpg
 
Working Speedometer !

Man that's crazy.The clutch rod looks great -Average Joe that's the real deal and I appreciate the feedback. Helps a lot !
So now the clutch rod is squared away.It's time to tackle that speed o cable.One wierd thing is the way the cable is inside the car.1 big plus is headers can't burn it. I routed it underneath console .then under dash it turns at steering column up to gauge cluster. I disconnected the A/c duct so I could reach in and connect cable. It works like a champ. I'm once again putting miles on odometer.Its calibrated for 3:55 rear gearing it's not far off.That's 2 items off the punch list. I want to fix reverse lights next. I may revisit shifter too!:icon_question:
 

Attachments

  • image.jpg
    image.jpg
    50.1 KB · Views: 179
Last edited:
Auto Transport Service
Back
Top