• When you click on links to various merchants on this site and make a purchase, this can result in this site earning a commission. Affiliate programs and affiliations include, but are not limited to, the eBay Partner Network.

Road-racing Engine

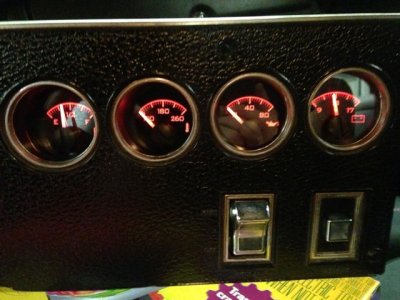
The latest on the gauge install

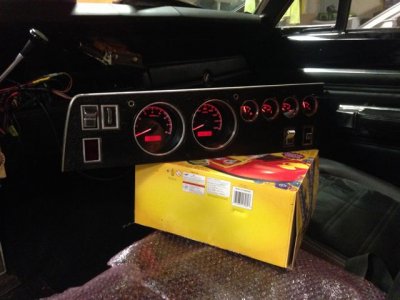
Well the gauges are in and running - for the most part. You can see actual life in the needles though!

IMG_1924.jpg

IMG_1929.jpg

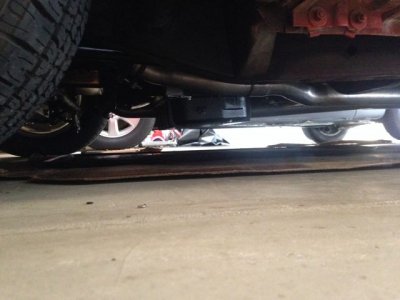
Here's one problem: I needed an automatic transmission fluid pan with a fitting in it to hold the Dakota Digital Trans Temp sender. There is nowhere on a stock trans to place a sender like that. I thought about simply having a fitting welded to the stock pan, but decided to go with an aluminum aftermarket pan. It already has the sender fitting in it. It has a drain plug to get rid of the insane trans fluid mess every time you pull off the pan (This drives me nuts - the manufacturers can't afford the cost of installing a drain plug???). And, it's aluminum which, in my Dodge truck (same trans) has significant cooling benefits.

Only problem: It's deeper that the stock pan, apparently by A LOT. Is this thing gonna get shaved off by the first speed bump I go over?
.
IMG_1931.jpg

Looks like I may be having a fitting installed in the stock pan after all... I HATE TRANSMISSIONS!
 
I've seen shallower pans than that before......
 
I have printed your list! Some of the things I had on mine, others not.

Where is that pretty blue and silver electric fan from? I really like the idea of getting rid of the mechanical fan. Wonder if I can find an electric that fits the stock shroud...

Thanks Bud...

I liked the aluminum electric fans better too, Perma Cool a #PRM-19113 13" pusher 2650cfm for an auxiliary "just incase" {for really hot days or what ever} & a #PRM-19115 16" puller 2950cfm 2-7/8" deep, offset for clearance twards the passenger side of the radiator, 16" is for regular driving, both from Summit racing, made my own aluminum custom shroud on the inside of the 22" alum. 4 core down flow radiator... Old copied photos "suck", dirty engine compartment too, you cant see much of the fans or electric Pro-comp 37gpm water-pump set up either... I made a relay panel, aux electronics/harness fuse panel {kind of see it on the pass. side top inner fender in the bottom 2 photos} & 4 switch panel from Painless inside the car, for my fuel pump, 2 electric fans & the elec. water pump, override/arming switches...
 

Attachments

  • 68 RR #24 Apr 21 2011 479ci-6bbl.jpg
    68 RR #24 Apr 21 2011 479ci-6bbl.jpg
    54.9 KB · Views: 270
  • 68 RR #25 479ci-6bbl Front of engine bay.jpg
    68 RR #25 479ci-6bbl Front of engine bay.jpg
    59.4 KB · Views: 262
  • 68 RR #26 479ci-6bbl Dec. 2013.jpg
    68 RR #26 479ci-6bbl Dec. 2013.jpg
    54.7 KB · Views: 250
K Gents,

Back on this thread again on the subject of carb settings and fuel mixtures.

Monday I took my car to a local carb/tuning guy who was recommended to me by a nearby Hot Rod shop. The guy was extremely knowledgable, and had a garage full of professional tools and diagnostic machines from the 70s - really cool stuff. The first thing he did was run my car on the diagnostics, including a wideband air/fuel mixture sensor in the exhaust pipe.

FYI: This is a 493 stroker with MP aluminum heads, a polished Edelbrock RPM intake and about 10.5 to 1 compression with a pretty lumpy cam. It runs on a mechanical fuel pump with a Quick Fuel 850 carb and an ignition from Don at Four Seconds Flat. And I was literally getting about 4.5mpg (albeit that's driving around town with my foot in and out of the throttle all the time.)

At first run, the CO% was above 9% at idle and the Hydrocarbon reading was literally off the chart - above "2,000", which I'm guessing is in parts-per-million. The carb guy walked to the back of the car to see if there was actually a dinosaur back there blowing on the sensor causing the readings to be so high...

The first thing we (he) did was check all of the ignition settings as a baseline, first on the car and later with an old Sun distributor machine. The Four Seconds Flat distributor is interesting because it looks like Don (Gould of FBO) uses a "limiter plate" to limit the total mechanical advance instead of spot welding the weights to limit travel as is commonly done. That earned a "Hey. that's neat. I've never seen that before." from the guy doing the tuning.

In the end we got the CO down to about 3% at idle, which is pretty good, but the Hydrocarbon is still high - near 2,000. Maybe nothing that can be done about that. After adjustments we ended up with 18 degrees of advance on the crank and an additional 18 of mechanical advance. The mechanical comes in at 800RPM, hits 5 to 6 degrees at 2,000RPM and is all in (18 degrees) at 3,000RPM.

We also switched main jets from a #76 (.084 orifice) jet to a #71 jet (.076 orifice). I learned something interesting about jets that I never thought about before: The "size" of the jet is a function of it's total area, not really its diameter. Since the area is Pi-R-Squared, a jet with a .086 inch orifice has an area of .005542 square inches. A jet with a .076 inch orifice has an area of .004536 square inches. So the smaller jet is actually 18% smaller than the larger one. That's a lot.

So what does everyone think? 10.5 to 1, 493 stroker with MP aluminum heads and a hydraulic roller .582 lift cam; Quickfuel 850 with a #71 main jet running 18 degrees of advance on the crank and 18 degrees of mechanical for a total of 36 degrees at 3,000RPM. Sound about right?

Yeah, I know. Pretty complicated question...
 
If that's what the engine likes, then yes. 36 degrees total is reasonable. Looks like the 4.5mpg was from running over the top rich which can happen if the jetting is off.

A/F ratio is a really good piece of data to have around for any carb application you might consider putting a wideband gauge in your car. Beats going by exhaust odor and plugs alone. If my wife bars entry from the house after working on the carb, then I know I'm tuning it too lean.
 
Just got done reading your whole thread Grab and just wanted to say it sounds like you have one killer engine built for the Silver State! If you don't mind me asking, who did you have build the engine? I'm in the final stages of finishing my 64 belvedere and the stout engine is pretty much all that is left. I noticed you are in Socal. I'm in San Diego. Sounds like your engine builder really knows what he is doing and I was just curious as to who you used. Can't wait to see how she does.
 
When was 90 miles a long distance and relatively a straight line at only 100 mp ave. Why all the crazy added expense? You all ready have 3:23 gears just put some good tires on and go. You already have more than enough suspension and steering upgrade. Why the added weight of the 440 when our present 383 with 6 quart pan and high volume pump will get it down the road all day with no problems. 3800 rpm with 30" tall tires. If you do not like the rpm's go to higher gears and have it over with.
 
Just got done reading your whole thread Grab and just wanted to say it sounds like you have one killer engine built for the Silver State! If you don't mind me asking, who did you have build the engine? I'm in the final stages of finishing my 64 belvedere and the stout engine is pretty much all that is left. I noticed you are in Socal. I'm in San Diego. Sounds like your engine builder really knows what he is doing and I was just curious as to who you used. Can't wait to see how she does.

Hey Wes sorry for the delayed reply. I had Blair's Speed shop in Pasadena do the machine work and much of the fitment (or re-fitment). They seem to have two kinds of customers: Old guys with nice cars and lots of money who want stuff done now - and who they are happy to accommodate for a price; and younger guys trying to learn who they are happy to accommodate at a very reasonable price if you let them take their time. As I may have said, it took me a year to build my motor, but it's really cool even to be able to say I have a motor from there. The owner is a guy named Phil and he's been in it forever. Phil bought the place after working there for years from a guy named Don Blair. Google him. Famous old 60's street racer. Phil is really into boats too and spends a lot of his time (from what I can see) on boat motors for guys who "blew up last weekend and gotta get back in the water..."

- - - Updated - - -

When was 90 miles a long distance and relatively a straight line at only 100 mp ave. Why all the crazy added expense? You all ready have 3:23 gears just put some good tires on and go. You already have more than enough suspension and steering upgrade. Why the added weight of the 440 when our present 383 with 6 quart pan and high volume pump will get it down the road all day with no problems. 3800 rpm with 30" tall tires. If you do not like the rpm's go to higher gears and have it over with.

Hey 3B,

Fair question. Out here in So Cal a lot of guys run their cars at track days at Willow Springs Raceway. It's a big open California style racecourse with high speeds and lots of elevation change. You gotta be able to get to well over 100mph to have fun out there. Also, 100mph is just the starting point for the Silver State. After one year at that speed you can qualify to go faster, and faster, and faster... And to be honest I don't guess that my 440 is any heavier than my stock iron 383 given the the aluminum heads and intake manifold, tube headers, modern pistons, etc.

But: Having now driven a highly modified 383, I might just build that motor .30 over with a solid roller cam if I had it to do again. An engine that will turn 6,500+ rpm is FUN!
 
Dyno!

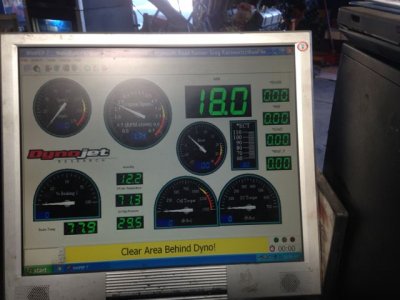
So I finally got the car on a chassis dyno this weekend. If you've never done it before, it's exciting. It's OMG loud and sounds incredible, and it's scary as hell watching your car at max output.

IMG_2613.jpg

HIGEHST PULL.jpg

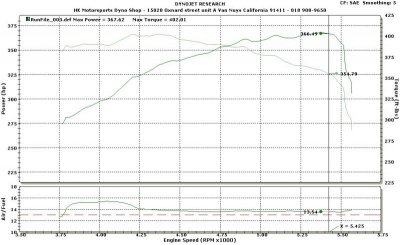
I learned a bunch of things in three pulls of 5 seconds each, and I don't know that much about dynos. First, You'll see in the video if I can attach it that I am running the big 285 sticky rubber tires which the dyno guy told me eat a lot of power. Second, my transmission stalls at 3,000rpm and will flash to 3,500 when pushed hard. Third, my air/fuel ratio through the rpm range is strange (look at the chart). Fourth, my FBO rev-limiter works. Fifth, the torque curve is awesome with over 350lbs/ft all the way from 3,750 to 5,000rpm. And last, the car only seems to make about 366hp at the rear wheels.

Horsepower and driveline loss: the guy running the dyno guessed by just listening to a description of my motor that it would probably conservatively make about 500hp at the crank. He also said that with big sticky tires and auto trans the total driveline loss could be as much as 35% (I've generally heard an average of 15%, but then also I've heard that the 15% rule is BS). Interestingly, if you take the 366hp that the car made at the rear wheels and add back the 35% loss, you get 494hp. That is both exactly what the dyno guy guessed based on my combo AND almost exactly 1hp per cubic inch (493), which is an old standby guesstimate for a well built street car motor. Still, I thought (hoped?) the car would make more power at the wheels.

Transmission: I asked for a road racing transmission and I ended up with a 3,000 stall converter in an auto trans that hangs in first and second on the street and won't shift smoothly unless I have my foot on the floor, in which case it goes like hell and shifts into 3rd at more than 65mph. that sounds like A DRAG TRANSMISSION! I have no idea what the builder (who shall remain nameless) was thinking. No wonder I can't stand this transmission.

Air/Fuel Ratio: I JUST had this car tuned! WTF. To me the A/F ratio looks good until 4,250 at which point it goes lean the rest of the way through the rev range. Strange given that the car is at full advance at 3,000rpm. Why the change at 4,250? And then look at the nice flat (lean) line from there to 5,500. Maybe I need my #76 jets back.

Thoughts? Comments? Suggestions?
 
Hmmm... Searching for answers I came across this enlightening article: http://www.hotrod.com/how-to/engine/hrdp-1103-chassis-dyno-testing/

Now that I think about it, I think I trust Hot Rod magazine more than I trust a guy at a Dyno shop. In the article, they remind us: "Don't forget that torque and horsepower always cross at 5,252 rpm. If they don't, raise a red flag".

Now I'm a little embarrassed that I didn't think of that. You can calculate one from the other using that factor. Duh. Now why doesn't that hold true in the graph that I posted above, in which Torque and HP cross at 4,800 RPM? It WAS interesting that the guy offered to tune the car for me for $500.00 but told me I'd have to leave the car and couldn't hang around and watch while he worked - "too busy in the shop". I wonder if he would have "found me another hundred horsepower" by recalibrating the dyno. I wonder if every new customer finds that his car "could make a lot more power" with "the right tune"...

A learning experience for sure.
 
Well I am off on my latest project - to replace the stock fuel tank with an aftermarket aluminum tank with a tank-mounted fuel pump capable of supporting my current carburetor and maybe eventually a fuel injection system. I found a tank from a place which is local to me called Hot Rod City Garage. They are a Vet-owned business and do very pretty aluminum work. The tank has not only an internal pump, but a linear, vertical fuel gauge sender, a sump near the pickup and internal baffles to keep the fuel from sloshing around. And a drain. As far as I'm concerned, ANYTHING that hold liquid should have a drain. Damn transmission pans! I HATE transmission pans...

Sorry - Not the greatest picture.

View attachment 298862

I also bought an Aeromotive Fuel Pressure Regulator which has the capability (through changing the internal spring) to support 3 to 10 psi fuel pressure for carburetors and up to 60 psi for fuel injection. That way if I go to fuel injection I don't have to buy a new regulator.

View attachment 298861

I'll admit that what looks like an easy project - bolt the new tank into the stock location - quickly becomes a serious one when you start having to run high pressure fuel delivery and return lines from the tank to the engine bay, and then to mount the regulator neatly. Wiring the power for the fuel pump was the easiest part of the project, that's for sure.

I had originally intended to run flexible braided lines (the black nylon braided type) from the tank to the engine bay, but have had numerous people tell me of the great danger of doing so (some sarcasm here) - What if you have an accident. That line can be easily cut... the options are essentially to run aluminum or steel line from a short "whip" at the tank to another short flexible whip at the regulator. I need to take pictures to do that job justice and share it with you, but boy is that a chore. For now, I'll show you what i ended up with at the carburetor end, because that is what I have pictures of.

Let me start by saying that what appears in the photos to be hundreds of dollars of aluminum AN fittings is, in fact, hundreds of dollars of aluminum AN fittings! To be fair, it's HALF of the total number I bought, tried, and then set aside! Well maybe not that bad, but I have plenty of "spare parts" left...

Here is where I started. Note that the coil is side-mounted using a hemi-type coil bracket and I have a flex-line running between the two carb bowls.

View attachment 298876

View attachment 298873


And here's where I ended up. Fuel comes in from a line which runs up the firewall inside a silver flexible cloth heat shield to protect it from areas where it is nearest the last header tube on the passenger side. It's no closer than about 6 inches, but hey, it's FUEL hose. Can't be too careful. The fuel supply line is in the foreground with the inline filter visible and the ONE BLUE FITTING (I'll get rid of that).

The regulator is mounted to the "fuel rail" in between the carb bowls using both hard fittings and a short section of hose to allow the parts to have some flexibility and to be assembled. The tolerances are VERY tight. The fuel return line is just barely visible in the picture. It runs from the bottom of the regulator into the heat shield sleeve with the fuel supply hose.

I mounted a gauge on the end of the fuel rail but I may use that just for adjustment and then simply cap the end of the rail. Not sure it is really necessary to leave it on there permanently. I know in the end the layout looks simple, and I wrote it up for in 15 minutes, but MY GOD did it take a lot of fiddle-f!@#ing and figuring. This may be my most complicated project yet...

View attachment 298872

View attachment 298874

View attachment 298875

My understanding is that the in-tank pumps run relatively high pressures - up to 130psi - to support all kinds of modern injection systems. This means that I'll have lots of fuel bypassing the rail and running back to the tank, and SPRAYING back into the tank. The guys at Hot Rod City actually said they align the fittings at the pump such that the returning fuel runs over the pump to keep it cool when the tank is low. Even though a fuel injected engine runs higher rail pressures, the actual amount of fuel consumed is no higher than in the same carbureted engine, so my system should not be "circulating" any more fuel that and stock modern high pressure system. Seems odd though. Is that how modern systems work? Or do they simply deadhead at the rail, holding a constant pressure?

I haven't tested it yet as I'm not quite ready with all the lines to fill the tank. I wish I could test it with something other than gasoline just to check for leaks, but I guess there's no real danger in the gas as long as the engine is cold and not running. One advantage of the bypass is that I can test the whole system with the pump on and the engine not even running. The Fuel system shouldn't know whether the carb is drawing fuel or not...

Does this all sound safe and effective so far?
 
Auto Transport Service
Back
Top