• When you click on links to various merchants on this site and make a purchase, this can result in this site earning a commission. Affiliate programs and affiliations include, but are not limited to, the eBay Partner Network.

Road-racing Engine

Looking great. I love the look of a fresh engine.
 
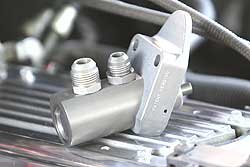
I also attached a picture of the position of the rocker on the valve, which looks pretty good to me. We're running about 320 pounds of total spring load with this hydraulic roller setup. You can see the Crower lifter in the last pic too...

Tell me more about your springs...rate, installed height, please...

Didn't you say you were using the stock RPM springs? Catalog says max lift of .600" and I thought you said cam lift was .588"...and that some 'things' had to be done to them? Shimming is the only thing I can think that could be done, which would screw w/ installed height.... Coil bind/compressed coil clearance an issue?

Can you not get the tip centered any more? Looks a bit off...what's the sweep pattern look like?

We're at the limits of my expertise, but let me see if I can answer.

Valve Lift: The installed cam is .582 "advertised" max lift. I believe the "advertised lift" figure listed for the cam refers to the actual valve lift given a standard rocker arm ratio - 1.5 in the case of a Mopar head. So 0.582" IS the total valve lift, and the total "cam lift" is actually 0.582 / 1.5, or 0.388". Interestingly, this figure (0.388") is the figure listed for Duration at .050" Lobe Lift. I have always assumed that Duration at .050" Lobe Lift is the number of degrees during which the valve is open by AT LEAST .050". Is it a coincidence that my total cam lift is the same as my Duration at .050" Lobe Lift? Someone wiser than I will know the answer. (VALVE-TRAIN WIZARDS HELP HERE)

Get the tip centered: In the pic you can see that the tip of the roller appears to be slightly outboard (toward the exhaust side) of the center of the valve. We shimmed the rocker shaft slightly after the pic was taken (pic was taken during the mock up process) in order to move the tip slightly toward the valve stem center. With that adjustment and the expected scrub distance due to the rotation of the rocker "around" the shaft, I think that the "average position" of the roller on the valve stem will be centered. In other words, it should be centered at half of the total lift.

Springs: We started with stock springs. The builder I'm working with didn't like the variation in the spring pressure between all of the different springs. What he did to solve the problem I don't actually know. He may have ordered replacement springs from Edelbrock or another manufacturer or may have "machined" the springs he had - if that is even a possible solution. Beyond my expertise here. I'll ask though...
 
Last edited:
Valve Lift: The installed cam is .582 "advertised" max lift. I believe the "advertised lift" figure listed for the cam refers to the actual valve lift given a standard rocker arm ratio - 1.5 in the case of a Mopar head. So 0.582" IS the total valve lift, and the total "cam lift" is actually 0.582 / 1.5, or 0.388". Interestingly, this figure (0.388") is the figure listed for Duration at .050" Lobe Lift. I have always assumed that Duration at .050" Lobe Lift is the number of degrees during which the valve is open by AT LEAST .050". Is it a coincidence that my total cam lift is the same as my Duration at .050" Lobe Lift? Someone wiser than I will know the answer. (VALVE-TRAIN WIZARDS HELP HERE)

Advertised Camshaft Specifications
Intake: Duration 312*, .582 lift
Exhaust: Duration 312*, .582 lift

Duration at .050" Lobe Lift:
Intake: 236*
Exhaust: 236*

110* LSA

Intake: .388
Exhaust: .388

I think you're confusing yourself, cuz you confused me. Lobe lift you understand. Duration at 'x' lobe lift defines the lobes used and how quickly/slowly the lifter moves up the lobe 'ramp', and is expressed in degrees. The higher the lift, the less the measured duration...since the lobe is 'peaking' for lack of a better term. I quoted the specs from the other page just for clarification of the cam you have...

Shimming the shaft would fix the rocker as it sits in the pic you posted...no worries there.

Still curious about the springs...
 
Ok, yeah, you've got it. I may've gotten caught up in semantics.

The .388" is lobe lift...that multi by rocker ratio gives valve lift...you had expressed that correctly in a previous post as well.

Here's a concise, picture is worth a thousand words example...

camshaft_diagram.jpg
 
There ya go... That pretty much says it all. I came across the same graphic on Jegs doing research after we talked earlier. Now I move on to Torque Converter research!
 
I pray that isn't a summit racing SFI damper. Every square inch was covered in surface rust after one to two months time, went with the big name' SFI damper after that. Still looks like new six months later.
 
LOL. I noticed how bad it looked in the picture after I posted it. It's actually a 440 Source fluid-type damper. It's absolutely covered in oily fingerprints and smudges in the photo. I didn't use any of their internals, but ordered a timing cover from them as the engine neared completion. My engine guy has been really impressed with the quality and fit of their stuff and so I have kept ordering from them for external front-end stuff. Everything fits like stock, they have everything you need to make each part work (for example the special bolt that goes with it), and they are really easy to deal with by phone and web. Everything arrives fast.

I know not everyone seems to be 440 Source fan, but they seem to have spent a lot of time on their designs and manufacturing from what I can see...
 
Hey guys how do I know what size air cleaner I'm gonna need for this new engine? Is there a way to calculate the max CFM for a 493 and convert that into a size? As in 2" high by 14" diameter, or 3" high by 16" diameter?

I was looking at (thousands of) air cleaners and it occurred to me that many of them may be unable to provide the amount of air the engine needs. It's gotta be a a CFM vs. surface area problem, but I don't know how to solve it...

Thanks
 
Man O man, some guys are building a "Wicked" 400 CI engine...
They get BIG displacement and BIG power....

Just throwing this out there....

- - - Updated - - -

And on that note...

I'm back with the Road Racing Engine thread. My stock 440 block is now at the machine shop with a Mancini Racing internally balanced 493 stroker kit sitting next to it - a complete short block rotating assembly ready to go together. Now we're talking about cams and types of cams. The shop is a fan of Crower cams (they say they like the billet they are made from) and recommends going with a hydraulic roller setup. I'm not opposed to either for any reason that I know of. I don't mind the ease of maintenance of a hydraulic. I don't mind the limited RPM (6,500 or so) because I don't expect to be above there anyway with my setup (3.55 rear end, 727 auto trans / 2,500 RPM stall converter, 27-28" tire) . Crower doesn't have a stock Chrysler 440 hydraulic roller cam in their catalog, but the machine shop suggests going with a custom grind.

I spoke to them about the oil clearance issue and they have no problem with that because they build boat motors all the time. The problem is, the shop guy keeps telling me: You're not gonna find a cam that is good for sustained "high RPM" road racing and still comfortable on the street. To refresh your memory, what we are trying to build here is an engine that will hum along comfortably at 4,000 to 5,00 RPM, which is what it takes to go 100+ in a 3.55 Roadrunner for an hour or more.

Now I didn't tell him I need maximum horsepower at 4,000 to 5,000 RPM. I just need SUSTAINED operating at 4,000 to 5,000 RPM with enough horsepower to maintain the high speed over varied highway terrain. I know that I can keep my Roadrunner at 100+ MPH on just the stock 335HP that my 383 makes (less, since it DEFINITELY doesn't make 335HP in its current condition). So that means that as long as the motor makes 300 to 400HP between 4,000 and 5,000RPM. I'm good to go.

It can't be THAT hard to come up with a cam profile that will do that and still be streetable right? (I'm planning on standard Edelbrock performer RPM 84cc heads, my existing Schumacher tri-y headers, good ignition and some big carb.). It'll probably be closer to 450+HP in that range I'd guess. Obviously the car will spen more time on the street trolling around than on the "track" at 100+MPH.

Here's a proposed grind based on a Lunati cam from Mancini:

Item# LUN60304LK
$218.95

Product Description
Hydraulic. Hot Street cam, likes 2800 converter, Hi-Rise type dual plane intake with 850cfm carb, headers, 10:1 compression and 3.73 gears. Likes up to 200HP nitrous.

Advertised Duration (Int/Exh): 276/284

Duration @ .050 (Int/Exh): 234/242

Gross Valve Lift (Int/Exh): .513/.533

LSA/ICL: 110/106

Valve Lash (Int/Exh): Hyd/Hyd

RPM Range: 2200-6400


Anyone care to check my calculations and my logic? Be gentle!

Thanks

Greg


Oh my GOSH....Killer Motor!
SWEET!
 
Still curious about the springs...

Herr Poopschitz (It's like addressing the Commandant in Hogan's Heroes),

With regard to your valve spring question: My machine shop guy ordered a complete set of replacement hydraulic-roller-compatible springs from Crower - like I said, he's a "Crower guy". They're another long time SoCal company, so he's probably just used their stuff forever. The springs look similar enough to the stock Edelbrock springs that I couldn't tell. He changed the "spring keepers" on top too.

I called Dynamic Torque Converters and spoke to Shawn about a new T/C for my trans. He spent about 20 minutes on the phone with me and recommended a custom 9 1/2 inch converter for this engine and rear end combo (3.55) with 28" tires and for my intended use (street / road racing). I spent a while thinking about the fact that I was going to have to pay someone to rebuild the trans I have anyway (it's shot) and finally decided to just order a complete trans from him. I've spent going on a year assembling an engine by ordering one bolt at a time and I'm kinda done with it. Now I'll have a finished trans in a box in my garage! No special parts to hunt down...

If anyone in SoCal needs a 727 core, let me know. It's just sitting here on the floor waiting to never go back in this car... Hey Ski do you need a trans?

Greg
 
Any new updates ??, or did you run it yet ??, any more photos or better yet a video ??, I browsed thru your hole tread now, can say I have much to add... Been a while, Just curious do they let you run stock fuel tanks ?? do they let you run with out racing seats or harnesses... I think I'd want a fuel cell & harnesses at a min., for any type of racing... Are you adding any downforce to the car ?? spoiler or wing rocker extensions, belly pan etc. ??, any cool/forced air to the carb/air cleaner ??, also what rim & tire combo, did you end up with ?? Good luck either way... IMHFO I think that "Flying Brick" will do pretty damn well I suspect, you've done allot of research & asking allot of good questions... I do have one question maybe that will help did you do any thing to lighten/beef up/strengthen your driveshaft & universals ??
Hey guys how do I know what size air cleaner I'm gonna need for this new engine? Is there a way to calculate the max CFM for a 493 and convert that into a size? As in 2" high by 14" diameter, or 3" high by 16" diameter?

I was looking at (thousands of) air cleaners and it occurred to me that many of them may be unable to provide the amount of air the engine needs. It's gotta be a a CFM vs. surface area problem, but I don't know how to solve it...

Thanks

Just about any "Gauze type" air cleaner 2" x 16" or thick/tall or more 3"x 13"-14" diameter {Like a K&N or AEM etc.} will flow plenty enough air volume to feed your engine easily...
 
Funny you should ask...

Well Bud(nicks), it's funny you should ask...

I have been running the car for a number of months. Need to add in some details here. Started on some new projects working toward my end goal. See below...

I have been quietly waiting for my new gauges to arrive from Dakota Digital because I have been deathly afraid that my poor stock gauges would fail me and I would fry my new engine. they arrived the other day and I have been feverishly working away on the wiring - and there IS wiring - For DAYS! I am integrating the system into a stock dash wiring harness so there are a lot of splices that are required. Luckily I have a fair amount of DC wiring experience and lots of parts and pieces from Mark at MADs Electronics to keep my wiring clean and low resistance...

IMG_1877.jpg

This picture begins to give the idea. That's the main control module for the gauges and the gear shift control module for the transmission (an electronic gear position indicator). I have one more module to install which accepts inputs from three more temperature sensors. At the moment I have only one of those to add - a transmission temperature gauge. The gauges themselves have moving needles, but they are electronically controlled by stepper motors. The trans temp will read out in one of the "information displays" in the speedo or tach. Does anyone know if it's possible to install a trans temp gauge in a 727 case or do I need an aftermarket trans pan with a bung for a temp sender? The one I put in my Dodge truck is in an aftermarket pan.

IMG_1878.jpg

The gauges look like this installed in the factory dash face plate. They really look good in the factory faceplate.

I have been thinking extensively on mods for downforce, and really want to find one of these front spoilers.

View attachment 182675

Unfortunately, this one exists only in a drawing as far as I can tell. I checked with Randy at "Spoliers by Randy" and he said he could make me one - if I shipped him my front bumper. I'd really rather not ship it across the country and back, so I'm gonna need to find a shop here in So Cal. As far as rear downforce, I have been looking at differences between Go Wing types of spoilers and NASCAR style spoilers which extend up as a lip on the rear deck lid. The deck lid style appear to be the way to go, but there is also not one of those available as far as I can tell.

My current wheel/tire combo is a 28" tall 275/60/15, which gets me 3,000RPM at 66mph with my 3.55 rear end gear. (according to my iPhone speedo app). That's 4,550RPM at 100MPH or 5,227 at 115MPH. That's too high. I nearly bought a Gear Vendor last week to get a 22% reduction (.78 ratio) which would put me at 4,000 at 115MPH. I'm pretty sure my motor would hold that RPM for the 48 minutes it would take to do the 90 mile course at that speed. (ANY THOUGHTS ON THAT ENGINE GURUS?)

On safety equipment: I have a plan for a four point roll bar with a seat belt bar, and I plan to put in at least one racing seat in place of the new front seat which I just had redone...

IMG_1767.jpg

Much as it kills me to take out a newly upholstered seat, I couldn't see redoing the interior and skipping the driver's seat, so I'll just put it aside for now to put the racing seat in. In the mean time I did install a modern 3-point retractable set of front seat belts. They're actually really comfortable, and WAY safer than the factory lap belt and shoulder belt combo I think. Like my new interior? That's vinyl and Suede with an orange stitch.

IMG_1789.jpg

On drivetrain: I pulled the driveshaft and had it sanded, painted and balanced when I put in the new rear end. I replaced both the u-joints at that time and had the welds checked at both ends, so the drivetrain is pretty much up to speed. I ended up going with a Proformance Transmission from Dynamic Converters (the Frank Luppo Dynamic) So I'm pretty sure I've got a bulletproof 727 for my purposes. I'd still like to put a stand-alone trans cooler on it, but waiting to get the trans temp gauge installed first. I am about to install an Unlawful Racing frame connector setup with a built in driveshaft hoop so at least that should keep me from pole-vaulting into the desert if I have a u-joint failure.

I've done nothing with the fuel tank so far. The rules allow a stock tank, but not sure that I won't upgrade it to a fuel cell.

OH! Almost forgot! I bought a suction cup mount for my Contour GPS camera so that I can do a video for you guys once I get the car moving again...
 
Last edited:
WOW on the Dakota Digital pkg.

Like others, I am a total newb on electrical so am watching this for all the details you can add. When you are splicing into the harness does this include routing around the 'bulkhead connector"? From Dakota Digital ads it appears that the harness feeds the modules, then 'outputs' via Cat5 to the gauge cluster?
 
A couple more pictures from today

Yes! That is a hand fabricated sheet steel mounting plate for 2 Dakota Digital control boxes, primed and hand painted in none other than spray-can Allis Chalmers orange, a startling likeness for Hemi Orange... The control boxes look so cool in there I almost hate to put the gauges in.

IMG_1884.jpg

IMG_1881.jpg

WOW on the Dakota Digital pkg.

Like others, I am a total newb on electrical so am watching this for all the details you can add. When you are splicing into the harness does this include routing around the 'bulkhead connector"? From Dakota Digital ads it appears that the harness feeds the modules, then 'outputs' via Cat5 to the gauge cluster?

To answer your question: Yes and No. The Dakota Digital gauge package comes with senders for Water Temp; Oil Pressure and Vehicle Speed. These senders have their own wiring harnesses and these must be routed from the engine compartment into the dash - so they go around the bulkhead connector. I actually routed them through a grommet below the brake master cylinder. I am also wiring in Trans Temp and Gear Position (for the automatic trans) and these senders as well have their own harnesses which will also go through the grommet. The combined bunch of new wires running into the dash is about 3/4" around. It's a lot of wires.

The new fuel gauge however is fed by the existing dash wire from the stock fuel level sender in the fuel tank. The Tach is fed the same way, using the stock tach wire in the dash harness coming from the negative terminal of the coil. These gauges MAKE USE OF the existing harness and therefore the bulkhead connector.

And here's where it gets complicated. You'll see in the pictures above that the main control module has inputs for High Beam, Brake Warning, Left Turn and Right Turn (and other indicators I'm not using). That is because the Speedometer is capable of displaying a warning light when the parking brake is on; an indicator when the High Beams are on; and a left or right arrow when the turn signals are on. These need to be fed from somewhere, and the easiest thing to do is to use the wire which lights the stock indicator bulb in the stock gauge panel. I had a decision to make: Do I try to splice into each of these (plus others for power, ground, etc) or do I simply cut the bulb sockets off and use the wires themselves. I am a wiring geek and hate the wire-taps. I also know for a fact that I (or someone else) can order a brand new dash harness from Year One for $500 if I ever need it. So I cut the stock bulb sockets off and use those wires to feed the indicator inputs on the module.

Oh, and you need to keep the many wires that feed the stock headlight switch and dimmer module as well as the wiper control switch and washer pushbutton. Actually now that I think of it, I'm not sure there is anything left to dim with the dimmer - maybe the radio faceplate...

I ended up needing 7 separate grounds (main module; 2 sub-mudules; fuel sender; Switch 1; Switch 2; turn signal LED's - you can see most of them in the picture) so I took a huge ring terminal and stuck seven 18AWG wires into it and clamped it under a dash bolt after scraping the paint off underneath. It's a lot of wires, but I know I have good grounds everywhere).

I also needed 3 ignition-hot power leads (for the 3 modules) and one constant-hot lead(for main module memory I assume). For the constant-hot I used the gray clock-power wire that is in the stock harness to feed power to the clock in the Tic Toc Tach - neat trick. For the ignition-hot, I plugged a spade connector into an unused plug in the existing dash harness. Basically any pink wire in the harness is ignition-hot, so I plugged into one of those. I really have no idea where THAT wire gets it's power, so I put a fuse in my harness before I split off the 3 wires. The stock glass-fuse fuse box is a little sketch for my tastes, but I haven't wired around it yet. Also, trying to modify the ignition harness in the steering column is a bitch - even the stock one barely fits in there, so I didn't mess with it.

I still need to mount the gear position sender and the trans temp sender to the trans but I've been having such a good time working sitting upright in my newly upholstered seat that I can't bring myself to crawl under the car again...
 
The Engine; The Car

For Budnicks

I have been running the car most weekends for a few months now - to the tune of about 500 miles of driving. I did one oil change and found some metal fuzz on the oil pan magnet, but my motor guy described it as par for the course with a brand new engine. It didn't seem unreasonable. Maybe the most interesting thing is that the car starts on the first crank every time when it has been sitting all week. I wasn't sure if I could expect that from a performance engine of this kind with no choke. It is a little harder to start when it's hot, though I'm not sure why...

I am also running a stock (though completely redone) 26" radiator with a hi volume water pump and the car seems to run really cool. So cool that I checked with a digital laser thermometer - and found the same thing. The car will get to 180 if I'm idling around but generally runs more like 160 to 170 at the radiator. My stock temp gauge doesn't work (part of the reason for new gauges) but I do have a radiator cap gauge that I constantly check when stopped.

It's LOUD! I'm running an Accurate LTD exhaust with "hemi mufflers" and boy does this car make noise. My neighbor has a stock 70 440 six-pack Challenger and even he says my car is loud. Doesn't bother me, but it does get noticed.

I am now running a 493 stroker which we conservatively estimate makes about 500 horsepower (probably closer to 550) through a Proformance trans with a custom converter and a Dr. Diff Eaton True-Trac 3.55 rear end to 275/60/15 BFG Radial TA's. You could politely describe the car as "traction limited". On the 1/4 mile slightly-uphill onramp in my neighborhood, I can run the quarter (measured it with a GPS) in just over 12.5 seconds from a stop based on my iPhone Speed Box app and a stopwatch. Neither of these is particularly accurate, but probably close. It is fair to say that I can run in the 12's in the quarter. Take into consideration that I don't know the first thing about drag race driving and the fact that the tires literally spin in first unless I back WAY out of the throttle, and that second gear still spins the tires on the shift and I think it's fair to say that a real drag racer with a real set of tires could probably get the car into the 11's. I'm sure you guys will tell me if I'm off the mark. I'm not a drag racer, but the car feels FAST!

More important to me, the car runs 66MPH at about 3,000RPM, and it will get to 100 so fast that you'd better be watching what's driving in front of you. I haven't timed it because I'm busy at 100mph, my wife won't ride with me and my 11 year old doesn't either when I'm driving that fast and he has only a lap belt. You have to be careful at 40+ or so because the car will shift down if you romp on it and that will break the tires loose. I'm really not sure how the auto trans is going to work out for road racing, but it will be fine for the Silver State and similar events. I really need to switch to 18" wheels and get some serious matched (front to rear) performance tires on this car before I go backwards into a ditch. One thing's for sure, for a car that's 21 feet long and has staggered tires, it doesn't understeer nearly as badly as I had anticipated. Maybe because it is so powerful, has such a good limited slip and runs short (by modern standards) gearing. That was a pleasant surprise.
 
a few more ideas & suggestions

Grabinov911 it pretty much sounds like your trying/covering all basis's, your 493ci engine sounds like it's a beast, should do the job nicely... you could cut gear ratio a little more with a slightly taller tire height/diameter too, obviously not as well as an O/D trans like a gear venders, pricy but a great idea... An aftermarket aluminum deep cool pan, help to keep things cool & easier to change fluid & add a tem sensor, a trans pan with a drain plug with magnet & a bung for a trans-temp sending unit would be a good idea too... I'd like to add a few other overlooked things, the area between your hood seal to the rad support, then from the grill & to the radiator support, should be sealed {a piece of fab-ed up aluminum/carbon fiber etc. screwed or Dzuz fastened over the gap between the grill & rad support} well to so all the air that hits the front end goes either around the car & over or thru the radiator, you don't want air getting under it lifting it at speed, better cooling at speeds too, less air getting under the car... a front air dam of any kind {even a ABS plastic style 69 Camaro, bolt-on cheapo $69 Summit Racing}, the example you should above would be nice, even a piece of aluminum fab-ed up with a couple of bends to keep it in shape, attached to the lower part of the car doesn't have to attach to the bumper it can go under the car {it's better if you can direct some of the air around the car thou} & direct air where it should be going that will help keep air out from under the car & give you down-force on the nose too, some kind of removable belly pan under your engine to keep air from coming up under the car & adding lift especially at speed like 100mph+... I'm not sure how much the Go-Wing will do but it gotta' be better than nothing at all... Anyway you can keep air out from under the front of the car will help for handling & even cooling too, if you can redirect some thru the radiator... for the race you could put on a electric water-pump {& electric fans}, keep water running at a constant temp & flow, verses a mechanical pump cavitation at higher rpms, sucking air or just not flowing like they should... I know it sounds like allot of overkill & it's all just merely recommendations not an absolute must... Fuel system & supply is very important too especially at constant hi-speeds {you don't want a fuel starvation or lack of an ample & constant supply of COOL-fuel, to your engine}, not remembering what you have for fuel pump, fuel lines etc., you need a 3/8" pick-up & 3/8" {#6AN minimum to feed that 493ci}, I'd highly suggest a electric fuel pump & a bypass style regulator, with a fuel cooler plumbed inline, keep your fuel much cooler than a mechanical pump, help allot at speeds to not detonate/ping itself to death, or a real race style Race Pump, with a bypass regulator & cooler... All wired thru arming switches, senders & relays of course... you've gone this far, a little more wouldn't hurt, free up some free HP {not really free, you gotta' buy the parts & install them}, less belt drag, no ugly mechanical fan, you can regulate all the liquids temps/flow much better... Good luck, keep us all posted
 

Attachments

  • Race Pump Brand mechanical fuel pump.jpg
    Race Pump Brand mechanical fuel pump.jpg
    7.3 KB · Views: 202
  • Race Pump Brand BB Mopar 450gph 50psi rpu-2000_w $319.95.jpg
    Race Pump Brand BB Mopar 450gph 50psi rpu-2000_w $319.95.jpg
    11.4 KB · Views: 216
  • Quickfuel 175gph Electric Pump & Built in Bypass regulator $199.99.jpg
    14.5 KB · Views: 203
  • Quickfuel Billiet Bypass Regulator Alcohol & Mech.Pump $99.99 Jegs.jpg
    Quickfuel Billiet Bypass Regulator Alcohol & Mech.Pump $99.99 Jegs.jpg
    12.6 KB · Views: 200
  • MRE Sending Units 0.375in & 0.500in.jpg
    MRE Sending Units 0.375in & 0.500in.jpg
    4.7 KB · Views: 209
  • Pro-Comp Electric BB Mopar Water Pump 35gpm pro-66219 $223.97.jpg
    Pro-Comp Electric BB Mopar Water Pump 35gpm pro-66219 $223.97.jpg
    9.5 KB · Views: 211
  • Perma-Cool Electric fan 16in. alum. 2950cfm prm-19115 $157.31 Summit.jpg
    Perma-Cool Electric fan 16in. alum. 2950cfm prm-19115 $157.31 Summit.jpg
    14.2 KB · Views: 211
  • Perma-Cool Electric fan 13 in. alum. in 3000cfm prm-19113 $153.05 Summit.jpg
    Perma-Cool Electric fan 13 in. alum. in 3000cfm prm-19113 $153.05 Summit.jpg
    14.8 KB · Views: 215
  • MRE B&M A727 TF Mopar deep Aluminum Cool Pan MREBMM10280 $148.95.jpg
    MRE B&M A727 TF Mopar deep Aluminum Cool Pan MREBMM10280 $148.95.jpg
    12.9 KB · Views: 207
  • Camaro Spoiler ABS plastic OER-3916673 $32.97 Summit.jpg
    Camaro Spoiler ABS plastic OER-3916673 $32.97 Summit.jpg
    2.3 KB · Views: 203
I have printed your list! Some of the things I had on mine, others not.

Where is that pretty blue and silver electric fan from? I really like the idea of getting rid of the mechanical fan. Wonder if I can find an electric that fits the stock shroud...

Thanks Bud...
 
Auto Transport Service
Back
Top