• When you click on links to various merchants on this site and make a purchase, this can result in this site earning a commission. Affiliate programs and affiliations include, but are not limited to, the eBay Partner Network.

SGTPauls 68 Charger RT project

Painted Black…

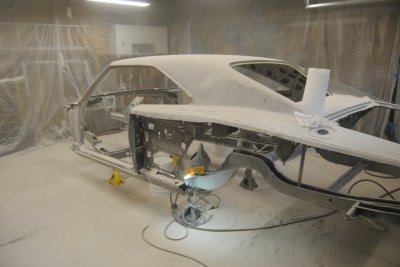
Thanks for the comments and support. Since my last post I took my car to the beach. Oh no wait, I took the beach to my car with some touch up sand blasting to address the flash rust and parts the original guy could not get to. If you do this in your garage as I did make sure you cover the stuff in your garage attic. I only covered some things. Got a little dusty up there. Car is all cleaned up and car has been primed with DP90!!!! :icon_thumleft: A few spots to touch up but overall pretty happy with the coverage. Sure does take a long time to paint all that frame stuff. Almost took me longer than it did to paint my truck body. :thinker: 2 coats inside the frame that will be covered with floor panels and 1 coat everywhere else. Will do additional coat(s) when all the floor panels are in. Also painted the axel before the rust resurfaced on that as well. A few progress pics below.
 

Attachments

  • pic 1.jpg
    pic 1.jpg
    162.7 KB · Views: 1,420
  • pic 2.jpg
    pic 2.jpg
    39.4 KB · Views: 1,398
  • pic 3.jpg
    pic 3.jpg
    191.9 KB · Views: 1,464
  • pic 4.jpg
    pic 4.jpg
    42.4 KB · Views: 1,438
Last edited:
No braces? Putting that shell on four jackstands without a brace across the doors or side to side is risky! I'd get some support on that thing fast, before you end up with a tweaked body on you hands and many hours of work to correct it. BTW... Nice to see another one being saved!
 
I’m not sure I follow and now I’m a little worried. I have the all the frame cross members & roof structure holding the body from left to right and front to rear. The roof structure at the c post has temporary braces from the roof structure to the frame to hold up the roof and I have temporary braces at the tail panel to the frame. I’ve taken a lot of measurements before, during, and after I replace anything and they’ve all been good. I looked at other threads and they were also only supporting the stripped down frame at the four jacking points as I have. Only ones I’ve noticed additional bracing on have been the ones when cross frame members have been removed. When I removed my rockers and torsion bar cross member I used temporary braces to stabilize the a post and rockers. Where o where should I add any additional braces? Anyone? Bueller? Bueller?
 
I was thinking the same thing; it looks a little weak in the frame support department, the roof and upper car (roof) weighs a bit and likely is the heaviest part of this car. I built a roll around dolly/jig for my GTX b/c I didn't want any flex and sag, etc. Looks good though, really good! Did you put the DP90 down on bare metal?
 
I’m not sure I follow and now I’m a little worried. I have the all the frame cross members & roof structure holding the body from left to right and front to rear. The roof structure at the c post has temporary braces from the roof structure to the frame to hold up the roof and I have temporary braces at the tail panel to the frame. I’ve taken a lot of measurements before, during, and after I replace anything and they’ve all been good. I looked at other threads and they were also only supporting the stripped down frame at the four jacking points as I have. Only ones I’ve noticed additional bracing on have been the ones when cross frame members have been removed. When I removed my rockers and torsion bar cross member I used temporary braces to stabilize the a post and rockers. Where o where should I add any additional braces? Anyone? Bueller? Bueller?

The typical supports I've seen is from door post to post (behind where the headrests would be. And from the A pillar to the door jam, which provides the support the door would give. The outside supports you put on the A pillar are an excellent idea too. The basic rule is, you can't put in too much support when the floor is removed from any uni-body. We had a Chevelle twist on us years ago because the builder didn't put enough supports in place. Be careful. Good luck too. It's looking great!
 
I think your ok Paul, I probably would have added more to take the place of the doors, especially being a hdtp., not too late. At this point I would prep your floorpans to the point they are ready to be welded in and toss them in place but before you weld them in bolt your doors in place to make sure all your gaps are good. Also check your chassis/unibody for square using the frame dimension chart that Donny provided before welding the floors in and also check it for square top to bottom. Let me know if you need a hand...
 
Great job Paul, You are going down a road not many would have the guts to travel. Keep it up, always looking forward to progress pics .
 
that is a job i would not attempt. i think someone was trying to say to maybe have some more support on the rear frame rails.
 
Really coming along good, The things some of you undertake with these cars is something, you guys truly are pros!
 
Looking good Paul, this will be nice to work with, no more rust, just good solid steel!
 
Awesome! Well, I am about to cut my roofskin off... and tack in a AMD replacement. Any suggestions?
(recommendations?)
 
All dollied up!

Hey gang! Thanks for all the comments and support. Sorry HRDCHGR I don’t have any roof replacement advice for you. It’s the only piece of exterior sheet metal welded to the car that the previous owner’s didn’t goof up. Ask Donny, I think he replaced his.

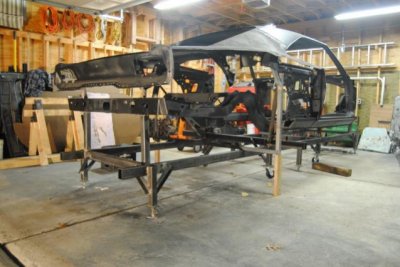
After learning that I was going down the wrong path without having much support, I decided it would be a good thing to build a dolly for my car. Special thanks to Matt and Donny for their advice on the dolly construction and to Matt for letting me take a bunch of additional measurements from the “junkyard dog”. Dolly is all built now and car on it. Yes I had a few things to address. My front frame rails are slightly high but I believe that will lock into place after installation of the surrounding sheet metal and floor. The rear frame rails were about ¼” too low so I cut them out (again :angry1:) and put them back where they were supposed to be. Roof now has good support as well from the outside until I install my floor. Busy at the day job now and the weather is cooling off so the progress is slowing a bit. Will scuff up the DP90 and install the doors temporally to verify I didn’t goof up anything else. Then I’ll start on the inner fenders, firewall, and radiator frame. A few progress pics for your enjoyment.
 

Attachments

  • pic 1.jpg
    pic 1.jpg
    47 KB · Views: 1,188
  • pic 2.jpg
    pic 2.jpg
    47.9 KB · Views: 1,192
  • pic 3.jpg
    pic 3.jpg
    45.9 KB · Views: 1,187
  • pic 4.jpg
    pic 4.jpg
    46.9 KB · Views: 1,189
Nice work SGTPaul! I might be crazy but that just looks like fun! I can't wait to start on my A66.
 
Looking good there on the dolly! I built my first one where the car is at standing height, yeah, that's the one that's holding my GTX-and yes I yanked the roof skin off to blast it, and get the rust out of the corners and under the roof supports -- rust was in there too, and media blasting could not reach in those tight areas -- so off it came!
 
Great job SgtPaul . Nice to see one coming back from the grave. I have great admiration for those of you who attempt this deep type of resto. Must have lots and lots of patience
 
Hey SGTPaul, Nice 68R/T....looks like a great foundation to start with. It will be worth it when your done. Stay In The Fight brother you will get it done. Im going to do new floor pans and a trunk pan due to a flat peice of sheet metal rivited in as a patch. Interior wise mine is ok other than front seats and carpet. Dash, door panels, back seat, headliner, and rear dash all look great in mine and hopefully I wont run into any other problems but im ready if I do. Hooah !!! TITAN II.
 
Great job SgtPaul . Nice to see one coming back from the grave. I have great admiration for those of you who attempt this deep type of resto. Must have lots and lots of patience


Agree 100%...I have to wonder if this is a resto...or a re-build. WOW. You sir are the "Evel Knievel" of restorations. Please take that as a compliment. He's the only guy from my day that would attempt this and not bat an eye...congrats to you sir. Nice work, please keep us posted!!
 
Awesome dolly , Just remember that you have quite the fan base . and are always waiting to see your progress. Its really starting to look like something , Canuk
 
Wow!!! So many cool comments! As Frank and Ed would say “Thank you for your support”.
 

Attachments

  • Bartles and James 2.jpg
    Bartles and James 2.jpg
    11.3 KB · Views: 985
Auto Transport Service
Back
Top