• When you click on links to various merchants on this site and make a purchase, this can result in this site earning a commission. Affiliate programs and affiliations include, but are not limited to, the eBay Partner Network.

The Official Rear Main Seal replacement thread

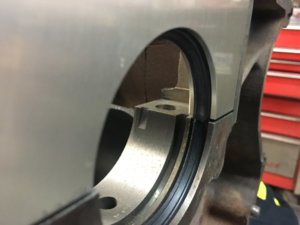
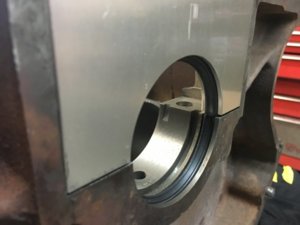
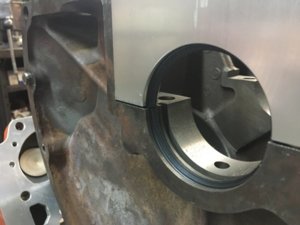
When just snugged down

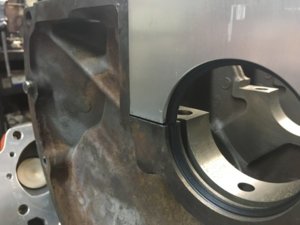
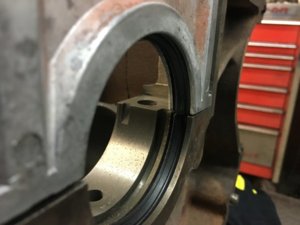
How much the two seal halves can bee off where they meet at the parting line shown in the pictures with both factory and mancini retainers

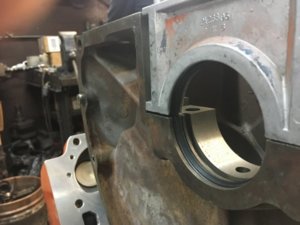
Then some pictures where the seal halves are lined up on both retainers

That's because there is so much slop in the factory retainer where the bolts slide in the holes

Mancini billet retainer is tighter as far as slop - Have now used the billet retainer on a few blocks

I got to align my two seal halves at the parting line , then i clocked the seal halves at 12 and 6 to see where the retainer aligned , then i marked the retainer and block with a sharpie marker so when I put everything together after assembly shortblock

IMG_0082.JPG IMG_0083.JPG IMG_0084.JPG IMG_0085.JPG IMG_0086.JPG IMG_0087.JPG
 
Last edited:
Should be a sticky.

These are the seals I hear are the best and what I used. The vitans for the crank, the silicone seal for the side. Click on "addition images" for the instructions. They come with detailed instructions that are excellent with pictures. (tried to find on line with no luck)

http://store.440source.com/Rear-Seal-Caps/products/26/
Thanks for that info.
Did you use the ($24) red "VITON' seal (described as superior) listed on that page ....or the ($7) black "O.E. stlye" with the Chrysler part number, also listed there?
 
Thanks for that info.
Did you use the ($24) red "VITON' seal (described as superior) listed on that page ....or the ($7) black "O.E. stlye" with the Chrysler part number, also listed there?
Oh wait .... I see that you specified "Viton" in your message.
:thankyou:
 
Here is the file. You will need Adobe Acrobat Reader or a similar program to view it.
So at the bottom of the page, it says "HughesEngines.com".
Does 440Source.com sell the same Viton seal as Hughes?
Hughes lists their Viton (fluoroelastomer material) seal as FelPro, but 440source doesn't mention the manufacturer.
 
Thats the one! Good job Mechanic :thumbsup:

I was waiting to contact 440 source (different time zone) but you saved me the trouble.

What do you think about useing it for a sticky? Someone can copy each page as a jpeg. I tried but I'll have to send it to my computer.
So at the bottom of the page of those instructions that 'themachanic' posted, it says "HughesEngines.com".
Does 440Source.com, where you bought your seals, sell the same Viton seal as Hughes?
Hughes lists their Viton (fluoroelastomer material) seal as FelPro, but 440source doesn't mention the manufacturer.
This looks like a good seal to use, but I'm wondering if 440source & Hughes are selling the same thing?
 
The "compatability chart" there for the FelPro BS11748 *rope seal* only shows year 1961 & earlier applications.
Is this seal for the RB engines only?
Would there even be a difference on the rear main seal for B vs. RB engines??
The rope seal I posted fits B and RB. If you never installed or seen one done I wouldn't do it. Here is a vinton from Mancini.
https://www.manciniracing.com/marabviremas.html
 
The rope seal I posted fits B and RB. If you never installed or seen one done I wouldn't do it. Here is a vinton from Mancini.
https://www.manciniracing.com/marabviremas.html
I like the idea of using what Chrysler used.
And the rope seals are supposed to "swell" and make a good seal.
I'd be doing this with the engine in the car. The rope is very difficult to remove & replace (using the 'Sneaky Pete' tool)?
 
The 2nd thread over at Dodge Charger . com was mine.

The problem with leaky mains in BB Mopars, more often than not, is the Groove that holds the seal in the Block is machined "offset" to one side from the Crank centerline....
meaning....
the lip on the seal is NOT COMPRESSED on one side..... and drip.... drip.... drip.
Worse on some Blocks than others.
It never mattered from factory as ALL BB Mopars used a rope seal that would expand/absorb oil on the loose side and seal up
but,
nowadays using neoprene seals..... you get the picture !

The way to check:
* with the Engine upside down on an Engine stand
* Install upper seal half in Block flush with the Block/Main Cap Parting line
* Install Crankshaft
* VISUALLY inspect both sides..... to SEE if the seal Lips have equal compression against the Crank on BOTH sides !
usually this inspection will verify what is quite common on many Blocks.... that one side of the lip is compressed against the Crank, and the other is barely touching/sealing.

* The "Fix" is to offest the non-contacting side approx 1/4" above the Main Cap/Block parting line.... and offset the other seal half the same reverse amount in the Seal Retainer
* Gently work/wiggle the Seal Retainer down into place, do up bolts lightly finger tight
* Then using a screwdriver on the NON-Contacting seal side..... gently apply pressure to the Seal Retainer to move the offending seal side over into contact with the Crank as you tighten down the retainer bolts. Unfortunately, this is a by "feel" type thing ? I can't relate a quantitative amount of sideways pressure to apply on the Seal Retainer as you tighten the bolts.... but just a very gentle sideways pressure to drag the lip seal into contact.

I have been dumb-founded over the decades at the plethora of aftermarket wiz-bang CNC Billet shiney-**** seal retainers being marketed.... all professing to "cure" the problem.... when the Seal Retainers themselves NEVER were the PROBLEM in the first place ?

I'm out..... but next time you are assembling the Crank in a BB Mopar have a close look... you'll SEE what I am talking about.
This would suggest a pretty low rate of success when replacing the seal with the engine in the car?
OR..... With a car on a lift, is it possible to see the “non-contacting” side of the upper seal? (so as to then make the needed adjustment when installing & tightening the cap)

Any hints for a successful seal replacement with the engine in the car?

Rick
 
OK, just an update... I'm new at all this, so I guess my comments will be directed more at those who might be apprehensive about this job, as I definitely was!! Another FFBO member & I replaced my 383 main seal with the engine in the car & the car on his lift (Texas MOPAR owners ROCK!) ....& yes, you could do this with the car on jack-stands or ramps... just adds a level of difficulty like any other job without a lift. But it wouldn't be "horrible". My engine is now completely DRY underneath. Not a single drop on the garage floor! But, it took some doing & I'll add those "pointers" here. Really, this is probably just a confirmation of info in the posts above that was "spot on" & helpful.

First, perhaps I'm the luckiest guy in the world, but we got it with *one* try & we used NO "alignment prying" nor measuring on the seal retainer. Really, none of that was/is an option with the engine in the car... it's too far up in there & no room. In fact, the retainer went in (slides upwards) very tightly... so if Chrysler had machined any misalignment on the retainer to the crank bore, we could not have seen it or done anything about it. I'm not saying that the "mis-alignment" phenomenon isn't real... maybe just not as prevalent as some of the above posts indicate? (or maybe I am the luckiest guy in the world). I wouldn't let all the info above (or on those other forums) deter you from the job ... it's SO nice to have an oil-free garage floor!!!

I used the Viton seal from Hughes Engines, "BB REAR MAIN SEAL - PREMIUM, Part # *FEL 2947", along with the "BB REAR MAIN SIDE SEAL, Part # *USS CS4240SB" (both seem to be the same that is offered at 440 Source, see the link by khryslerkid in post #2).

Reference Post #13 .... as I've mentioned, with the engine in the car, we couldn't do any of that measuring & math suggested there, but the last page of those instructions is important! The side seals are the correct length. It's a very tight fit sliding it all into place, even after putting oil on the side seals (but you definitely want to put some oil on the side seals). Someone had posted somewhere that just a touch of super glue in each end of the two grooves will help to hold the side seals in place. I did this after one failed attempt to slide the retainer into place without the side seals sliding part way out. That was a GREAT tip! I don't know if I would have gotten it all in correctly without the touch of super glue.... you're sliding the retainer up into a tight space with two wiggly side seals oiled up ... juggling three pieces with oily hands. The setup is so tight, that you also run the risk of damaging the side seals (on the machined "flat" on the block) as the retainer is forced up into place ... a spare set of side seals in hand might be comforting at this point in the job! But, yes, if the side seals end up not *flush* with the block once the retainer is installed, then they're not in all the way (mine were maybe protruding a millimeter or less, which they were when "on the bench" out of the engine). If there's "extra" to trim once installed, don't trim it off! Do it over (perhaps with your spare set?).

Main seal itself: I staggered it maybe 1/8" as illustrated & discussed in all the instructions, ...with just a tiny smear of Permatex #51813 (don't know why I bought the 50ml tube... Permatex 51817 is the same thing in a 6ml tube). I used Permatex because I couldn't find the recommended Locktite 518 ... it's all the same stuff "518". I think the key here is that you want to be using a *anaerobic* gasket maker. And this tiny smear on the little ends of the main seal is just to sort of "glue the circle together". I only did this on the two ends in the retainer cap. Can't really do that to the ends of the seal that you've already slid up & around the upper side of the crankshaft.

Those instructions referenced above suggest a thin smear of silicone sealer on the [metal] retainer ends before sliding it into place. Thin is the key!! On the metal retainer... not on the seal ends where you put the 518 stuff.

Along the lines of "less is more",.... in the days after completing the job, I was convinced that my seal was still leaking, since I always had a small oil drop at the weep hole on the bottom of the flywheel dust cover. But then I noticed that the oil pan gasket had oozed out at one corner. I didn't think that was leaking, but I decided to replace the oil pan gaskets again, just to make it right. When I pulled the oil pan off, I could see up in front of the flywheel at the crankshaft, and it was perfectly dry! So I knew the new seal wasn't leaking! So, "on" with the new oil pan gaskets, & I have NO leaks anywhere now! (it's funny how an oil leak from the pan must swirl around under the car when driving & end up on that weep hole back on the flywheel dust cover... makes it look like a rear seal problem!) Lesson learned.... with two pan gaskets being used (pan - gasket - windage tray - gasket - engine block), like a big peanut-butter sandwich... too much RTV sealer is gonna make one of those gaskets ooze out & tear! (That's what mine did.) I think you want to use just enough RTV on both sides of each gasket, to address any pitting or uneveness on the pan & windage tray surfaces. That's it. A fairly thin smear. Using RTV like butter (as I did the first time) will mean you're going to repeat the job (& a pan leak will look like a rear seal leak which is quite the "let down" after all this work).

I know I'm addressing some real "basics" here, but if you've never done the job before, like me, perhaps this will be helpful.

BTW, I used the "MP-15" oil pan gaskets from Hughes (part # SFP 2585) .... two sets are needed (assuming you have a windage tray in your pan).

One more thing. The rear seal needs to be installed facing the correct way. I had read this & known this. "No brainer" I thought. But, once it was all apart, I started to "second guess" myself on *which way* was correct (don't want to make a mistake at this point). In post #13 above, photos # 7, 8, 9 (unlabeled) ... the way the retainer & seal is orientated in those photos, your're looking at the back of the engine (looking forward toward the crankshaft). The pronounced seal lip is nearest the crankshaft. (Seems obvious, but one could make the argument that maybe the "stepped" part of the seal should face the crankshaft, with the lip at the aft end .... forget that I said that!!!!)

I'm going to go have dinner on my garage floor now (it's so clean :thumbsup: )

Thanks also for all who contributed on this thread!!! FBBO ROCKS too !!!
 
Last edited:
OK, just an update... I'm new at all this, so I guess my comments will be directed more at those who might be apprehensive about this job, as I definitely was!! Another FFBO member & I replaced my 383 main seal with the engine in the car & the car on his lift (Texas MOPAR owners ROCK!) ....& yes, you could do this with the car on jack-stands or ramps... just adds a level of difficulty like any other job without a lift. But it wouldn't be "horrible". My engine is now completely DRY underneath. Not a single drop on the garage floor! But, it took some doing & I'll add those "pointers" here. Really, this is probably just a confirmation of info in the posts above that was "spot on" & helpful.

First, perhaps I'm the luckiest guy in the world, but we got it with *one* try & we used NO "alignment prying" nor measuring on the seal retainer. Really, none of that was/is an option with the engine in the car... it's too far up in there & no room. In fact, the retainer went in (slides upwards) very tightly... so if Chrysler had machined any misalignment on the retainer to the crank bore, we could not have seen it or done anything about it. I'm not saying that the "mis-alignment" phenomenon isn't real... maybe just not as prevalent as some of the above posts indicate? (or maybe I am the luckiest guy in the world). I wouldn't let all the info above (or on those other forums) deter you from the job ... it's SO nice to have an oil-free garage floor!!!

I used the Viton seal from Hughes Engines, "BB REAR MAIN SEAL - PREMIUM, Part # *FEL 2947", along with the "BB REAR MAIN SIDE SEAL, Part # *USS CS4240SB" (both seem to be the same that is offered at 440 Source, see the link by khryslerkid in post #2).

Reference Post #13 .... as I've mentioned, with the engine in the car, we couldn't do any of that measuring & math suggested there, but the last page of those instructions is important! The side seals are the correct length. It's a very tight fit sliding it all into place, even after putting oil on the side seals (but you definitely want to put some oil on the side seals). Someone had posted somewhere that just a touch of super glue in each end of the two grooves will help to hold the side seals in place. I did this after one failed attempt to slide the retainer into place without the side seals sliding part way out. That was a GREAT tip! I don't know if I would have gotten it all in correctly without the touch of super glue.... you're sliding the retainer up into a tight space with two wiggly side seals oiled up ... juggling three pieces with oily hands. The setup is so tight, that you also run the risk of damaging the side seals (on the machined "flat" on the block) as the retainer is forced up into place ... a spare set of side seals in hand might be comforting at this point in the job! But, yes, if the side seals end up not *flush* with the block once the retainer is installed, then they're not in all the way (mine were maybe protruding a millimeter or less, which they were when "on the bench" out of the engine). If there's "extra" to trim once installed, don't trim it off! Do it over (perhaps with your spare set?).

Main seal itself: I staggered it maybe 1/8" as illustrated & discussed in all the instructions, ...with just a tiny smear of Permatex #51813 (don't know why I bought the 50ml tube... Permatex 51817 is the same thing in a 6ml tube). I used Permatex because I couldn't find the recommended Locktite 518 ... it's all the same stuff "518". I think the key here is that you want to be using a *anaerobic* gasket maker. And this tiny smear on the little ends of the main seal is just to sort of "glue the circle together". I only did this on the two ends in the retainer cap. Can't really do that to the ends of the seal that you've already slid up & around the upper side of the crankshaft.

Those instructions referenced above suggest a thin smear of silicone sealer on the [metal] retainer ends before sliding it into place. Thin is the key!! On the metal retainer... not on the seal ends where you put the 518 stuff.

Along the lines of "less is more",.... in the days after completing the job, I was convinced that my seal was still leaking, since I always had a small oil drop at the weep hole on the bottom of the flywheel dust cover. But then I noticed that the oil pan gasket had oozed out at one corner. I didn't think that was leaking, but I decided to replace the oil pan gaskets again, just to make it right. When I pulled the oil pan off, I could see up in front of the flywheel at the crankshaft, and it was perfectly dry! So I knew the new seal wasn't leaking! So, "on" with the new oil pan gaskets, & I have NO leaks anywhere now! (it's funny how an oil leak from the pan must swirl around under the car when driving & end up on that weep hole back on the flywheel dust cover... makes it look like a rear seal problem!) Lesson learned.... with two pan gaskets being used (pan - gasket - windage tray - gasket - engine block), like a big peanut-butter sandwich... too much RTV sealer is gonna make one of those gaskets ooze out & tear! (That's what mine did.) I think you want to use just enough RTV on both sides of each gasket, to address any pitting or uneveness on the pan & windage tray surfaces. That's it. A fairly thin smear. Using RTV like butter (as I did the first time) will mean you're going to repeat the job (& a pan leak will look like a rear seal leak which is quite the "let down" after all this work).

I know I'm addressing some real "basics" here, but if you've never done the job before, like me, perhaps this will be helpful.

BTW, I used the "MP-15" oil pan gaskets from Hughes (part # SFP 2585) .... two sets are needed (assuming you have a windage tray in your pan).

One more thing. The rear seal needs to be installed facing the correct way. I had read this & known this. "No brainer" I thought. But, once it was all apart, I started to "second guess" myself on *which way* was correct (don't want to make a mistake at this point). In post #13 above, photos # 7, 8, 9 (unlabeled) ... the way the retainer & seal is orientated in those photos, your're looking at the back of the engine (looking forward toward the crankshaft). The pronounced seal lip is nearest the crankshaft. (Seems obvious, but one could make the argument that maybe the "stepped" part of the seal should face the crankshaft, with the lip at the aft end .... forget that I said that!!!!)

I'm going to go have dinner on my garage floor now (it's so clean :thumbsup: )

Thanks also for all who contributed on this thread!!! FBBO ROCKS too !!!
Thanks for sharing! I felt like I was under the car with you by your play-by-play :D
 
No leak??....I do hope you put oil in the pan !!.......LOL.....Thanks for posting these tips..............MO
 
Weird - I'm surprised so many people have had issues with rear main seals - I have built close to 50 big blocks and I can say only 2 have ever needed the rear main addressed after assembly.

I just use the regular black seal and fiber side seals that come in the traditional Fel-Pro gasket sets.
 
Weird - I'm surprised so many people have had issues with rear main seals - I have built close to 50 big blocks and I can say only 2 have ever needed the rear main addressed after assembly.

I just use the regular black seal and fiber side seals that come in the traditional Fel-Pro gasket sets.
Obviously, the vast majority of leaks are on old old cars.
The issue with *new* seal replacements leaking, seems to be more prevalent when the job is done with the engine in the car, since it’s harder to get it *perfect* like you can with the engine disassembled & upside down on an engine stand.
Anyway, I did mine with the engine in the car (crankshaft installed) & it all worked out well
 
My 440 was just diagnosed with rear main seal leak. Thanks to this board I knew exactly what the tech was talking about when he said it was due to the combination of a knurled crankshaft and a rubber seal -- I came right back with "yeah, it needs to be a rope seal!" Also said the retainer needs replacement since it won't work properly with a rope seal. Keeping my fingers crossed...
 
IMO the best way to address the seal problem is to convert it to a BBC real main. More choices, better seal, blueprint the location and the knurl gets ground off the crankshaft.
It’s the only way I prep these blocks. I will have a rear seal carrier soon that is machined for the Chevy seal. It will only need a final cut. The block will only require the adapter.

This is about a $500 process with parts, block and crank labor but has proven to be 100% effective. (As if price really matters with this stuff)

Video 1


Video 2
 
My 440 was just diagnosed with rear main seal leak. Thanks to this board I knew exactly what the tech was talking about when he said it was due to the combination of a knurled crankshaft and a rubber seal -- I came right back with "yeah, it needs to be a rope seal!" Also said the retainer needs replacement since it won't work properly with a rope seal. Keeping my fingers crossed...

Got my car back and no more leaky... the tech at the shop I used is very thorough and he told me he ordered a bunch of different seals and retainers before he found a combo he was confident in installing. He decided not to go with a rope seal after all, I was skeptical but I think he ended up using the fast fish seal and it worked out. Also went with new Milodon 6qt oil pan/gaskets/windage tray and also replaced an oil pump that had a slight leak. Both that pan and pump had been previously resealed by a hack job shop in early 2019, who also told me the rear main was fine. Goes to show the PARAMOUNT importance of finding proper, experienced help for stuff you don't want to do yourself. If it wasn't for this shop I would have 100% sold this car by now and concluded this hobby wasn't for me.
 
Nick's Garage just did a great segment on fixing a big block rear main seal leak (start at 16:08):

 
Nick's Garage just did a great segment on fixing a big block rear main seal leak (start at 16:08):


Man, how many times did that guy use the words, "Hope," and, "Hopefully"? LOL.
And... it's always easier to do this job with the engine out of the car & upside down!
I should have done an "engine in car" video when I did mine last year. Over 1,000 miles so far & still dry!
Interestingly, he did not use an anaerobic gasket sealer on the mating ends of the two halves of the seal (yet he previously mentions that this would be a common area for leaks). Humph.
One good "take-away" from that video (at 20:50) are those guide studs that he made to help keep the retainer straight as it is slid into place.
I have no idea why he also removed the rear main bearing. I found that unnecessary.
 
Auto Transport Service
Back
Top