You are using an out of date browser. It may not display this or other websites correctly.
You should upgrade or use an alternative browser.
You should upgrade or use an alternative browser.
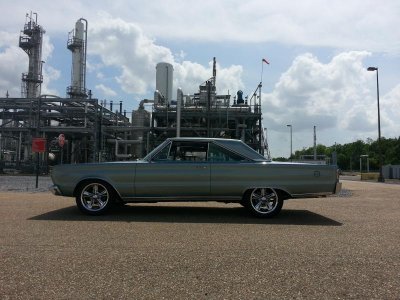
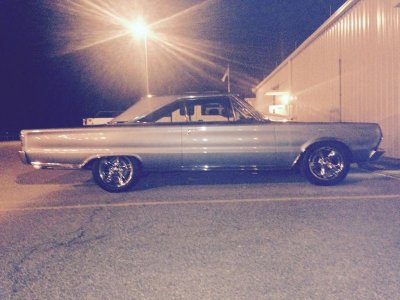
1966 Satellite restomod street toy
- Thread starter bherman
- Start date
bherman
Well-Known Member
Hi Guys'
I was really hoping not to carry an additional jack. Unfortunately the low rear wheel opening on this car means the rear axle must go to full droop to get the rear tires off. If I was to carry a spare I'd probably need to do what your doing...........still pondering thanks for the input, Brian
Haven't you seen the Viagra commercials where the guy buys bottled water and cures his overheating Camaro. The message is that once you've reached adulthood these little challenges aren't supposed to get the better of you, HAHA.
The fuel tank will weigh in at 75 lbs. according to my computer model. It could have been a lot lighter but I like robust and it is right behind the rear axle.
Thanks for your kind comments, Brian.
Boise68
All I can say is wow....all the detail. I am not worthy. thanks for taking the time to post and share your vision. I would be interested in your spare solution also. I carry a racing jack, necessary for rear tire removal.
I was really hoping not to carry an additional jack. Unfortunately the low rear wheel opening on this car means the rear axle must go to full droop to get the rear tires off. If I was to carry a spare I'd probably need to do what your doing...........still pondering thanks for the input, Brian
747mopar
I just made sure my insurance had towing included haha.
Haven't you seen the Viagra commercials where the guy buys bottled water and cures his overheating Camaro. The message is that once you've reached adulthood these little challenges aren't supposed to get the better of you, HAHA.
Gpuller
Mad fab skills! You'll have to post up some pick of the tank when your done. Got any idea what its gonna weigh?
The fuel tank will weigh in at 75 lbs. according to my computer model. It could have been a lot lighter but I like robust and it is right behind the rear axle.
Thanks for your kind comments, Brian.
HYRDGOON
Well-Known Member
- Local time
- 1:03 PM
- Joined
- Apr 20, 2013
- Messages
- 3,375
- Reaction score
- 2,746
- Location
- Breslau, Ontario, Canada
Hey Brian,
It's been a while and I apologize life gets away and I still haven't given you a call to chat about the front suspension and steering components from our PM discussion. Just found myself searching back into your thread to both admire and get inspiration.
Haven't been any updates here in a while curious how the project is going? Hope all is ok with you and your MS isn't affecting your progress.
Cheers!
Mike
bherman
Well-Known Member
Fuel Tank is ready for install!
Hi Guys' unfortunately I haven't had much time to work on the "66". The guy I work for thinks when he has paying work for me, I should work on his stuff rather than my car...............can you imagine! Finally got the tank welded and powder coated so it could be assembled. I decided to use a by-pass regulator and dump the by-pass right back into the tank. The fitting in the by-pass port is o-ringed and pushes into a receiver in the tank and is held in by the regulator/ fuel filter bracket. We have done this in the past and just run one line up front @ 8-8.5 PSI and put another regulator (4.5-5.5) between the carb bowls. This system wouldn't work for FI but we have found it works well on low horse power carb cars and doe not require to the tank. The in-tank pump is a Walbro GSS 340, it should be plenty for this engine but the mount is built to take a Bosch 044 if it's not. I have all of the parts to do the installation in the car and I'm hoping to do it this weekend. Thanks for looking Brian.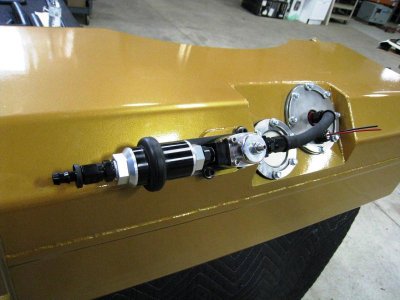
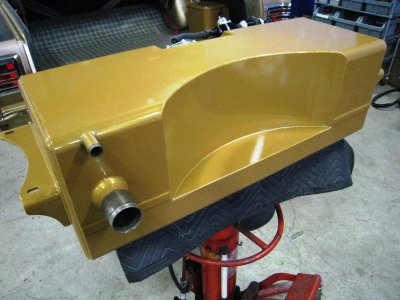


Hi Guys' unfortunately I haven't had much time to work on the "66". The guy I work for thinks when he has paying work for me, I should work on his stuff rather than my car...............can you imagine! Finally got the tank welded and powder coated so it could be assembled. I decided to use a by-pass regulator and dump the by-pass right back into the tank. The fitting in the by-pass port is o-ringed and pushes into a receiver in the tank and is held in by the regulator/ fuel filter bracket. We have done this in the past and just run one line up front @ 8-8.5 PSI and put another regulator (4.5-5.5) between the carb bowls. This system wouldn't work for FI but we have found it works well on low horse power carb cars and doe not require to the tank. The in-tank pump is a Walbro GSS 340, it should be plenty for this engine but the mount is built to take a Bosch 044 if it's not. I have all of the parts to do the installation in the car and I'm hoping to do it this weekend. Thanks for looking Brian.


bherman
Well-Known Member
Fuel tank installed!
Hi Guy's after what seemed like an eternity of being occupied with work related projects, I finally managed to get some time on the 66. When I was rudely interrupted I was working on the brake lines while I was waiting for the powder coating and plating for the fuel tank. When I got free, all of the tank parts were here and installing the tank looked like more fun than bending brake lines. When I was designing and building the tank it was my goal to have a modular fuel system assembly that was relatively easy to remove from the vehicle for service. This system has an in-tank pump and pick-up assembly an in-tank sock filter, external 40 micron filter and an integral by-pass regulator. The components packaged quite nicely under the trunk floor and hopefully they are in a protected location. I believe that this system will be no more difficult remove than the original tank. I guess like a lot of other components on this car I'll have to wait until it's done/running to see if it works! If you guy's see anything that you believe to be issues or problems please don't hesitate to comment. Thanks for looking Brian.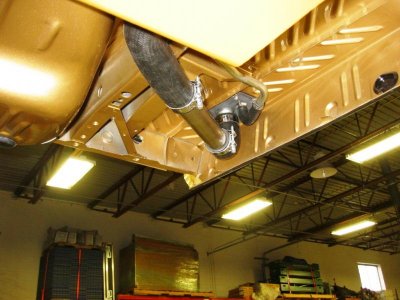
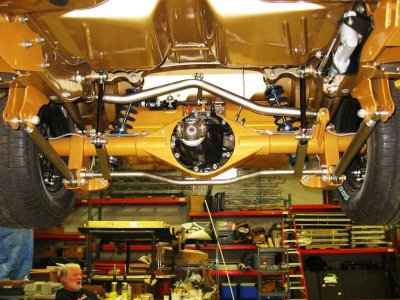
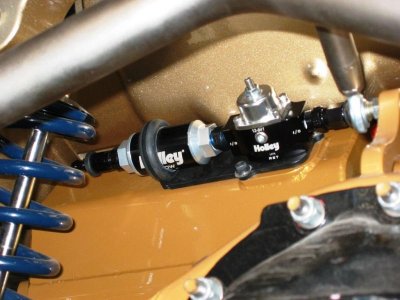
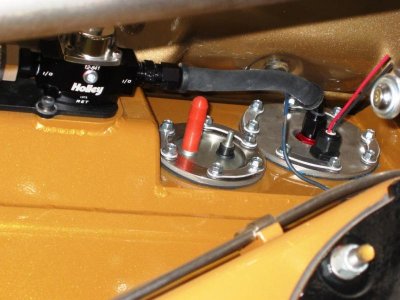
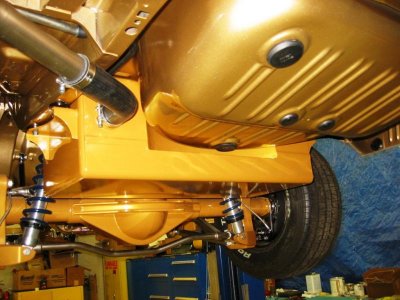
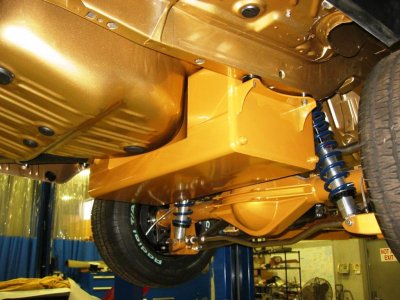


Hi Guy's after what seemed like an eternity of being occupied with work related projects, I finally managed to get some time on the 66. When I was rudely interrupted I was working on the brake lines while I was waiting for the powder coating and plating for the fuel tank. When I got free, all of the tank parts were here and installing the tank looked like more fun than bending brake lines. When I was designing and building the tank it was my goal to have a modular fuel system assembly that was relatively easy to remove from the vehicle for service. This system has an in-tank pump and pick-up assembly an in-tank sock filter, external 40 micron filter and an integral by-pass regulator. The components packaged quite nicely under the trunk floor and hopefully they are in a protected location. I believe that this system will be no more difficult remove than the original tank. I guess like a lot of other components on this car I'll have to wait until it's done/running to see if it works! If you guy's see anything that you believe to be issues or problems please don't hesitate to comment. Thanks for looking Brian.


- Local time
- 1:03 PM
- Joined
- Dec 14, 2008
- Messages
- 13,085
- Reaction score
- 18,724
- Location
- Long Island,New York
Better build a trophy room,your gunna need it.You will get best of show wherever you go!:notworthy:
Not sure how I missed this thread,but I just read it from 1st post,all I can say is your vision is amazing. Hope the little ones know how to polish!!
Hope to see that car in Carlisle some day before my time is up!
Not sure how I missed this thread,but I just read it from 1st post,all I can say is your vision is amazing. Hope the little ones know how to polish!!
Hope to see that car in Carlisle some day before my time is up!
Jimw
Active Member
Superfreak
Well-Known Member
Lots.
WOW, WOW, WOW, IS ALL I CAN SAY! If attention to detail and skill were the determining factors for trophies you'd win every show but unfortunately some don't like to see Mopars kicking *** which this one is going to do. My hats off to you for the over the top work your doing..... sick.... just sick fab skills!
bherman
Well-Known Member
Better build a trophy room,your gunna need it.You will get best of show wherever you go!:notworthy:
Not sure how I missed this thread,but I just read it from 1st post,all I can say is your vision is amazing. Hope the little ones know how to polish!!
Hope to see that car in Carlisle some day before my time is up!
HEMI-ITIS, Thanks for you kind comments. My intention was/is to build a street toy that my wife and I can take to the ice-cream shop or to dinner, certainly not show car. I think the camera hides most of the faults and makes the car look better than it is. I also hope to get to Carlisle before my time is up, thanks again Brian.
- - - Updated - - -
Man that car is going to be great. I wish I had the skills and money to do that to my 66. How much would it cost me to have a suspension like that on my car. View attachment 299133View attachment 299134
Jimw, Sweet car, what color is it? I really don't know the answer to your question, I don't keep track. Thanks for looking, Brian
bherman
Well-Known Member
WOW, WOW, WOW, IS ALL I CAN SAY! If attention to detail and skill were the determining factors for trophies you'd win every show but unfortunately some don't like to see Mopars kicking *** which this one is going to do. My hats off to you for the over the top work your doing..... sick.... just sick fab skills!
747mopar, thanks for your encouragement, I just try to do the best that I can. If some people don't like this car because it's not their brand of choice or because it's not a straight restoration, so be it. I'm having fun building it the way I envisioned it! Thanks for looking Brian.
Superfreak, I guess it's all relative, not that much really.
bherman
Well-Known Member
Fools Gold Update!
Hi Guy's, A friend has been helping me with assembly on this project while I've been screwing off. He's been installing the interior, fitting the rear quarter regulators and glass, seals ect. I've never been involved with this type of restoration work before and was not aware of the difficulties that could be encountered. As near as I can tell if Mopar restoration licenses a reproduction part, under application year(s) it should say fits NONE. The interior soft parts fit very well with the exception of the carpet. The molded carpet was formed to something, but I'm pretty sure it wasn't a B Body, it's issues may have been caused by the fact that it arrived in a box 8" x 8" X 32" that contained both the front and rear sections. It must have been put in the box hot off of the forming operation, when I cut the packing tape off one end the box split lengthwise the entire length! After wetting it, laying it out, steaming it numerous times and practicing our Gator wrestling, it fits pretty well.
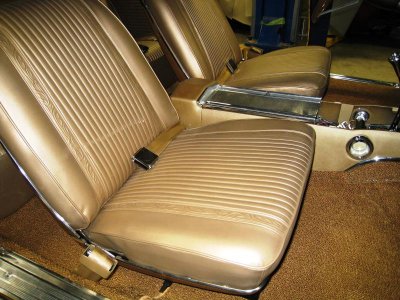
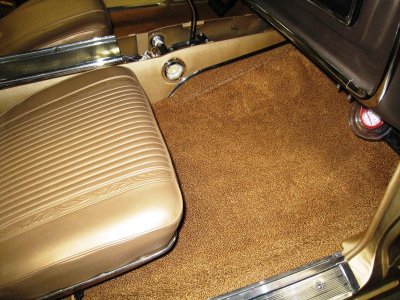
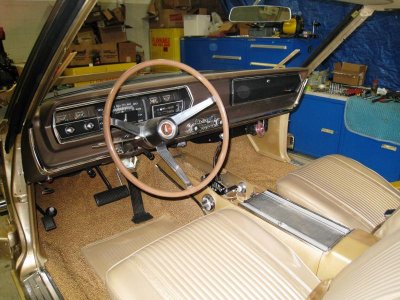
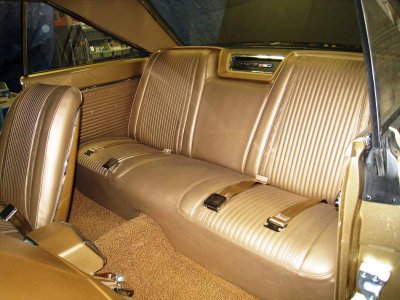
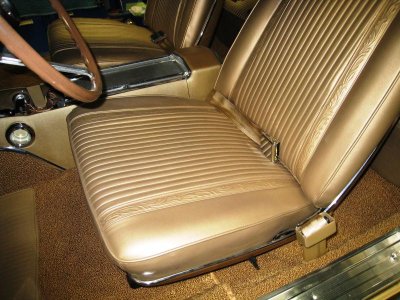
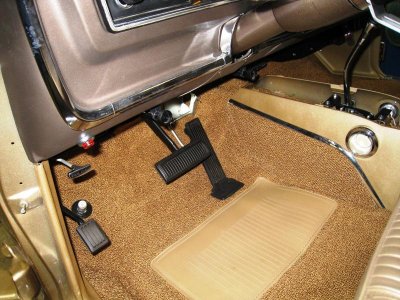
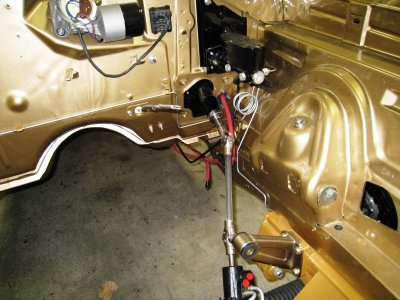
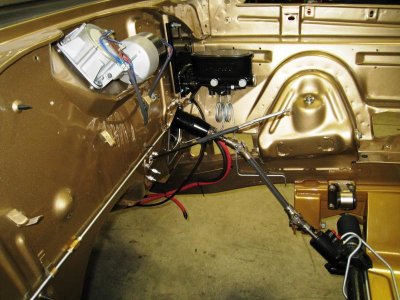
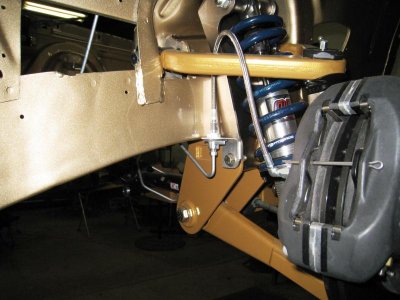
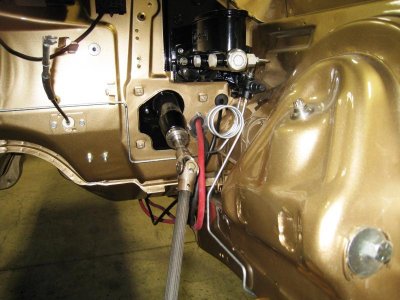
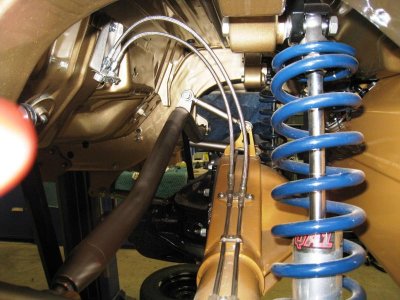
While my friend Matt was making progress on the interior, I have been working on other portions of the project. After installing the fuel tank (shown previously) I had to quit stalling and get on the brake lines. I decided that I would bend brake line templates out of steel tube before I bent the actual lines out of stainless tube, it was a good decision as I used all of the long lengths that the close auto parts store had and am working on another. I have discovered that I am not worth a poop at bending brake lines! I've always wondered why the OEM's put the spring around the outside of the brake line. It seems in the original steel tube material all it's good for is holding dirt and crud against the line and creating a good spot for rust to start. Well I did buy it and will install it when I bend the "real" lines. Thanks for looking Brian.


Hi Guy's, A friend has been helping me with assembly on this project while I've been screwing off. He's been installing the interior, fitting the rear quarter regulators and glass, seals ect. I've never been involved with this type of restoration work before and was not aware of the difficulties that could be encountered. As near as I can tell if Mopar restoration licenses a reproduction part, under application year(s) it should say fits NONE. The interior soft parts fit very well with the exception of the carpet. The molded carpet was formed to something, but I'm pretty sure it wasn't a B Body, it's issues may have been caused by the fact that it arrived in a box 8" x 8" X 32" that contained both the front and rear sections. It must have been put in the box hot off of the forming operation, when I cut the packing tape off one end the box split lengthwise the entire length! After wetting it, laying it out, steaming it numerous times and practicing our Gator wrestling, it fits pretty well.


While my friend Matt was making progress on the interior, I have been working on other portions of the project. After installing the fuel tank (shown previously) I had to quit stalling and get on the brake lines. I decided that I would bend brake line templates out of steel tube before I bent the actual lines out of stainless tube, it was a good decision as I used all of the long lengths that the close auto parts store had and am working on another. I have discovered that I am not worth a poop at bending brake lines! I've always wondered why the OEM's put the spring around the outside of the brake line. It seems in the original steel tube material all it's good for is holding dirt and crud against the line and creating a good spot for rust to start. Well I did buy it and will install it when I bend the "real" lines. Thanks for looking Brian.


Jimw
Active Member
Jimw, Sweet car, what color is it? I really don't know the answer to your question, I don't keep track. Thanks for looking, Brian[/QUOTE]
Thank you The color is steel gray
Thank you The color is steel gray
bherman
Well-Known Member
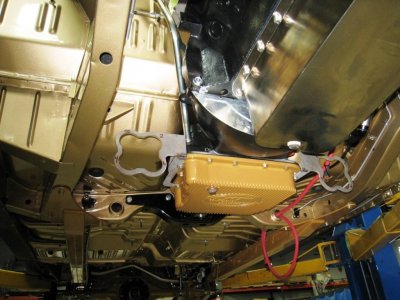
After investigating possible header options I decided that it was unlikely I would be able to purchase a set that fit the unique front suspension. Headers that fit the Alterkation suspension looked like they might fit with modifications. Oh what the heck is another project? Thanks for looking Brian.
Last edited:
bherman
Well-Known Member
Hey Gpuller, Thanks but I can't take credit for them. Tony Dunlop at the shop machined them for me, all I did was draw them up and water jet the blanks. Thanks again, Brian.Those are some sexy header flanges.
66Satellite47
Well-Known Member
Your header work looks amazing. We built headers for my tube chassis Arrow & that took effort. Doing that for a stock body is really amazing. Best of luck with the results.
bherman
Well-Known Member
Hi Riverdawg, I like to go to car shows and look at all the cool vehicles but I haven't owned a toy car since I was a kid and I have never shown a car. I can see myself going to a small show that you can drive your car in, sit in a lawn chair for couple of hours and then leave. Autorama seems like a big commitment in time and effort.........I'm a lazy guy. Heck you only live in Lansing, if I ever get it done you could come down, I'll buy you lunch and we'll go for a cruise. BrianJust amazing work. Hopefully I'll be able to see the car in person someday. Any thoughts about taking it to the Detroit Autorama someday?
Similar threads
- Replies
- 20
- Views
- 1K
- Locked
- Replies
- 3
- Views
- 2K

