• When you click on links to various merchants on this site and make a purchase, this can result in this site earning a commission. Affiliate programs and affiliations include, but are not limited to, the eBay Partner Network.

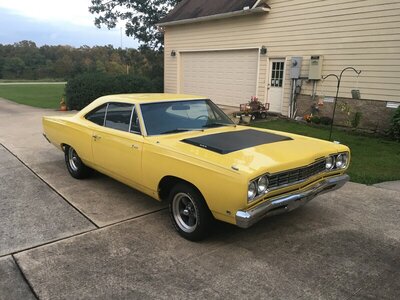
1968 Road Runner Projects 3

Ray Bolden

Active Member
Local time
9:19 PM
Joined
May 21, 2020
Messages
30
Reaction score
27
Location
Mountain View, AR
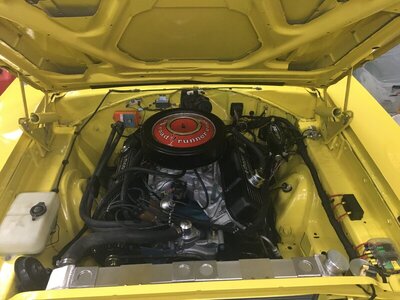
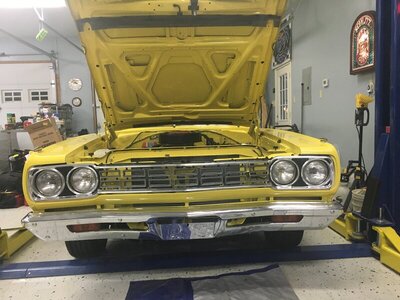
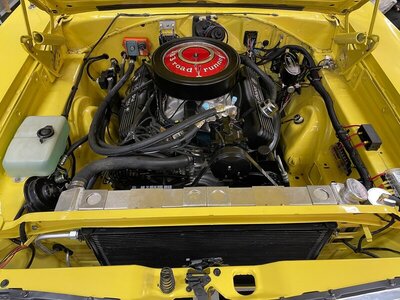
The engine upgrade and installation of the BeCool radiator went fairly smoothly. I really liked the idea that the new Edelbrock heads had "dry" exhaust studs. After installing a new exhaust stud kit in the heads I installed the factory exhaust manifolds. During the teardown, I'd sent the manifolds to Jet-Hot Coatings and had them coated "satin black." Honestly, I was impressed as to how well they look, albeit a little on the pricey side. I also installed a new fuse block under the hood to support the electric fans and the electric exhaust cutouts. While I was wiring, I also installed a new front light harness that I obtained from M&H electric (Year One) to replace the 50-year-old wiring.

My next project is to install a FiTech EFI throttle body and a new gas tank with an in-tank pump. I made a short 2-minute video of the engine running with the new upgrades.

PS - The cam is a Comp Cams XE-274H grind.

To hear the engine running, click on this link: https://www.dropbox.com/s/cemjzpsnpfsaxui/Video Sep 13, 2 53 23 PM.mov?dl=0
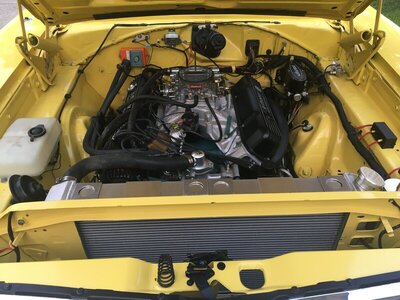
IMG_5951.JPG IMG_5952.JPG IMG_5957.JPG IMG_5958.JPG
 
Last edited:
I finally finished up the installation of the FiTech EFI and associated parts. The FiTech unit that I purchased was the flat black model 30002, which is supposed to be good for up to 600 HP. That's way more than this old guy plans to make but the tech said that this unit was very suitable for this application.

I also purchased a Tanks inc. replacement EFI fuel tank with the in-tank Walbro fuel pump and floatless fuel sending unit. The fuel tank has a nice powder-coated finish and the appearance is very nice. The tank fits into the car perfectly and reminded me that I have some cosmetic work ahead of me under the car. Because of the limited space to route the fuel line I went with the GM style fuel filter with its own built-in regulator and fuel return line and mounted it near the tank. With the limited space under the car, running a single line forward made the installation easier. I used DEI thermal shielding on the fuel line in areas where heat might be a factor and we all know how heat affects fuel.

The instructions that came with the FiTech unit were fairly simple and easy to follow. When everything was completed the car started up instantly and in my opinion, runs pretty darned well. It pulls strong and smooth all the way to about 5K RPMs (no guts!). About the only issue that I had was finding a source for 12 volts at both the key on and cranking mode. I finally decided to tap into the wire that goes to the ballast resistor and used that to trigger a relay. With the relay activated, that gave me a full 12 plus volts for the EFI unit. I've only put about 25 miles on it since this installation but I'm already looking forward to the 2021 cruise season. Here are a few pictures of the finished product.
IMG_6009.JPG
IMG_6014.JPG
IMG_6015.JPG
 
My last planned project before the beginning of this year’s cruising season is to install air conditioning in the Road Runner. Actually, once I began, I also figured that if I ever planned to convert the front belt drive system to a serpentine style, this would also be a good time to do that too. So before I began tearing down the belt drive I got online with March Performance and ordered their deluxe serpentine belt drive in a powder-coated satin black color. When they arrived, I found that everything was double, and in some cases, triple wrapped to ensure that the finish wasn’t damaged.
IMG_6060.JPEG


Because I’d previously installed a BeCool crossflow radiator in the car, I found that I had to piece together the condenser, hard lines, drier, etc. I found a condenser at Vintage Air that measured about 27” X 15 ½” and fit the radiator support opening perfectly. I also bought a couple of their “U-Bend-Em” hard lines, a Sanden 508 compressor, a universal drier, and a universal line kit, and I was off and running. Installing the condenser was fairly simple and straight forward. Measure, mark, and drill!
IMG_6055.JPEG


I then moved on to removing the v-belt pulleys. Although I could have probably done this installation with the radiator in place, it just made things much easier to remove it for better access. The only real issue that I had with the belt drive was getting the press on v-belt pulley off of the alternator and pressing on the serpentine pulley provided by March. In my small community, I initially couldn’t find anyone willing to touch it. Fortunately, I was able to find an old Mopar gearhead at Lumpy’s Garage in Mountain View, AR. He did a great job and as you can see from the pictures, the pulley lines up perfectly.


IMG_6075.JPEG
IMG_6076.JPEG
IMG_6077.JPEG
IMG_6090.JPEG


My plan is to complete all of the under hood installation and then take the car to Bob Villiger and crew at Ozark Mountain Classics in Mountain Home, Arkansas for the installation of the Classic Auto Air evaporator and control panel. At my age, I feel like it’s too painful rolling around under the dash. So with that said, I’ll be letting someone else enjoy that part of the project for a change.

If I have anything negative to say about the March pulleys, it’s that they didn’t provide any narrative assembly instructions whatsoever. They do provide some drawings, which are good, but a simple paragraph here and there to guide the installer as to which part needs to go on first, etc., would have been a big help. I was able to figure everything out through a little trial and tribulation and am very pleased with the outcome.
 
After completing my work under the hood for installing the Classic Auto Air system, I took the Runner to Bob Villiger at Ozark Mountain Classics in Mountian Home, AR. Bob's crew went to work installing the under-dash unit, the control panel, and louvers. They had to remove some metal from the dash to accommodate the center louver but the clean look obtained was well worth the effort. Although the unit is made by Classic Auto Air, I used some parts from Vintage Air, including the center louver.
IMG_6151.jpg

IMG_6149.jpg
IMG_6148.jpg

The main reason that I went with Classic Auto Air was due to the manner in which the underhood A/C hoses were routed. The Vintage Air system routes these hoses from the engine compartment into the outer fender well and connects to the evaporator in the kick panel area. The Classic unit hoses are routed in what I consider the conventional method and go directly into the firewall on the passenger side.

IMG_6147.jpg

The guys at Ozark Mountain Classics also charged the system and it works very well. This upgrade will make cruising in the upcoming hot and humid days of summer much more comfortable. IMG_6146.jpg
 
Last edited:
I've made a couple more mods to the Road Runner since my last post. I'm not sure how much a power steering cooler will benefit the system but to be on the safe side, I went ahead and installed a Durale P/S cooler. It measures about 6" X 11" and it
IMG_6472.JPEG
should be sufficient to help the system live a longer life. It was a simple installation and is mounted on the driver's side of the car in front of the radiator.

I also updated the ignition system with an MSD 6AL digital CD box. As long as I was making changes to the ignition system, I also bought a Summit Racing magnetic pickup type distributor along with an MSD Blaster coil to complete the system. Once the new plugs and MSD spark plug wires are in place, the old girl should be good to go.
MSD2.jpg


MSD4.jpg
 
My latest venture involves the dash. Some things work and some, well, not so much. I don't want to stray too far away from the stock appearance of this car so I thought I could either have my stock dash refurbished or install something new. Dakota Digital has a new dash assembly that looks pretty much stock, yet, it has several enhancements that are only possible with the latest technology. I decided to go with their new dash, part # RTX-68D-STD-X. It came complete with the new instrument cluster, wiring, senders, electronic controller, etc. Since working under the dash is no longer something I choose to do, I contacted Bob Villiger of Ozark Mountain Classics and asked him and his crew (Brian) to install this new dash cluster for me. Here are a couple of pictures of the stock dash as it was removed from my car.

IMG_6726.jpg
IMG_6727.jpg


Brian of Ozark Mountain Classics did a nice job getting the new instrument cluster installed and calibrating the speedometer, gas gauge, etc., and also getting everything working correctly. In my opinion, Dakota Digital has created a real winner with this new instrument cluster. In addition to providing the basic information, it has the capabilities of their other digital clusters and provides an abundance of driver information. Here are a couple of pictures of the new instrument cluster installed. One is with the key off and the other, key on.

IMG_6728.jpg
IMG_6729.jpg
 
Very nice car and it seems to be set up for comfortable, fun cruising - enjoy it!
 
Auto Transport Service
Back
Top