• When you click on links to various merchants on this site and make a purchase, this can result in this site earning a commission. Affiliate programs and affiliations include, but are not limited to, the eBay Partner Network.

1969 Charger R/T resurrection

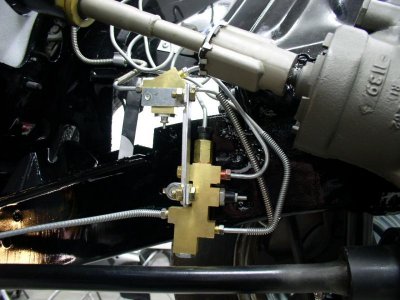
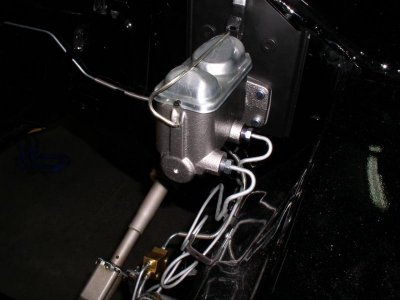
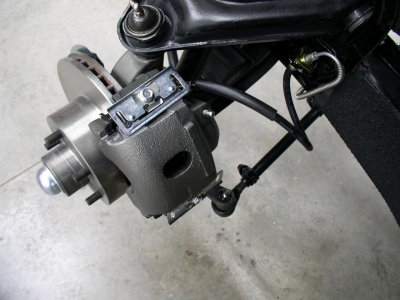
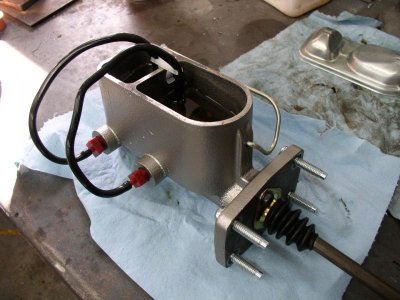
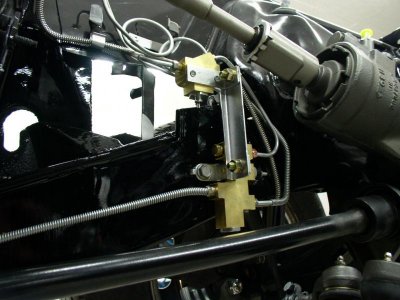
Knock on wood - I think I am all done with the entire brake system. This is the disc conversion I bought from Pirate Jack. The only thing I didn't care for was the complete master cylinder was painted black. I stripped this down and painted the body Eastwood brake grey, and the top and clip with some clear. I also had to make a mounting strap to hold the 2 valves together. Other than these 2 things everything was fine and went together well.
P1100186.jpgP1080177.jpgP1080178.jpgP1080179.jpgP1100184.jpgP1100186.jpg
 
Knock on wood - I think I am all done with the entire brake system. This is the disc conversion I bought from Pirate Jack. The only thing I didn't care for was the complete master cylinder was painted black. I stripped this down and painted the body Eastwood brake grey, and the top and clip with some clear. I also had to make a mounting strap to hold the 2 valves together. Other than these 2 things everything was fine and went together well.
Holy Cow H2E . . . you're smoking through the rebuild process like your pants are on fire ! ( is that how you're keeping warm ? ? ) ( SMILE )

And you're doing it with perfection - you don't skip anything ! !

I'm very impressed . . . you keep it up at this rate and you'll be done well before Spring ! ! !

Oh . . . is it DONE YET ? ?
 
Very cool, and you just changed my mind to painting my calipers grey haha, everything looks really sharp man! And it's funny I actually have the exact same setup except mine was stolen (bought lol) off my friend's '70 Hemi Challenger R/T. Giant single piston calipers right?
 
Looks great Elk and nice documentation .. so thanks for the **** LOL I'm looking at disc brakes me own self and I appreciate your update brother
 
Very cool, and you just changed my mind to painting my calipers grey haha, everything looks really sharp man! And it's funny I actually have the exact same setup except mine was stolen (bought lol) off my friend's '70 Hemi Challenger R/T. Giant single piston calipers right?

Looks to me like Speedy and H2E are having a race to the FINISH ! ! ! They've both been making major headway lately ! ! !

Go Man GO . . . GO Man GO ! ! ! ! ( SMILE )
 
Looks to me like Speedy and H2E are having a race to the FINISH ! ! ! They've both been making major headway lately ! ! !

Go Man GO . . . GO Man GO ! ! ! ! ( SMILE )

I'm just short a mountain of bodywork and a jaw-dropping black paint job like Joel's lol!
:eek:ccasion14:
 
I'm just short a mountain of bodywork and a jaw-dropping black paint job like Joel's lol!
:eek:ccasion14:

And we can't wait :eek:ccasion14:.

But we'll be disappointed when it's over :(

My apologies for the interruption to your most excellent thread Elk
 
I'm just short a mountain of bodywork and a jaw-dropping black paint job like Joel's lol!
:eek:ccasion14:

Just remember Speedy . . . that last 20% of the work only takes 80% of the time to get completed ! ! ! ( sigh )
 
h2e, when i get mine running good this summer i just might have to make a road trip to wisconsin to see this SEXY beast in person. nice, keep the charger **** going...
 
And we can't wait :eek:ccasion14:.

But we'll be disappointed when it's over :(

It's never over!! lol! Even after old Frankenstein's back together I'll be doing quite a few upgrades next winter and posting about all the adventures I'm hoping to get into this summer. Hopefully Elk sticks around after this resurrection is complete!
:eek:ccasion14:

Just remember Speedy . . . that last 20% of the work only takes 80% of the time to get completed ! ! ! ( sigh )

Ah I know, I'll probably be blocking til July.. haha. But all these pics of Elk's car in paint are keeping me motivated :icon_thumleft: (sorry don't mean to threadjack man!) :)
 
Great update, brakes look terrific like everything else. Looks like one of us is on a smooth ride to Spring.
 
Giant single piston calipers right?

Yep - just 1 big piston. It is the same setup as the late 70's F bodies used.

- - - Updated - - -

I'm just short a mountain of bodywork and a jaw-dropping black paint job like Joel's lol!
:eek:ccasion14:

Yeah, but yours will be running before mine :icon_thumleft:. I will say that I sure was a happy camper when the bodywork and painting were done. So time consuming and costly. I think that is the stage where a lot of projects get abandoned.

- - - Updated - - -

h2e, when i get mine running good this summer i just might have to make a road trip to wisconsin to see this SEXY beast in person. nice, keep the charger **** going...

Sounds good to me. Maybe stop and pickup Propwash on the way, with his black beast of course :cool:.

- - - Updated - - -

Great update, brakes look terrific like everything else. Looks like one of us is on a smooth ride to Spring.

I don't know if I would call it a smooth ride, but a trip it is. The biggest challenge left in my mind is the window mechanisms Devin. You made it look so easy on your car. So I was thinking, if it only takes you 15 minutes per window maybe you could pop in next time you are in the area and show me the tricks of the trade lol.
 
Haha, once you get your windows done you'll be thinking "man I can't believe I was sweating that". After the sheet metal and body work it all should be easy "right"????????
 
Im sure you will figure it out on the window mechanisims man she sure looks shinny n clean are you sure you going to drive it you mite get it dirty
 
Im sure you will figure it out on the window mechanisims man she sure looks shinny n clean are you sure you going to drive it you mite get it dirty

This thing will get driven - a lot. I don't believe in having a car so valuable you can't have fun with it.
 
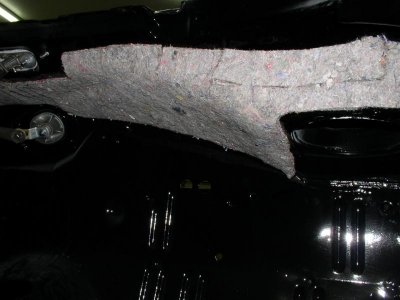
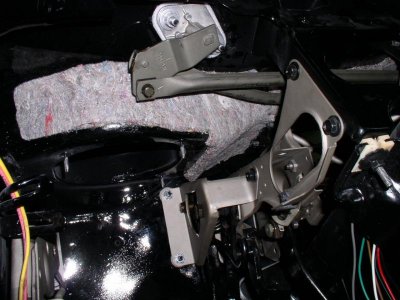
Got a whopping 20 minutes in the garage today on account of 2 boys in basketball tournaments today. Got the under dash insulation glued in and thought I would add, it would be easier to do before the pedals and wiper arms are installed for you guys in the same boat as me.

P1110189.jpgP1110190.jpg

- - - Updated - - -

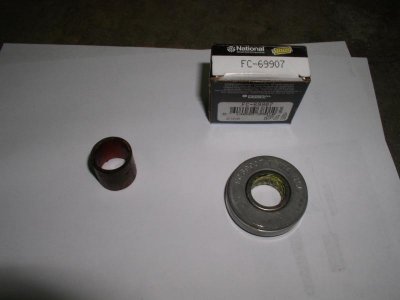
A friend of mine who I am sure has forgot more about Mopars than I will ever know, told me to throw away the original style pilot bushing and use a newer style needle bearing - so I did. Anybody else ever heard of this upgrade?

View attachment 162342
 
I seem to be having problem posting pics again.

P1110188.jpg
 
Got a whopping 20 minutes in the garage today on account of 2 boys in basketball tournaments today. Got the under dash insulation glued in and thought I would add, it would be easier to do before the pedals and wiper arms are installed for you guys in the same boat as me.

View attachment 162339View attachment 162340

- - - Updated - - -

A friend of mine who I am sure has forgot more about Mopars than I will ever know, told me to throw away the original style pilot bushing and use a newer style needle bearing - so I did. Anybody else ever heard of this upgrade?

View attachment 162342

Man this is fun watching your car get all these restored and new parts on that pretty black background.

Thanks for those underdash shots Elk. I'll be needing to switch to a 3 speed wiper set up to make room for a 6 BBL breather later and it's handy to have a good shot of them together w/o everything in the way.

Needle bearing upgrade sounds logical but check this out

http://www.crankshaftcoalition.com/wiki/Pilot_bearing_and_bushings
 
Got a whopping 20 minutes in the garage today on account of 2 boys in basketball tournaments today. Got the under dash insulation glued in and thought I would add, it would be easier to do before the pedals and wiper arms are installed for you guys in the same boat as me.

View attachment 162339View attachment 162340


- - - Updated - - -

A friend of mine who I am sure has forgot more about Mopars than I will ever know, told me to throw away the original style pilot bushing and use a newer style needle bearing - so I did. Anybody else ever heard of this upgrade?

View attachment 162342

The bigger, torrington style bearing fits into the step of the crankshaft, thus allowing the use of improperly drilled automatic crankshafts. Also easier to install and remove if you need to.
 
Auto Transport Service
Back
Top