• When you click on links to various merchants on this site and make a purchase, this can result in this site earning a commission. Affiliate programs and affiliations include, but are not limited to, the eBay Partner Network.

1970 Coronet R/T Project (Dasfusca's Car)

Here are some shots of the plug welds I used to attach the new panel to the rib. I am almost ready to actually weld it to the car. The last picture is of me. The phone switched cameras on me.

52BF3047-8422-46DD-856D-DD7E8922E361-10947-00000D4BEC06E4CA.jpg

B571C378-244B-48E5-91B7-6437342146E1-10947-00000D4BB6EEAA42.jpg

1B0D4825-B2D8-4DF7-9E25-5C26366D854B-10947-00000D4B9DF58709.jpg

F4EE64E9-CD28-486F-8642-5228F667C22B-10947-00000D4B292925EF.jpg

BC2F674A-4DDF-4B95-809A-2DEB3505A21B-10947-00000D4B1402EF51.jpg

0B17A17D-985E-43F4-96B1-978DC4DE0DA9-10947-00000D4B84E415DA.jpg
 
Makes a guy feel good when a new metal piece is welded in. Lookin good. (The car that is)lol.
 
35D48252-7D58-4D76-AE2F-42648CF74186-1058-000000B9EBFDE768.jpg

Here is a picture of my welder in my cart. The cart is my original wagon. When I was a kid, I would pretend to fix this thing by laying under it with tools. Radio Astronaut Flyer!! That Hijacker sticker has been on it forever.

- - - Updated - - -

621E5414-7BB0-4E7B-BE22-677CD86344DA-1058-000000BB3859EA55.jpg

2B88F7D3-57E0-4A2F-B57C-7AA421F4D330-1058-000000BB60AEE7D9.jpg

The more I get into this car, I am thinking of preserving the original paint. I have wire wheeled and sand blasted the roof which was the ugliest part of the car. I think I will Rust Bullet the roof, weld up all its rust holes, and replace the vinyl top. I haven't polished the paint, yet and still has a bit of a shine to it. I saw some old unrestored race cars at the Philly auto show and they looked cool. Chips and little dents and all that character in original paint was something to see. I was drawn more to them then the perfect cars. I guess it really depends on how well the paint for the rear quarters matches up.
 
Really enjoying your restoration. Keep pressing on and i know what you mean about the original patina on the old cars, it's really cool. Looking at your pics there really is a lot of good looking paint left on your R/T.
 
35D48252-7D58-4D76-AE2F-42648CF74186-1058-000000B9EBFDE768.jpg

Here is a picture of my welder in my cart. The cart is my original wagon. When I was a kid, I would pretend to fix this thing by laying under it with tools. Radio Astronaut Flyer!! That Hijacker sticker has been on it forever.

- - - Updated - - -

621E5414-7BB0-4E7B-BE22-677CD86344DA-1058-000000BB3859EA55.jpg

2B88F7D3-57E0-4A2F-B57C-7AA421F4D330-1058-000000BB60AEE7D9.jpg

The more I get into this car, I am thinking of preserving the original paint. I have wire wheeled and sand blasted the roof which was the ugliest part of the car. I think I will Rust Bullet the roof, weld up all its rust holes, and replace the vinyl top. I haven't polished the paint, yet and still has a bit of a shine to it. I saw some old unrestored race cars at the Philly auto show and they looked cool. Chips and little dents and all that character in original paint was something to see. I was drawn more to them then the perfect cars. I guess it really depends on how well the paint for the rear quarters matches up.

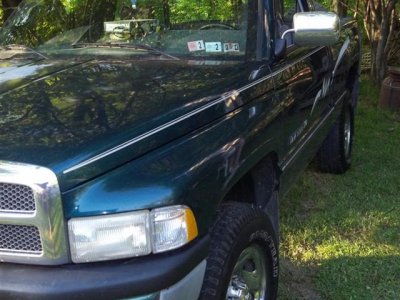
Ive seen a couple 70's lately painted this same color and just my opinion but i really think they look great, If you have any of that Mothers Gold spray wax, you might like what it would do to a little of that paint, Surprised me with the old paint on my Ram..
 
Sweet car!!! Nice job on the restoration. Can't wait to see it finished.
 
D3745C28-EA3F-49C9-B192-E68E2E2BCBF3-4409-000004031EF10803.jpg

I thew some wax on the original paint. It came out better. It's at least a little shinier. I'll try some of Ron 73's suggested wax when I get a chance. I used Nu-Finish.

- - - Updated - - -

7C762829-F7B5-4E25-818A-85C55F67FFC8-4409-00000403080C783E.jpg


0BC5AF41-B775-4737-AA6D-A1A5B028E716-4409-00000402DA8B0B57.jpg


I sand blasted the window frames. I welded up all of the little holes that were under the windshield. Also starting to weld up the roof holes too. My rust bullet should be here tomorrow. I have to grind the welds down then paint with rust bullet as my primer.

- - - Updated - - -

9DF6F23F-2F99-4F9C-A7D5-896B7487C190-4409-00000402BEF56A91.jpg


I finished my dust collector for the blast cabinet. It works great. No dust in the Shop Vac
 
That Nu-Finish is what i use on my car all the time, I bought that Mothers Gold and tried some over top of the Nu-Finish just for the heck of it, and it gave it a better shine! The paint on my car i put on about 3 year ago now i think but the paint on my Ram is original and Mothers Gold made a huge difference on it. Its a 97 so this is old paint, maybe not as old as yours but may help you.. I love that color, i hope it will turn out as good as you want, at least for awhile and you be able to have some fun before a new paint job.

nnnnnnnn (Small).jpg

This could use a new paint job! left side of hood, and roof paint/clear-coat coming off..
 
Here are some pictures of the application of Rust Bullet. I took advantage of the warm weather in NJ and did a little painting.
25F2C0FE-BB9A-45CE-A95F-6007883CC51D-5754-000006EFE883C162_zps4671e2bb.jpg

C04330BD-52F5-4D24-8C31-A9AEFC1CCAA9-5754-000006F001406110_zps4f410e3e.jpg

9A59AA5A-ACAC-4928-91C1-FF8FEC61A241-5754-000006EFC654C4AB_zps0864da87.jpg

ACC22F1E-B2B4-4802-83E8-E805841C23E0-5754-000006F01C2B86C4_zpsa1123dde.jpg

I put the heat on to help the paint cure between coats. It's easier to bring the temp up from 48 degrees than from the 20s. Now tonight we have 3 inches of snow in South NJ?
4866250D-B8CB-4F15-AAE8-73AC5311AFF6-12211-00000EDFC580585F.jpg

1B48C5F9-2C54-46FC-95A4-EAB2FAE44A32-6334-00000760CE8F973A_zps0c39dd56.jpg


After wire wheeling, sand blasting, welding, sanding and rust bullet, I think I can almost say I did what I can do about the rust. I still need to weld in more metal and fill to smooth everything before i can put on the vinyl top. I remember when another member did his new vinyl top over a rusty roof....you guys went nuts.

I am now FINALLY ready to weld in the rear panel behind the back window!!!:hello2:

I get to fix the inner wheel wells next and weld in the trunk pans.

Propwash, I will use your frame rail/trunk pan technique to mark where to drill for the plug welds in the trunk floor....very clever!
 
Good deal! She's looking good. Way to send that rust a packing! You could use a can of cheap flat spray paint to Silhouette that edge for drilling reference as well bud. Whatever works for ya. I'm sure you already know, but be sure to rough the rust bullet before laying any kind of top coat on it. Some 220 or one of those 3M scuff pads will do the trick. When it don't glare anymore and it's dull like flat paint, it's ready to go. Keep up the good work!!!
 
Everything is looking great. I like how the roof turned out, looks nice and smooth.
 
looking good thanks for the updates :headbang:
 
The corners of the back window are almost done. The dutchman panel is still not welded in place yet. We decided to do the corners first and then weld in the rear panel. My dad came in to give me a hand to fit the corners. We test fit the back window and trunk lid about 3 times during the process. Here is a reminder of what we started with.

Before
104_2237.jpg


Before
IMG_0376.jpg


Before
IMG_0345.jpg


We opted to lap weld with the new metal under the old. This seems to make more sense in preserving to original lines. The window's lines have to be straight and the points in the top of the fender have to line up too. There is a lot to juggle. The black marks are for reference. Without them and no rear panel in place, I would be lost in space.
I ground away all the rusted edges and they look petty clean compared to the before pics of the same area.
A1DB6D57-505E-422E-BDAF-D9525220C494-2198-000002A64CD2752E_zps0a1b686a.jpg

I have to remove the paint and weld in the new pieces. I had to do very little bending of the AMD corners to make them fit. When we push then up into place they fit nicely, so they should look great when finally welded in place.
74919534-6AE2-44FA-A0D6-3F66C18B28B1-2198-000002A632C43351_zpsb9732874.jpg
 
AFDC7CD7-2FE9-4717-B040-E97EC3CB35DE-389-00000065CA7FE4E0_zps2e90b370.jpg

F2C8C23A-EB17-4649-92D8-96D62FCF1CA2-389-00000065BD725E8B_zps28013b3d.jpg

5BA53CC7-5478-4990-BDDA-2D14DC0F96EC-389-00000065A6B7ECBC_zpsc0583412.jpg

AE872209-7FB6-412F-88B0-33F01B5FF520-389-00000065B1F377CF_zps5e5ef6d7.jpg

Ok. We just finished welding this panel in. It's now officially part of my car and it only took like a year. My goal is to move faster on the rest of the welding.
 
Looks good - one piece of the puzzle installed.
 
09BBE2B0-3F3F-41FB-845F-648BAF8D5EB8-4845-0000047A4069A6D1_zpsa83a3d1b.jpg
the corners are welded in now too
DBDCA117-F0E2-4448-B2C0-D3BE2235A299-3618-0000035AF7E08641_zps15f4abb7.jpg

6757DAFE-85C5-43F5-94A6-03760BCAE813-3618-0000035B75222AFD_zps0decf5df.jpg

991E4E13-48AC-4E16-88AB-6B8961FAB984-4845-0000047377B3BABB_zpsdae6c89e.jpg
using these clips to keep things lined up
B2E01FEC-7648-4D55-BA78-A9E8A3645B35-4845-0000047347B3FE44_zpsc8540107.jpg
drilling holes for the plug welds. used a marker to help show where to drill the holes. Learned that trick right hear on b bodies. Thanks
05A384F2-FCE5-48C0-AA27-913BDCE9BB98-4845-0000047C2C6B0211_zpsc705868d.jpg
we test fit the window just make sure
 
Auto Transport Service
Back
Top