• When you click on links to various merchants on this site and make a purchase, this can result in this site earning a commission. Affiliate programs and affiliations include, but are not limited to, the eBay Partner Network.

$500- 68 charger

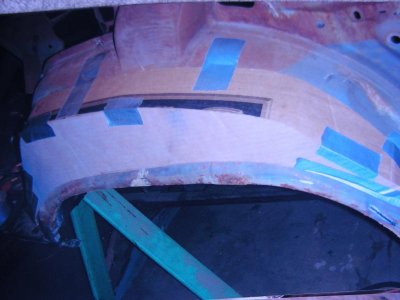
Don't know if you would gain anything by "dehumping" the wheel well or not. You would almost be like mini- tubing it wouldn't you? You would have to widen the tub closer to the rail to get bigger tires under it so it doesn't affect your quarters. I hope I commented on this with understanding what you want to do. Can't say yea or nay, it's your call.
 
Hey Kid. I was looking at doing the same thing on my charger (dehumping). I found about as much on the subject as you did. I think roadrunner man is right, the hump lines up with the wheel lip so, unless you trim the lip down it doesn't do much for you. Looking good, keep up the good work!
 
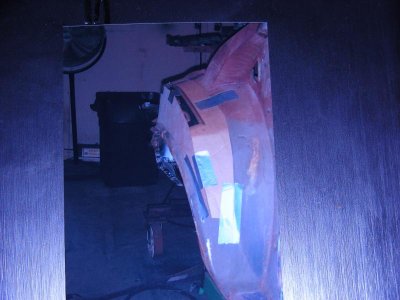
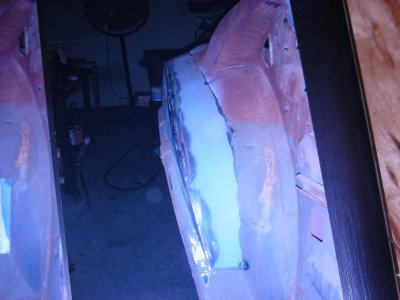
Thnx for the input.. Here are some better views, and with a tape on it. I think at least 2 inches could be gained. I could possibly do a conventional mini tub on the inners in the distant future, which would open them up both ways. The bud that suggested this has built many mopar race cars and said he did it to all of them, but he did his with aluminum. So he can't help me a whole lot with a stock steel mod. He said it lets you run taller fat tires if you want and lets you keep the rear at a respectable height. He told me to make cardboard pieces to fit, then copy them to sheet-metal. This is a fairly hidden area so I hope to make it neat enough to not be very noticeable as not stock.. Forgive my persistent request for opinions but this is the same way I built my jet/s, with a lot of helpful input on rc jet forums.. Isn't the internet great.. And I hope I end up with a nicely done hotrod.
Plz more opinions, suggestions, etc.
 

Attachments

  • IMAG1141.jpg
    IMAG1141.jpg
    51.1 KB · Views: 712
  • IMAG1148.jpg
    IMAG1148.jpg
    59.1 KB · Views: 717
  • IMAG1150.jpg
    IMAG1150.jpg
    65.5 KB · Views: 715
I "dehumped" my 1969 Charger wheel wells for the same reason you are saying, If you want some pics let me know (there might be a pic in my restomod charger post). Just checked, there's a pic on page 3. I have more if you need them. I used cardboard to nail down the shapes welded them in and then removed the humps. The way I see it is if you don't and you fill the tubs then you better run stiff springs and hope you never bottom the suspension, I've seen a lot of cars with rub marks inside the fenders from this. Good luck
 
Thanks, I think I saw you thread before, that pic looks familiar. That looks like what I will try, but I'll have to fab at least one of the lips where it meets the quarter skin, due to it being gone.
 
Finally after 5 weeks this monster comes in. I posted early about ordering this compressor from Northern Tool for $380 total. Now I have to wire and plumb it which will be another $100. Keeping fingers crossed it will not be a pos. 11.5 CFM@ 90 so I think that will help me with the blasting and the air saw. Been kinda lazy with the car work and busy at real job work. Got next three days off so may get some car work done hopefully.
 

Attachments

  • IMAG1159.jpg
    IMAG1159.jpg
    43.7 KB · Views: 677
Looks good Kid. Sounds like a hell of a deal. I've been putting together a compressor myself. I looked at the wheelhouses on my car again and your right. I new there was a reason I wanted to do the same thing but did not get any feed back on previous endevours. If you got the time and will power, it would be worth it. I'm thinking of putting my compressor in my shed and running black pipe up to my garage to keep the noise down. Good luck, 3 days of work is definately progress.
 
How far away is your shed? If I remember right, don't you lose air pressure at the end the longer the hose is? I may be wrong.
 
Your compressor is going to run constantly when you use air sanders and will over heat.
 
How far away is your shed? If I remember right, don't you lose air pressure at the end the longer the hose is? I may be wrong.

Yes, distance does matter, but I will be running a 1" line underground and into my garage. Length should be about 50 to 60 ft. Dual stage compressor, 60Gal tank.
 
Yes, yours. I had the same problem with a 60gal tank and 18cfm, luckily my tool salesman took it back under warranty because he warned me it would happen. I now have an 80gal 30cfm and is much better but the price was over $2000 after taxes.
 
I put on a fitting that you can dial the air pressure down. Put it on my sanding board and my air compressor doesn't kick in as often but still gives me good sanding results. It is not the air guage but a brass fitting.
 
Yes, yours. I had the same problem with a 60gal tank and 18cfm, luckily my tool salesman took it back under warranty because he warned me it would happen. I now have an 80gal 30cfm and is much better but the price was over $2000 after taxes.

I guess I'll be hand sanding it then, I'm not putting out 2gs for another one. Thnx for the heads up tho sf. I may be taking it to a body shop for the body work and paint anyway.

- - - Updated - - -

I put on a fitting that you can dial the air pressure down. Put it on my sanding board and my air compressor doesn't kick in as often but still gives me good sanding results. It is not the air guage but a brass fitting.
or I may try that, thnx rr
 
Last edited:
Different compressors for different applications................tools aren't cheap ( good ones anyway )
 
I found a wheel house half for $112 total. I will use only the outer 3-4 inches of it, since mine is good till there and I don't feel like getting into replacing the whole half.
http://www.autopartsnetwork.com/171...housing-apn-auto-body-parts/adDINkypS5Gshd5Bw

I have the patient prepped and ready for surgery. But I sure am nervous about cutting the quarter skin. I have a good line laid out with tape, about 1" below the top edge. I'll make that cut 1st. Then a few others as needed. I fix the wheel house after cutting the old skin out of the way.
 

Attachments

  • IMAG1162.jpg
    IMAG1162.jpg
    39.5 KB · Views: 651
  • IMAG1163.jpg
    IMAG1163.jpg
    58.2 KB · Views: 659
I'm sure you will do fine. Get the quarters lined up and secured in place. Once you do that and start tack welding in place, everything will look good.
 
Sorry it took so long, these are the only pics I have but it should give you an idea of what I did. I just cut cardboard untilI got a good fit, cut it out of sheetmetal and welded it together. I welded the metal in before I cut the inside out to help hold the shape. Hope it helps.DSCN7879.jpgDSCN7886.jpgDSCN7888.jpg
 
Big Thnx 747.. Those will be a BIG help. I will be starting on the left one as soon as I get the old skin removed.
I am still prepping everything for this skin install. I decided to leave the front and rear lips and most of the bottom lips on the new quarter skin. So I figured I need to remove the old ones to be able to correctly position the new skin to mark where to cut the old one. Here are pics of how I took the front lip off.
 

Attachments

  • IMAG1165.jpg
    IMAG1165.jpg
    30.7 KB · Views: 615
  • IMAG1167.jpg
    IMAG1167.jpg
    31.4 KB · Views: 610
  • IMAG1170.jpg
    IMAG1170.jpg
    46.1 KB · Views: 597
Auto Transport Service
Back
Top