• When you click on links to various merchants on this site and make a purchase, this can result in this site earning a commission. Affiliate programs and affiliations include, but are not limited to, the eBay Partner Network.

8.75" set up - questions - help

dpstark2

Well-Known Member
Local time
5:48 AM
Joined
Feb 27, 2012
Messages
323
Reaction score
147
Location
Livermore, CA
All,

Fellow B-Body-Board member Meep-meep and I set up this Sure Grip rear for my Charger a while back. The bearings, gears, etc., were all purchased from a reputable source we've all heard of that will remain nameless for now. The gears are US Gear (Strange). The pinion gear had a strange lip on it where the outer bearing shims rest that caused the shims to crush and would not allow us to achieve preload. The same supplier set us up with larger ID shims to solve this issue, which eventually got us a good preload.

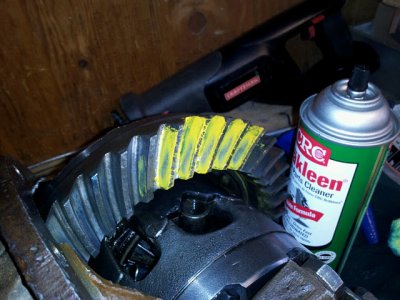
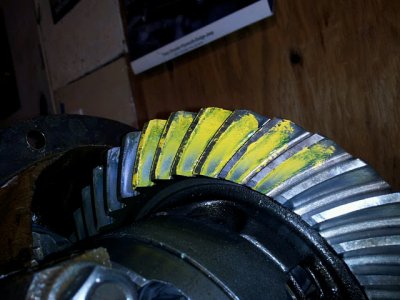
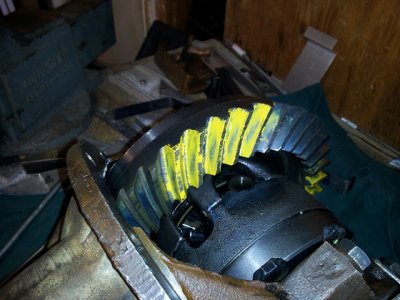
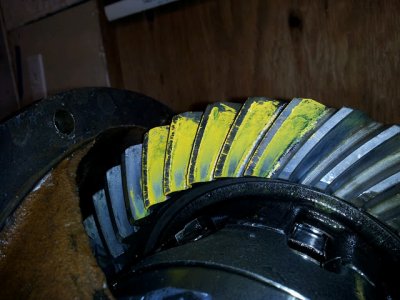
No matter what we did, we could not achieve a good pattern on these gears. I made a check bearing and we settled on .086" on the inner bearing. This put the drive side pattern solidly on the tooth, but the coast side was somewhat lacking... More or less shim and one side would begin to walk of the tooth. After giving up, I put the unit in the car and tried it for a couple miles. It makes no noise in the air, but under load, it whines a bit at cruise and makes a lot of noise under decel. Backlash was set at .007", which may be a bit tight but helped center the pattern from root to tip.

Here are pics of the pattern on two different locations:
2013-04-15%u0025252018.32.45.jpg
2013-04-15%u0025252018.32.29.jpg
2013-04-15%u0025252018.32.13.jpg
2013-04-15%u0025252018.31.51.jpg

The supplier has simply said "they are set up wrong." From the very first issue with the pinion, I thought something was wrong with these gears. We even tried another case. I checked run out on the Sure Grip and found it at .002-3", which seems OK to me.

I know this has been covered, but does anyone have a specific comment based on the pictures? Are these gear just bad? Any help?
 
on the nose rusty.by the noise its making and the picks.
 
Thanks to all- I haven't checked the pattern with more than .010", which was the max specified in the manual. However, as I have been informed, that may not be correct for "these gears." The guy I got it from said to use .008". I can check that easily enough though, and I will when I get a chance.

Rusty- I'm sure you're right, but with less pinion depth, the coast side contact pattern was walking right of the tooth! Granted, this was months ago- but I'm pretty sure we tried .084" and clearly had the coast side pattern off the tooth.

Am I wrong? Is the reason you think the pinion is too deep just the sound? Or is there something in the pattern I'm not seeing? I've never done this, but but my co-conspirator has and he has never seen a pattern do this, which is why I wonder about the gears.
 
I don't set up using the pattern method but use a pinion depth setting tool and use the numbers stenciled on the head of the pinion. You can also check it using a wide base depth mic if you have access to one but you need to measure the bearing saddles and caps to make sure they are both exactly the same. Not all cases are the same and sometimes vary by a few thousandths from center line. I've come up with some strange looking patterns after hitting the pinion depth number tool but they always ran quiet.
 
Last edited:
I don't set up using the pattern but have a pinion depth setting tool and use the numbers stenciled on the head of the pinion. You can also check it using a wide base depth mic if you have access to one but you need to measure the bearing saddles and caps to make sure they are both exactly the same. Not all cases are the same and sometimes vary by a few thousandths from center line. I've come up with some strange looking patterns after hitting the pinion depth number tool but they always ran quiet.
As I was reading through this thread I was wondering this very thing. How did you determine pinion depth?
 
but I'm pretty sure we tried .084" and clearly had the coast side pattern off the tooth.

I'm saying to try it with an additional .004 in the pin, you said you have it at .086, add another .004, meaning i want to see the pattern with .090 under the main pin bearing
 
So I may be confused, but part of the reason I did this myself (well, with Meep-meep's help) instead of paying a shop was to learn a few things. Let me see if I can shed some light on what went down.

First, there are no numbers at all stenciled on these gears. That should be the first clue they aren't the best. I hogged out a bearing so it was a very light press fit on the pinion, then checked the pattern with shims at .080", .090", and .1". The pattern seemed to do what it should do as the pinion moves in and out in terms on the contact patch walking along the tooth one direction or the other. However, nothing I did gave anything resembling a good pattern as shown in the FSM or any of the material I've found online. I settled for what looked liked a good centered pattern on the drive side as long as the coast side wasn't simply falling off the tooth.

There are a lot of tools up at the shop... but the factory pinion depth tool isn't one of them. We talked about making one from some measurements, but never got to it. I think that is necessary at this point.

Rusty- as far as "What does the coast side have to do with it?" - I don't understand the question. It must have something to do with it, right? The noise is on coast, the coast side seems to have a strange pattern and was consistently not where (I think) it should be... Isn't that the root of the problem, or do I not understand?

Thanks for all the input. I guess at this point it isn't too much work to take .002" out and run it again. Actually it is too much work, but I don't see an alternative.
 
I generally all but ignore the coast side. 99 times outta 100 when you get the drive side right, all is well. After all, you don't spend all your time in the car backin up. It sounds to me like your gears are worn beyond setup. When one side falls good and the other not, that's usually what it is. New gears are under 200 bucks. I'll stop right there. lol
 
The gears were new! Everything was new except the housing and Sure-Grip halves. Even the clutches were new!
 
IIRC, Alex and I emailed each other on this job. If the gears are not marked, you use the mounting distance to determine the pinion depth. The MD is the distance from the bearing side of the pinion head to center line of the carrier bearings. To find the pinion distance, you subtract the thickness of the gear head from the mounting distance. The MD for the 42 case is 4.350 and the 89 is 4.344 so whatever thickness the gear head is, subtract it from whatever case you are using then you can check it with a depth mic or pinion depth tool.
 
The frustrating part about this job is why the pattern kept falling off the tooth as we messed with shim packs. The current pattern is what looked to me to be the best out of what we saw but I have seen better. What I noticed about this pattern was the feathered edges, which I took as being as good as it gets on this set. Other patterns left a sharp edge on one side or the other indicating to me the pinion was either too high or too low.

What I didn't like about this gear set was the shoulder where the depth setting shims go was clearly screwed up from the factory. There was an extra step on these replacement gears and when comparing to an OEM set where there is a distinctive relief with a nice flat shoulder makes me think there maybe other issues.

Yes Cranky, this is the job. Thanks again for all your input and when we get around to working on it again we'll be pulling the notes! My approach is to get another set of gears from a different manufacturer and try again. Or even a set of used OEM 3.55's. Bottom line this isn't supposed to be this difficult!! I do agree on getting a reliable depth measuring tool and going from there.

Comment to Rusty about the coast side. We were never really happy about it but let it slide to get the drive side to what you see above. And to our surprise it makes noise on coast. The drive pattern seen above DOES NOT make noise on acceleration. If I correlate these test results with the pattern seen above I'd say my thinking about leaving a feathered edge is not too far off. And perhaps adding the component of getting the pattern closer to the center of the tooth AND a feathered edge is really the answer.

Another thing to mention is out of the box these gears had evidence of a pattern, possibly from some fixture or as checked in the gear cutting machine or whatever. Nothing we did was able to come close to duplicating it! The factory pattern was pretty ideal and well centered between drive and coast. This makes me think that the relative position of the R&P as cut is not the same as it lies in the housing. Two different housings produced the same pattern so those are at least consistent. If we try a different gear set - and it works - guess who is getting a set of gears shoved up their a**!
 
Thanks everybody! Hopefully we'll sort this some day. Time to bust out the lathe and the mill and make some tooling...
 
The frustrating part about this job is why the pattern kept falling off the tooth as we messed with shim packs. The current pattern is what looked to me to be the best out of what we saw but I have seen better. What I noticed about this pattern was the feathered edges, which I took as being as good as it gets on this set. Other patterns left a sharp edge on one side or the other indicating to me the pinion was either too high or too low.

What I didn't like about this gear set was the shoulder where the depth setting shims go was clearly screwed up from the factory. There was an extra step on these replacement gears and when comparing to an OEM set where there is a distinctive relief with a nice flat shoulder makes me think there maybe other issues.

Yes Cranky, this is the job. Thanks again for all your input and when we get around to working on it again we'll be pulling the notes! My approach is to get another set of gears from a different manufacturer and try again. Or even a set of used OEM 3.55's. Bottom line this isn't supposed to be this difficult!! I do agree on getting a reliable depth measuring tool and going from there.

Comment to Rusty about the coast side. We were never really happy about it but let it slide to get the drive side to what you see above. And to our surprise it makes noise on coast. The drive pattern seen above DOES NOT make noise on acceleration. If I correlate these test results with the pattern seen above I'd say my thinking about leaving a feathered edge is not too far off. And perhaps adding the component of getting the pattern closer to the center of the tooth AND a feathered edge is really the answer.

Another thing to mention is out of the box these gears had evidence of a pattern, possibly from some fixture or as checked in the gear cutting machine or whatever. Nothing we did was able to come close to duplicating it! The factory pattern was pretty ideal and well centered between drive and coast. This makes me think that the relative position of the R&P as cut is not the same as it lies in the housing. Two different housings produced the same pattern so those are at least consistent. If we try a different gear set - and it works - guess who is getting a set of gears shoved up their a**!
youre not alone. I was moving a brand new dana 60 around on a floor jack to position it under a car once. Dropped it right off the jack and it landed right on the yoke.i put in in hoping i would get lucky, but I too have had a set of gears jammed up my ***.
 
This is beginning to sound like a case problem. Almost like the centerline of the carrier is off somehow.
 
Possible, for sure. However, we did try two different cases. 40-50 year old cast iron isn't exactly known for staying straight. Has anyone seen a '742 case that drifted like that?
 
How was the pattern at .088, the 1.0 and then the jump to .090 and .080 are large, you can use those large jumps to see if you're going in the right direction, but once you have established that you then need to make smaller adjustments.

Not knowing how the pattern was at .090 but seeing how it is at .086, so now try .088

Im not knocking your attempt, hopefully you don't take this the wrong way but you aren't learning anything once, it takes me many many many diff builds when teaching a NON pre ruined hopeful to just about get it.
One diff just got them familiar with the idea of how it works, not anything on adjusting and which way and how much and other issues.

IF it doesn't get better with the .002 adjustment then you may have a housing issue, or a bearing race issue, you tried another housing, but you haven't made fine adjustments that i read here, and when you checked the other housing did you try other bearings and races or not, are they definitely positively seated.

Im not saying the gear isn't problem, i have seen gears have a problem, but i have found that when they have a issue with not getting perfect the housing has a issue (unless its a cheap knock off china garbage gear).

I would be looking at how the bearing race patterns look after that drive ?
Also when you can center the drive and the coast is off a little you should get a pitchy type sound at a area when there is no load, in your situation the pattern is kinda off the toe on coast
 
What the was the thickness of the shim that was in the case from the previous set up? IMO the coast pattern is also important. Due to the fact every time you let off the gas you are coasting on the coast side of the gear with the rolling weight of a vehicle (hence the noise). Why didn't you file the burr or lip off of the pinion? If it was more than a burr I would have returned the gear set.
 
Auto Transport Service
Back
Top