• When you click on links to various merchants on this site and make a purchase, this can result in this site earning a commission. Affiliate programs and affiliations include, but are not limited to, the eBay Partner Network.

Bringing it back to factory specs

IMG_0036 (Large).jpgBrian looking good!! When you showed the hood catch and two bolts I hope you know that should be body color. It was painted bolted on the hood originally.

Also I've owned two fixed fan cars over the years and I was under the believe the spacer was painted but I don't know this for a fact so just look into this for your restoration.
Ron.
 
When you showed the hood catch and two bolts I hope you know that should be body color. It was painted bolted on the hood originally.

Also I've owned two fixed fan cars over the years and I was under the believe the spacer was painted but I don't know this for a fact so just look into this for your restoration.
Ron.

Agree. Pic is from 69 STL plant "survivor". IIRC, Lynch Road built cars are not painted.
 

Attachments

  • 1_STL_hood_Latch_750.jpg
    1_STL_hood_Latch_750.jpg
    73.3 KB · Views: 504
Ok, that is easily enough changed then. That is what color it was prior to me pulling it off and it seemed like there was that plating still there. I wonder if it has anything to do with it being an early 69 car? I'll check with a friend of mine who also has an early 69 GTX vert and see what his is like. His car and our car are only about a week apart yet there are differences between the two. He has the squared off fender turn signal indicators while ours has the rounded bullet style type.
 
View attachment 180803Brian looking good!! When you showed the hood catch and two bolts I hope you know that should be body color. It was painted bolted on the hood originally.

Also I've owned two fixed fan cars over the years and I was under the believe the spacer was painted but I don't know this for a fact so just look into this for your restoration.
Ron.

Ron,

I would have to say that the spacer was supposed to be natural as there was black paint and the stamping "ENGINE SIDE" under where the spacer was on the fan. If it was painted together, it would have been bare metal under there with the stamping.
 
Brian, just saw this thread linked from DC.com. I dont get here much but holy cow! You are working wonders on that car! The trunk seal thing is over the top! :headbang:
 
Ron,

I would have to say that the spacer was supposed to be natural as there was black paint and the stamping "ENGINE SIDE" under where the spacer was on the fan. If it was painted together, it would have been bare metal under there with the stamping.


You may be 100% right but I never said painted together, just painted black.
Again I have no hard evidence just what I've encountered in the past.
Ron
 
No problem, Ron. :thumbsup: 
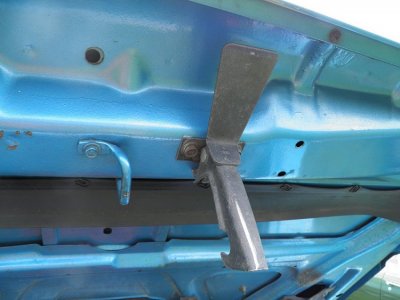
I'm just trying to go by the evidence that was there. The only conclusion that I could come to was that either the spacer was sat flat with the water pump side being down on something and painted so no paint would have gotten behind it or the only other option was that it would have been bare aluminum. Again, it is hard to say as I am starting to find a lot of weird things with this car. Although with the two other Mopars we own, I shouldn't be so surprised. lol

- - - Updated - - -

Brian, just saw this thread linked from DC.com. I dont get here much but holy cow! You are working wonders on that car! The trunk seal thing is over the top! :headbang:

Thanks, Chris! It was either do that or drop $1200 for an NOS one which really would have broken the bank for Dad. That $1200 could go for better things like getting the trans leak repaired. Still a long way to go but at least we are moving forward at a excellent pace.
 
Before pics of the underside condition of the engine.

IMG_0002.jpg


IMG_0003.jpg


Engine ID pad (will repaint once I get other stuff bolted back up.)

IMG_0006.jpg


In the previous pic, there is a B that is stamped under the front part of the valley pan. Also this sideways 1 is stamped on the driver side cyl. head. Also this 2 I or upside down T in the center of the driver side head.

IMG_0007.jpg


IMG_0008.jpg


Also came across this 242 written in red paint marker on the tail shaft of the tranny covered under 44 years of grease!

IMG_0001.jpg


making progress on the top end!

IMG_0005.jpg


Notice the lack of paint on the back side of the fuel pump. Paint would never have gotten there from it being painted after it was mounted on the engine. (yes, I know the engine mount hardware is not supposed to be painted. I'll tackle that later!)

IMG_0012.jpg


IMG_0010.jpg


IMG_0015.jpg


IMG_0014.jpg


IMG_0013.jpg
 
......Still a long way to go but at least we are moving forward at a excellent pace.

You're making Excellent progress and the work is Fantastic Master B! What a great project and pinpoint documentation to support the artistic craftsmanship. Keep the pictures coming.
 
Well, we had a little set back. I'll post some more pics tonight but apparently we were certainly lied to that this engine was rebuilt. I look at it as a blessing in disguise that when doing some engine clean up and part removal to clean and paint, I ended up unbolting the oil dipstick tube and ended up breaking off the part of the tube where it flares out right at the point where it enters the block. Figuring that the easiest method of removal would be to knock it out from the bottom up and out, I dropped the oil pan. Again, being told that the engine was rebuilt (and the way the thing performed, I would have agreed!) I was never expecting what I found. Stay tuned for pics........
 
Talk about suspense, how long must we wait?
 
Sorry, I had to get some sleep before going into work tonight. lol. Here are the pics as promised. Keep in mind, we were told that this engine was "rebuilt about 3000 miles ago!". Aside from this, I also found thick light gray sludge in the lower front part of the oil pan. Someone had told me it could have been from break in lube as it seems the timing gears and possibly the cam was changed at one point.

104_6344.jpg


104_6342.jpg


104_6343.jpg


This is what was all clogged up in the screen for the oil sump pick up. I could only imagine what oil starvation was like for the engine! This was all the broken nylon parts from the OE timing gear.

104_6354.jpg


bottom end of the engine which looked pretty good till I pulled two of the main bearings.

104_6351.jpg


orange inspection mark on the sections between the 4th and 5th bearing.

104_6350.jpg


still cross hatch marks on the lower part of the cylinder.

104_6352.jpg


104_6358.jpg


104_6362.jpg


104_6364.jpg


and then I pull the number 2 and number 4 bearing caps.....

104_6355.jpg


104_6356.jpg


104_6357.jpg


and starting to go back together...

104_6366.jpg


104_6367.jpg
 
Brian move your wire holder to the other bolt on the thermostat housing.
Ron
 
Ron,

I just put it back where it was. When we got the car it was on the driver side. Granted, someone could have changed it over the years. At least it is easy enough to change over to the other side especially since I have not touched up the engine paint yet. Although, it seems to be quite close to the distributor on the pass side. Seems like it would be too short of a gap for the wires.
 
A friend who races told me the bearings can be slid out with a thin screw driver with the crank still in the car. When I asked him how would I know what size they are, he mentioned that the sizing is stamped on the back sides of the bearings. I don't know if I am that adventurous to go and do something like that though. My luck I would get the top half out and never be able to get the top part back in and really be up the creek. If anything, I think I will mention it to Dad and see what he might want to do with it over the winter. At least at that point we would have more time to be messing around with it. Right now, there was no scoring of the journals on the crank and the engine ran perfectly with plenty of power. I'd sure hate to do something and totally mess up the rest of the car show season for Dad.

Anyway, here is what the distributor turned out like after I cleaned it up and applied RPM to it. Pay no attention to the crack in the distributor cap as that was one I had laying around for testing purposes and wanted to protect the points and rotor. Unfortunately, I have nothing really to compare it to as I forgot to take a before pic. I'm sure you can see the condition in previously posted pics of the engine.

What I would love to know is what that larger "67" that is cast into the housing means or stands for. It seems to be every 90* or so on the circumference.

104_6348.jpg


104_6349.jpg


104_6347.jpg


104_6346.jpg


104_6345.jpg
 
so, I was able to get to my Dad's house on Wed to get some more work done on the car. Instead of putting stuff back on the engine like I probably should have done, I decided to tackle the pesky trans leak which was coming from the gear shaft selector seal (apparently, a common problem). While trying to get the seal out gave me a little bit of grief doing it from above, I ended up having to drop the pan and the valve body to get the seal out from the bottom. When doing this, I was able to find out that the selector shaft was scored, most likely from the hardening up of the rubber seal. Similar to what happens to the harmonic balancer. Unfortunately, they do not make a repair sleeve like they do for the balancers. There is an upgraded seal that is a piece of machined aluminum with a rubber o-ring inside the ring and another one on the exterior of the o-ring. This will hopefully conform to the grove.

Anyway, here are some pics of the trans cross piece which appears to have never been out of the car. The paint on the inside of the cross piece as you can see in the pic is a shiny (gloss for lack of a better term) black. As you can see, there was a ton of grease on it from 44+ years of service.

IMG_0001-1.jpg


Here is how the nut that holds the trans mount to the cross brace. It appeared a clear zinc at first, however, once I removed it you can see a little of the factory red zinc left where the grease and oil could not get to.

IMG_0005-1.jpg


IMG_0006-1.jpg


Here is the same nut restored!

IMG_0007-1.jpg


What I was shocked to find was that the trans mount that was in the cross brace, was the original factory installed one. Mopar logo, part number, and even a date code of 7/68 on it. The pics are of how it looks after I restored it. Prior to restoring, it was nothing but covered in grease and grime.

IMG_0004.jpg


IMG_0003-1.jpg


IMG_0002-1.jpg


pics of the cleaned up, restored bolts from the cross brace and the two bolts that mount the trans mount up to the transmission housing. Once the grease was removed, the bolts were soaked in Evapo-rust to remove the minimal amount of rust, then they were treated to RPM to prevent any future oxidation.

IMG_0009.jpg


IMG_0008-1.jpg
 
So I got some more work done on the GTX today with the trans. Did I mention the car still has the original torque converter in it? Check out the drain plug in the converter on the left hand side of it almost up being covered by the block / trans housing.

IMG_0015-1.jpg


Trans after I cleaned all of the grease and grime off. One full bottle of Simple Green and 3 cans of Brake Cleaner spray! I honestly think it was 1/4" thick in some places with grease! Also, factory trans lines were in surprisingly good shape considering the age of the car. A little polishing with some 0000 steel wool and they look as good as new!

IMG_0014-1.jpg


IMG_0016.jpg


IMG_0017.jpg


IMG_0019.jpg


IMG_0018.jpg


Ok, this picture is of the new aftermarket gear shift selector seal which is an improvement over the tapered factory seal. This new seal is a machined piece of aluminum with an o ring to seal up the shaft and another outer o ring to seal up the ring to the trans housing. Very snug fit which is good because our gear shift selector shaft on the valve body had two grooves in it from where the old seal must have hardened up and wore into the shaft.

IMG_0010-1.jpg


IMG_0011-1.jpg


valve body. notice the two rings on the shaft. :(

IMG_0012-1.jpg


IMG_0013-1.jpg


Trans mount installed back into the cross member which was repainted in the same sheen black.

IMG_0020.jpg


IMG_0021.jpg


IMG_0024.jpg


IMG_0023.jpg


IMG_0025.jpg


Galvanized inspection cover reinstalled and treated with RPM. All I have left to do now is install the levers and rods and fill it with trans fluid and the job will be complete!

IMG_0022.jpg
 
Today I got the rest of the linkage and rods onto the trans as well as getting the drive shaft in. I seem to recall the pic of the factory installed u-joint straps being blurry so since my wife was nice enough to get me a new Canon digital camera, here is a new pic of it and the trans rods and linkage that was installed.

IMG_0026.jpg


IMG_0027.jpg


IMG_0028.jpg


IMG_0029.jpg


IMG_0030.jpg


I also got the intake manifold torqued down to the proper specs a well as getting the exhaust manifolds back on and painted with the propper pattern for the overspray.

IMG_0031.jpg


IMG_0032.jpg


IMG_0033.jpg


stampings in the ID pad clean and bare just like from the factory. (Special thanks to Dave Walden for that tip on how to do it!)

IMG_0034.jpg
 
Auto Transport Service
Back
Top