• When you click on links to various merchants on this site and make a purchase, this can result in this site earning a commission. Affiliate programs and affiliations include, but are not limited to, the eBay Partner Network.

Changing oil pan gasket

No room to put the bolt in from the top , so I will have to the same as I found it. Today I got all the old gasket material off the pan and block and also straighten out the pan flange a bit. As I mentioned I'm trying those one piece gasket/windage tray, I'm a little worried about those dimples on the pan. I'm going to verify with Summitt that it is OK to use with this type of pan.
 
one piece gasket/windage tray
I believe I mentioned this before, it's a good idea to add/enlarge the drainback holes, also in my case I had to cut some of the windage tray out to clearance the oil pickup tube. Mine is in an a-body so the pan is completely different.
The windage tray material is tough enough that I used some air tools to cut and shape it, just an fyi. If all else fails, you could cut the windage tray out, just spit balling here.
Also, I suggest using those bolts I posted or at least the largest washer that can fit, and avoid over torque.

That's a bummer on the nut/bolt in the front of the pan. Between those and literally crushing the pan with the other bolts, I don't know what the builder was thinking.

Take your time, think it through, to avoid doing this job more than once. These guys here on fbbo know what they're talking about.
 
Are you sure the rear main isn't leaking?
I'm no master engine builder but putting on an oil pan is pretty easy and this one has been butchered badly.
It's possible the guy had a rear main leak and just kept tightening the crap out of the pan hoping it would help.
I know it sounds negative but it would suck if you put it back together and the rear main was leaking.
I do hope it turns out well.
 
I would love to be able to drill and tap but then engine is still in the car, no room. I will try putting the bolt in from the top, not sure if there is enough room but that would be better. I was also thinking of jb weld the nut on top of the timing cover, but I think I would have to remove the balancer to gain access in order to do it properly. I wish my engine builder would have told me about this I would have told him to change it.

Out of the box.....
You might consider a channel nut (or variation of). Once the bolt is started, the pan should keep it from spinning.

upload_2020-12-15_13-9-14.png
upload_2020-12-15_13-12-55.png
 
Out of the box.....
You might consider a channel nut (or variation of). Once the bolt is started, the pan should keep it from spinning.

ATTACH=full]1040745[/ATTACH] View attachment 1040749

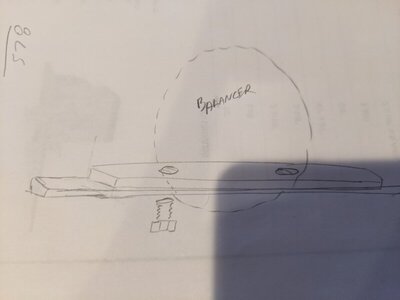
I like this, another idea would be to take flat bar and make kind of a backing plate that sits on top of the lip of the cover and has two threaded holes. The biggest problem is holding on to the nut when its in the back of the balancer. Make it long enough so it sticks out from the balancer and I could grab it. Kind of like your square nut but one piece with two holes.
I don't think the rear main is leaking, i did find a leaking passenger valve cover that I will change after I finish the oil pan.
 
I've never tried this BTW.
What I'm thinking. The nut won't spin if it lodges against the pan. A dab of blue Loctite to keep rattles at bay.

upload_2020-12-15_18-46-39.png
 
Yep I was thinking this, not a fancy drawing, but were thinking the same idea, as longs as its longer so I have something to grab to center it. That will be tomorrow's job. Your idea might be easier as I wouldn't have to be exact on the measurements


PXL_20201216_001804730.jpg
 
:thumbsup:
It might be tight under the chain bulge to get any thickness on flat stock for a reasonable amount of threads. Of course that's exactly what they did on the stock pan. Good luck with it!
 
Its done, went pretty well, kept the same old nut and bolt the engine builder used, wasn't bad putting them in. Now got to wait till the spring to see if it springs a leak, I'll post results next spring. I did use that one piece gasket/windage tray, what a breeze to put in. Thanks everyone for all the help and ideas. Now on to the valve covers.
 
Its done, went pretty well, kept the same old nut and bolt the engine builder used, wasn't bad putting them in. Now got to wait till the spring to see if it springs a leak, I'll post results next spring. I did use that one piece gasket/windage tray, what a breeze to put in. Thanks everyone for all the help and ideas. Now on to the valve covers.
Did that one piece gasket/tray look like it was going to seal around the pan indentations, or did you fill them?
 
Did that one piece gasket/tray look like it was going to seal around the pan indentations, or did you fill them?

I tought about it, measured many times and to me, the lips on the gasket could have been more spaced out if I had a choice. Many reviews I read people just put it on. I did check with Summitt and they said the same about the indents. So I didn't fill them, didn't know what to use first of all to fill them, I was afraid that whatever I used that it would fall apart and get in the oil. So I'm going to try it this way, if it don't work then I'll try plan B. If anything it will ge easy to take out as nothing is glued like the one I took out, it was more work to remove it than to install it.
 
I agree with you that those gaskets ribs could be a little further apart. I will be installing that same one on my 440 in my GTX. Just waiting for my 6 qt pan from Milodon which is on backorder.
 
Let us know what you think when you install it, I plan on posting the results in the spring when I get my car out from hybernation
 
Auto Transport Service
Back
Top